实战:MetalLB的安装与使用-2023.3.5(测试成功)
目录
文章目录
- 实战:MetalLB的安装与使用-2023.3.5(测试成功)
- 目录
- 实验环境
- 实验软件
- 前言
- 1、前置条件
- 2、安装
- 3、使用
- 1.创建ingress测试
- 2.创建svc测试
- 4、总结
- FAQ
- 2个crd
- nginx做代理
- 关于我
- 最后
实验环境
实验环境:
1、win10,vmwrokstation虚机;
2、k8s集群:3台centos7.6 1810虚机,1个master节点,2个node节点
   k8s version:v1.22.2
   containerd: v1.5.5
实验软件
链接:https://pan.baidu.com/s/1DK1s4pTplWP5BCHjsmPhwg?pwd=mql3
提取码:mql32023.3.5-实战:MetalLB的安装与使用-2023.3.5(测试成功)

前言
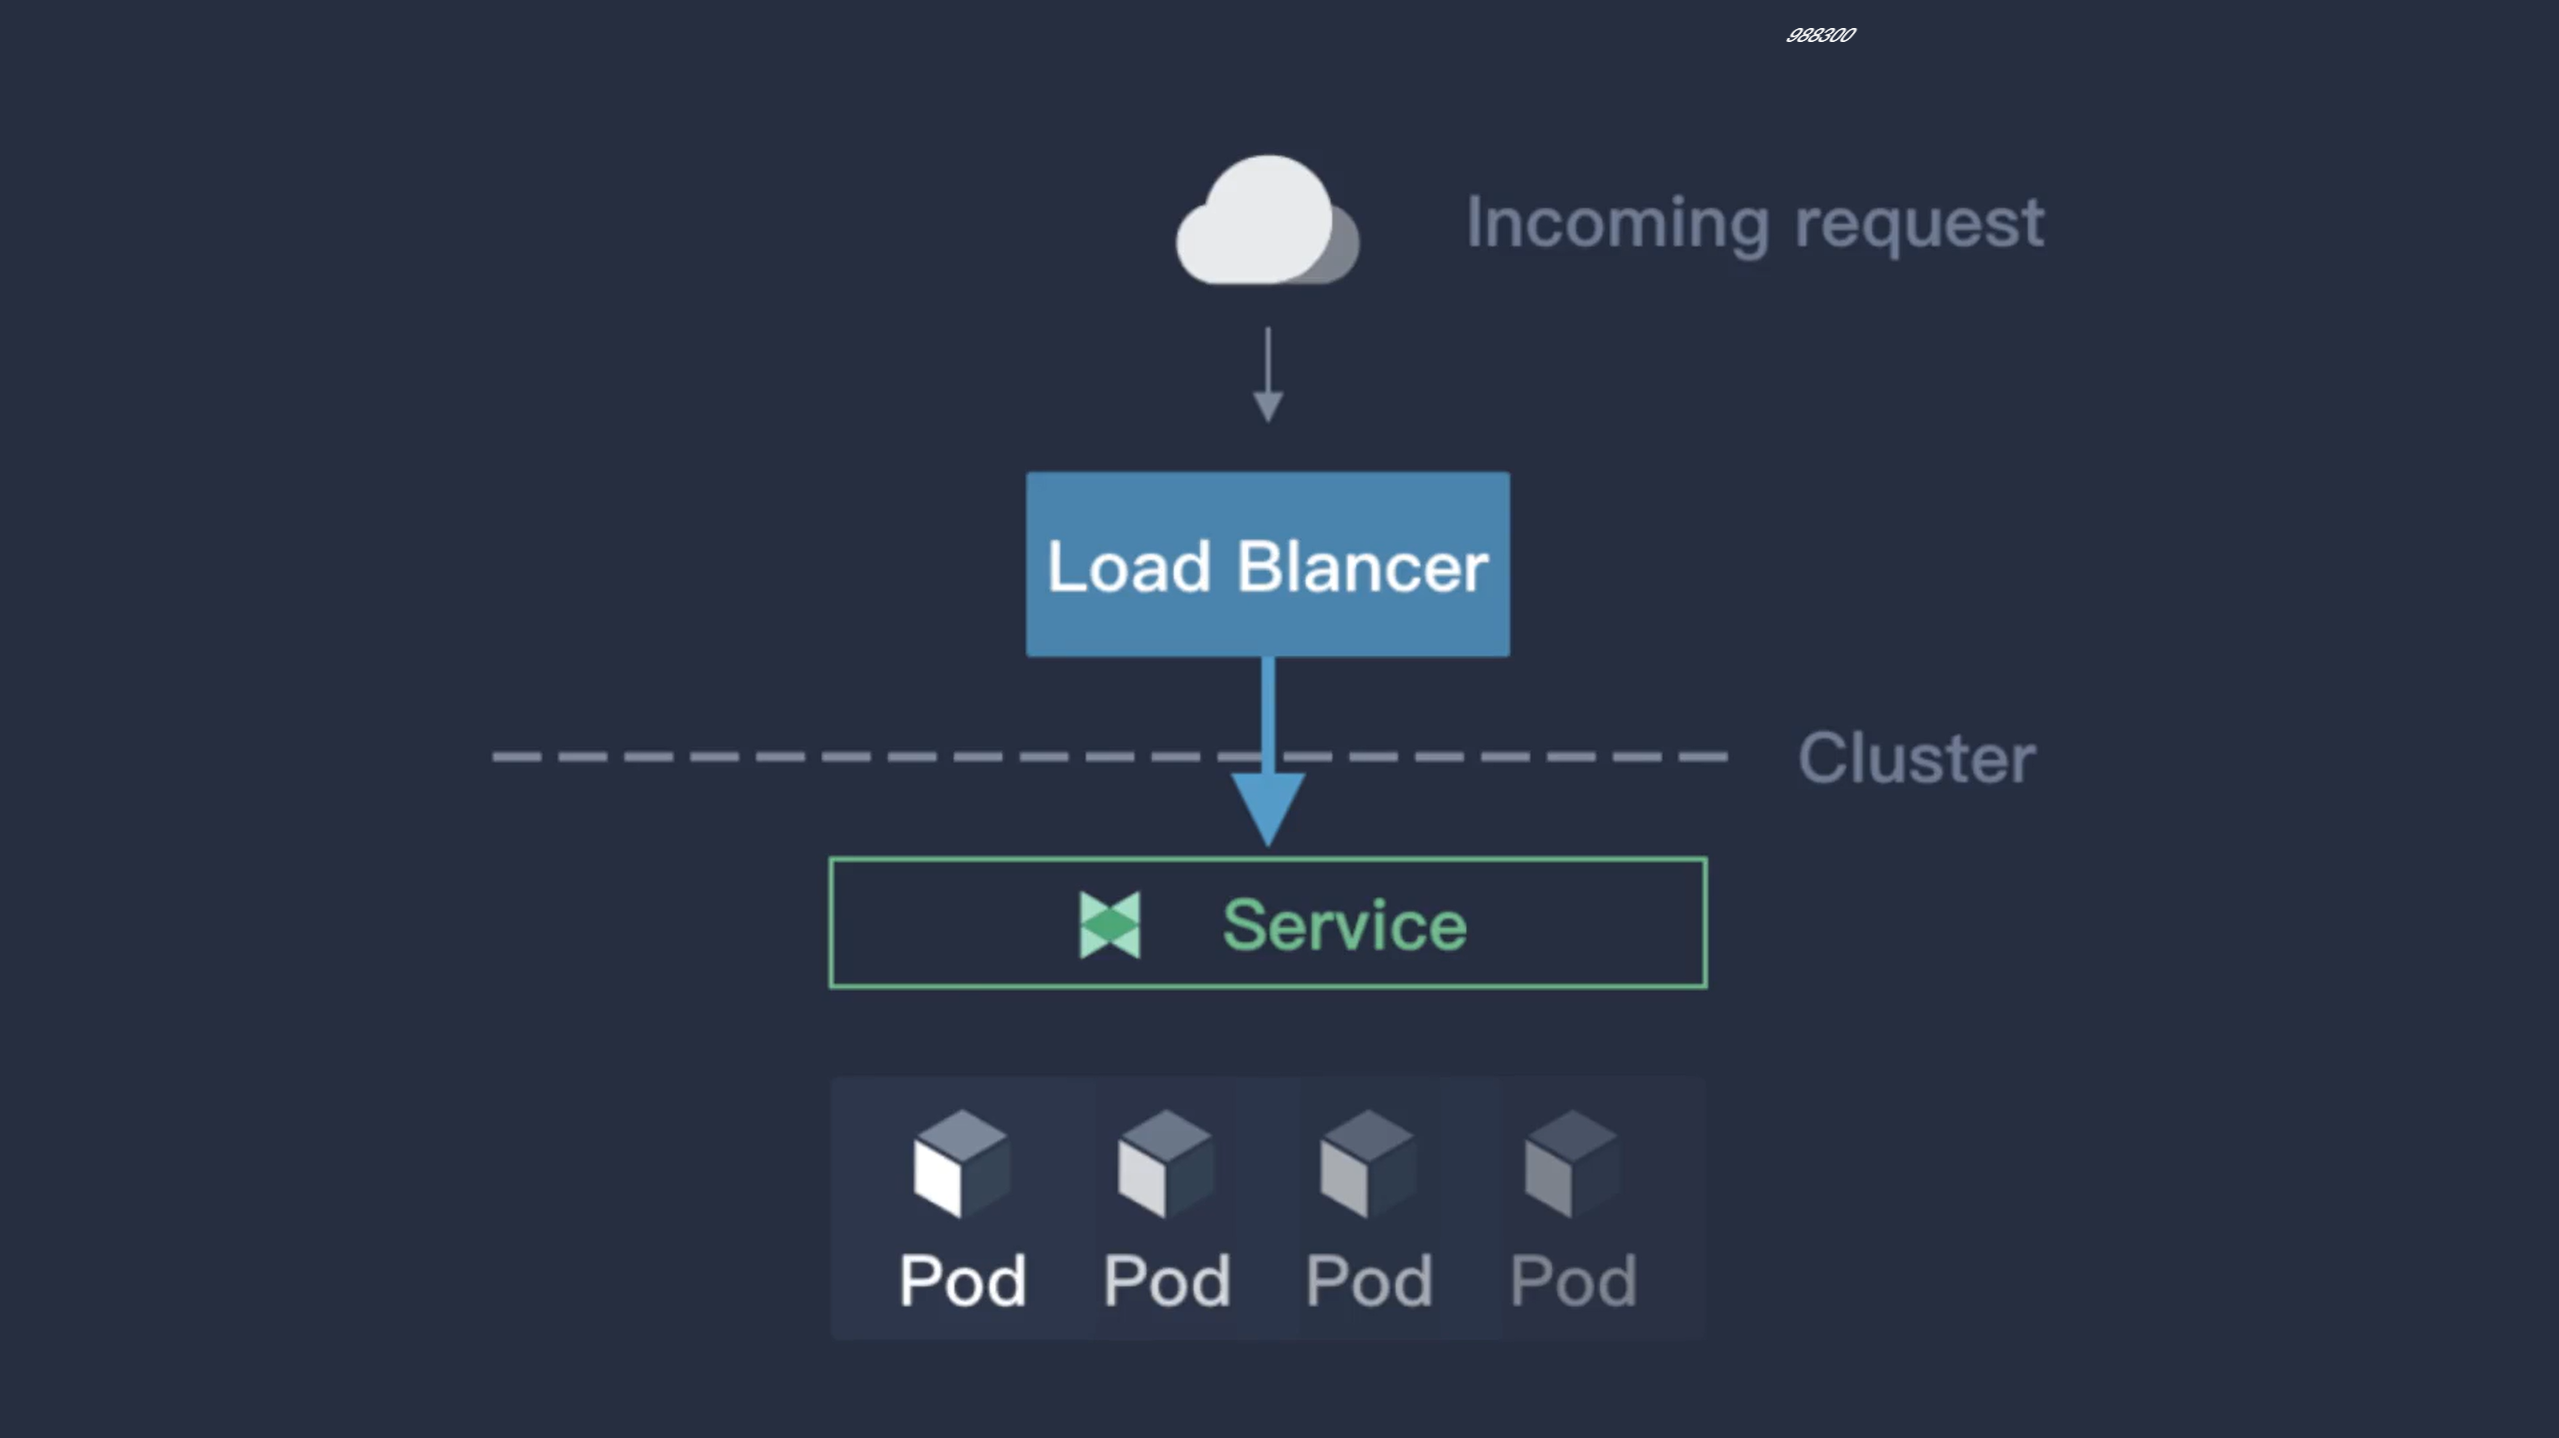
前面我们学习了在云环境下面可以创建一个 LoadBalancer 类型的 Service 来对外暴露服务,但是对于本地私有环境想就没办法了,这个时候其实我们可以在环境中部署一个支持该服务类型的负载均衡器就可以了,在社区中目前比较流行的应该是 MetalLB 和 OpenELB 这两个项目。
MetalLB 是裸机 Kubernetes 集群的负载均衡器实现,使用标准路由协议,主要用于暴露 K8s 集群的服务到集群外部访问,MetalLB 可以让我们在 K8s 集群中创建服务类型为 LoadBalancer 的服务,并且无需依赖云厂商提供的LoadBalancer。
它具有两个共同提供此服务的工作负载:地址分配(address allocation)和外部公告(external announcement),对应在 K8s 中部署的 controller 和 speaker。
-
address allocation:地址分配这个功能比较好理解,首先我们需要给 MetalLB 分配一个 IP 段,接着它会根据K8s 的 Service 中的相关配置来给 LoadBalancer 的服务分配 IP,LoadBalancer 的 IP 可以手动指定,也可以让 MetalLB 自动分配。地址分配主要就是由作为 Deployment 部署的 controller 来实现,它负责监听集群中的 Service 状态并且分配 IP。
-
external announcement:外部公告的主要功能就是要把服务类型为 LoadBalancer 的服务的 EXTERNAL-IP 公布到网络中去,确保客户端能够正常访问到这个 IP。MetalLB 对此的实现方式主要有三种:ARP/NDP 和 BGP,其中ARP/NDP 分别对应 IPv4/IPv6 协议的 Layer2 模式,BGP 路由协议则是对应 BGP 模式。外部公告主要通过由DaemonSet 部署的 speaker 来实现,它负责在网络中发布 ARP/NDP 报文或者是和 BGP 路由器建立连接并发布BGP 报文。
不管是 Layer2 模式还是 BGP 模式,两者都不使用 Linux 的网络栈,也就是说我们没办法使用诸如 ip 命令之类的操作准确的查看 VIP 所在的节点和相应的路由,相对应的是在每个节点上面都能看到一个 kube-ipvs0 网卡接口上面的IP。同时,两种模式都只是负责把 VIP 的请求引到对应的节点上面,之后的请求怎么到达 pod,按什么规则轮询等都是由kube-proxy 实现的。
Layer 2 中的 Speaker 工作负载是 DaemonSet 类型,在每台节点上都调度一个 Pod。首先,几个 Pod 会先进行选举,选举出 Leader,Leader 获取所有 LoadBalancer 类型的 Service,将已分配的 IP 地址绑定到当前主机的网卡上。也就是说,所有 LoadBalancer 类型的 Service 的 IP 同一时间都是绑定在同一台节点的网卡上。
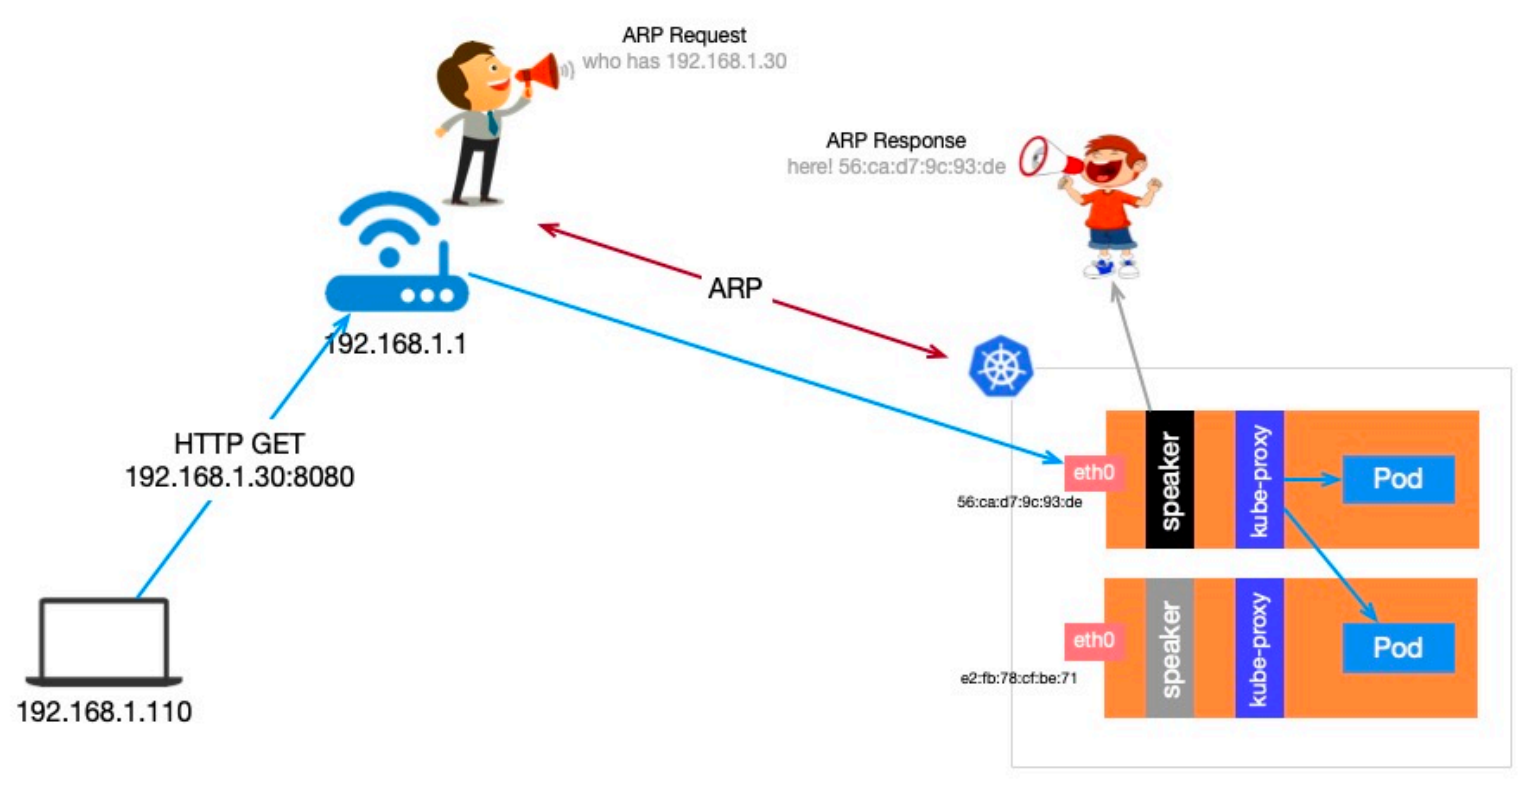
当外部主机有请求要发往集群内的某个 Service,需要先确定目标主机网卡的 mac 地址,这是通过发送 ARP 请求,Leader 节点会以其 mac 地址作为响应,外部主机会在本地 ARP 表中缓存下来,下次会直接从 ARP 表中获取。请求到达节点后,节点再通过 kube-proxy 将请求负载均衡目标 Pod。
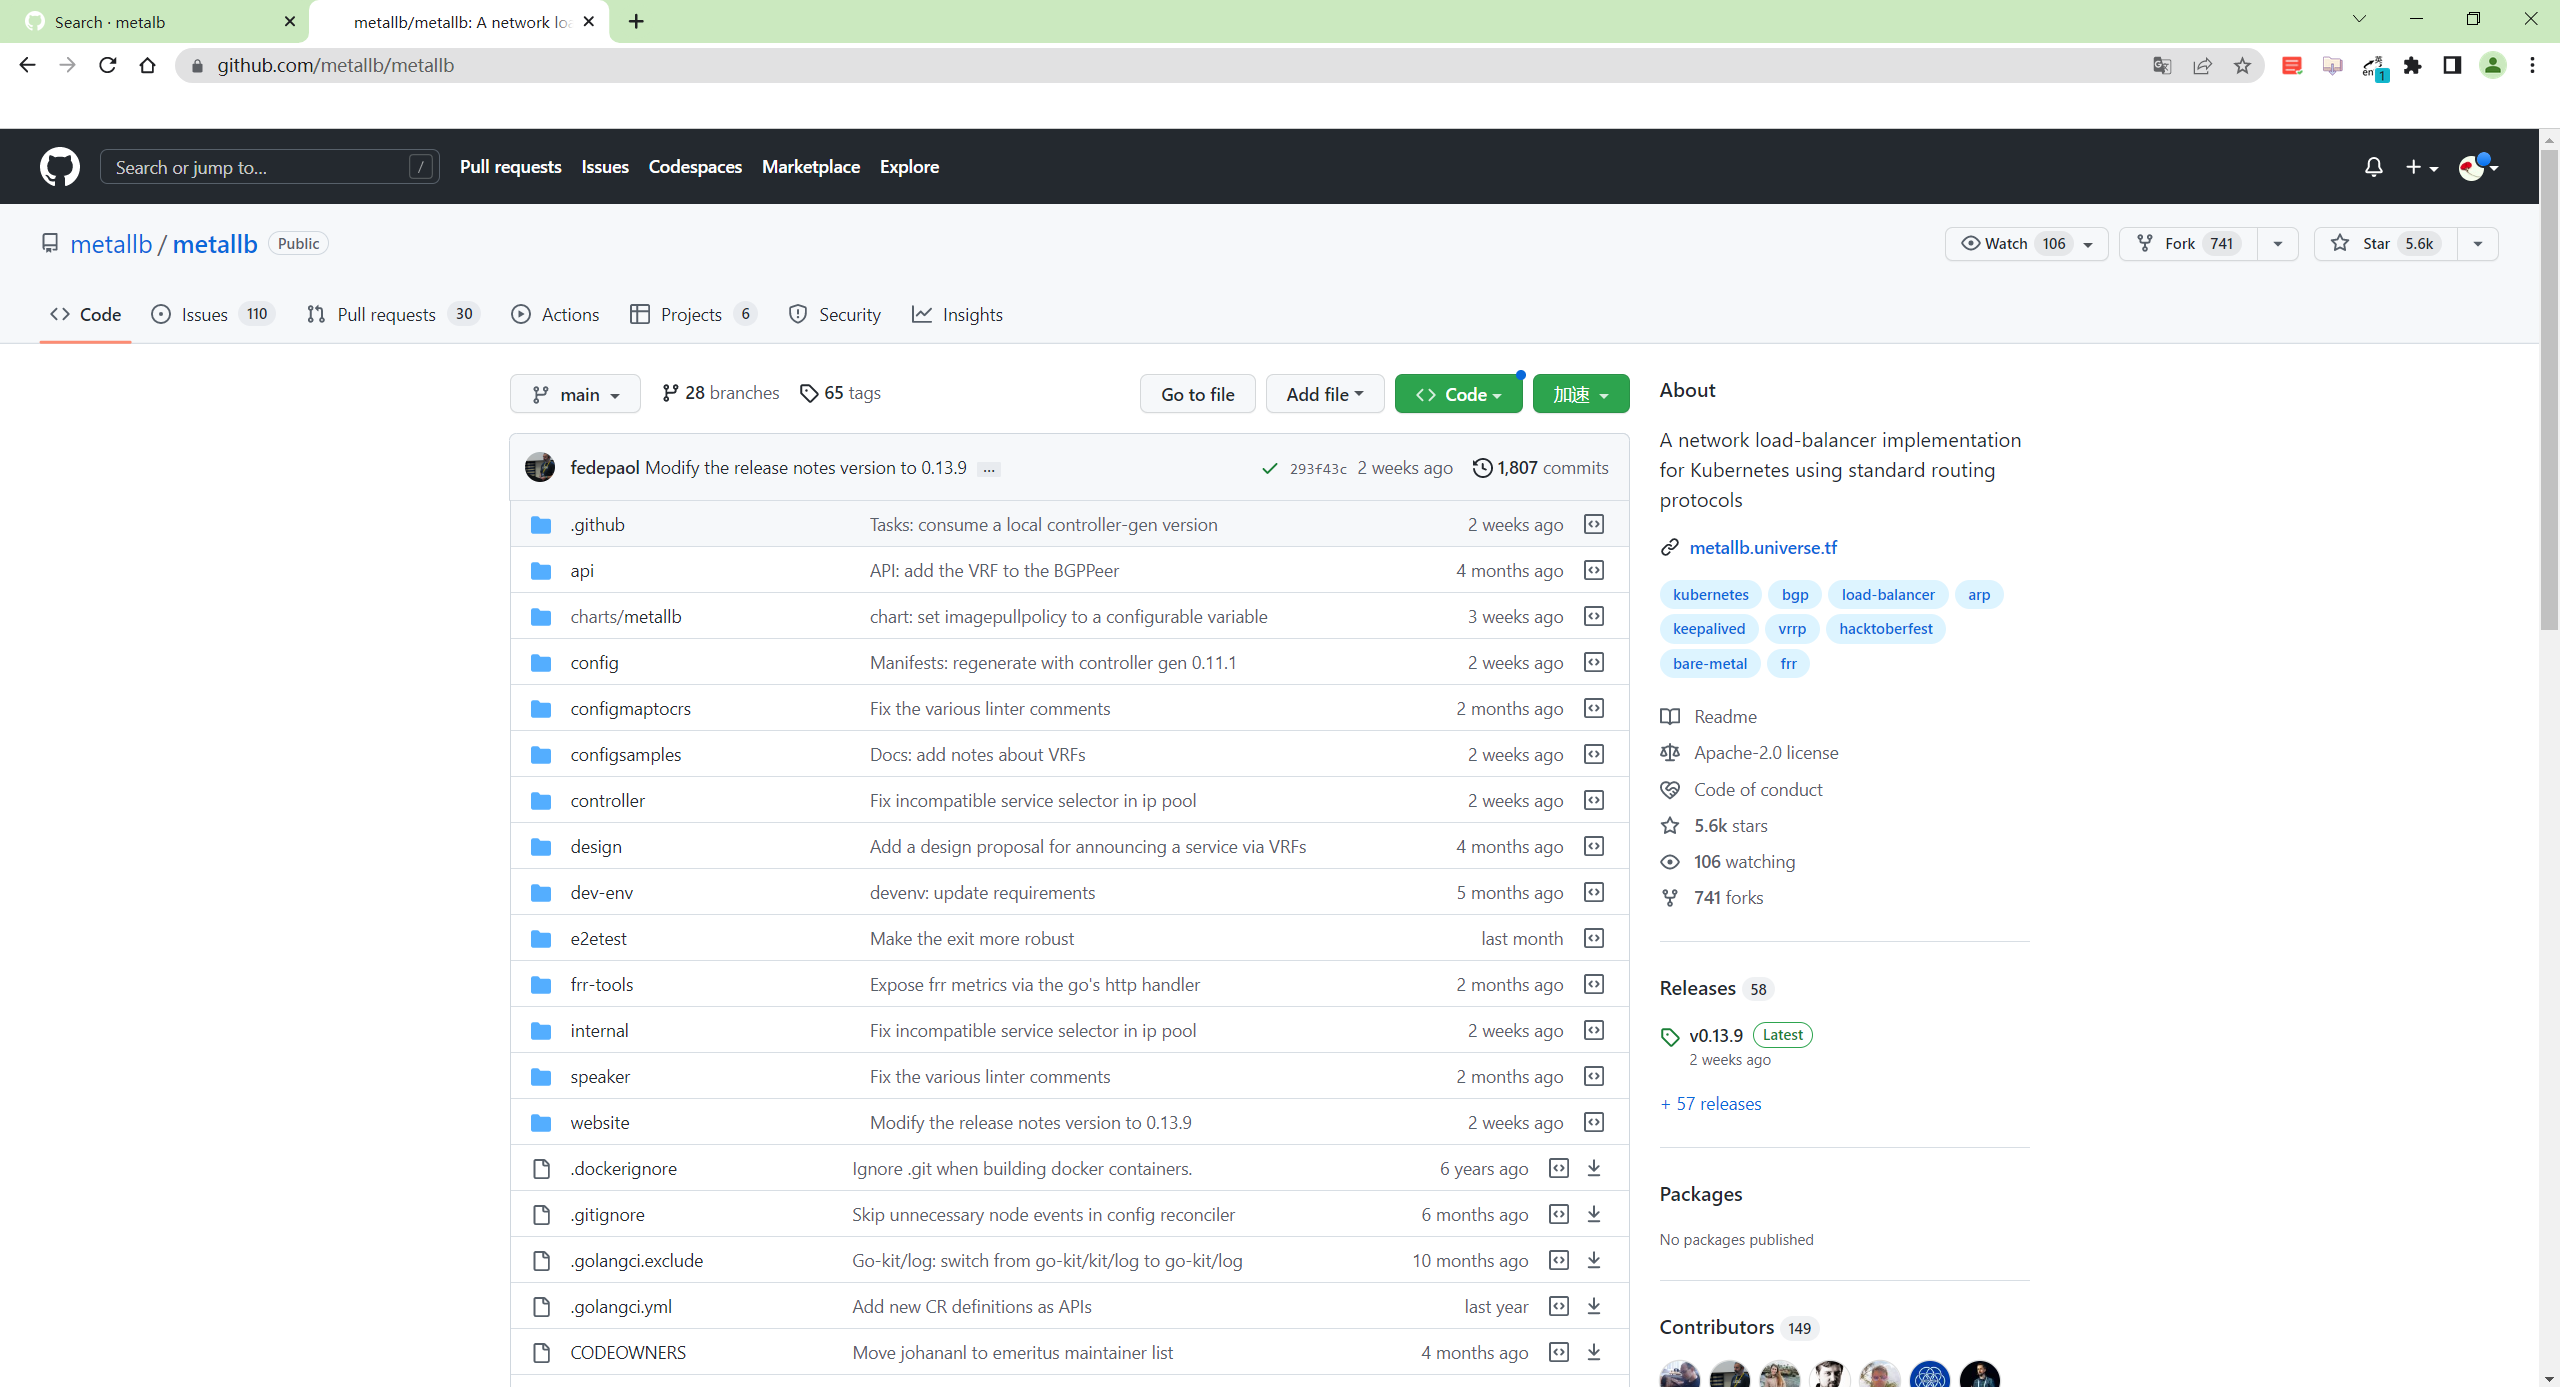
MetalLB github官方地址:
https://github.com/metallb/metallb
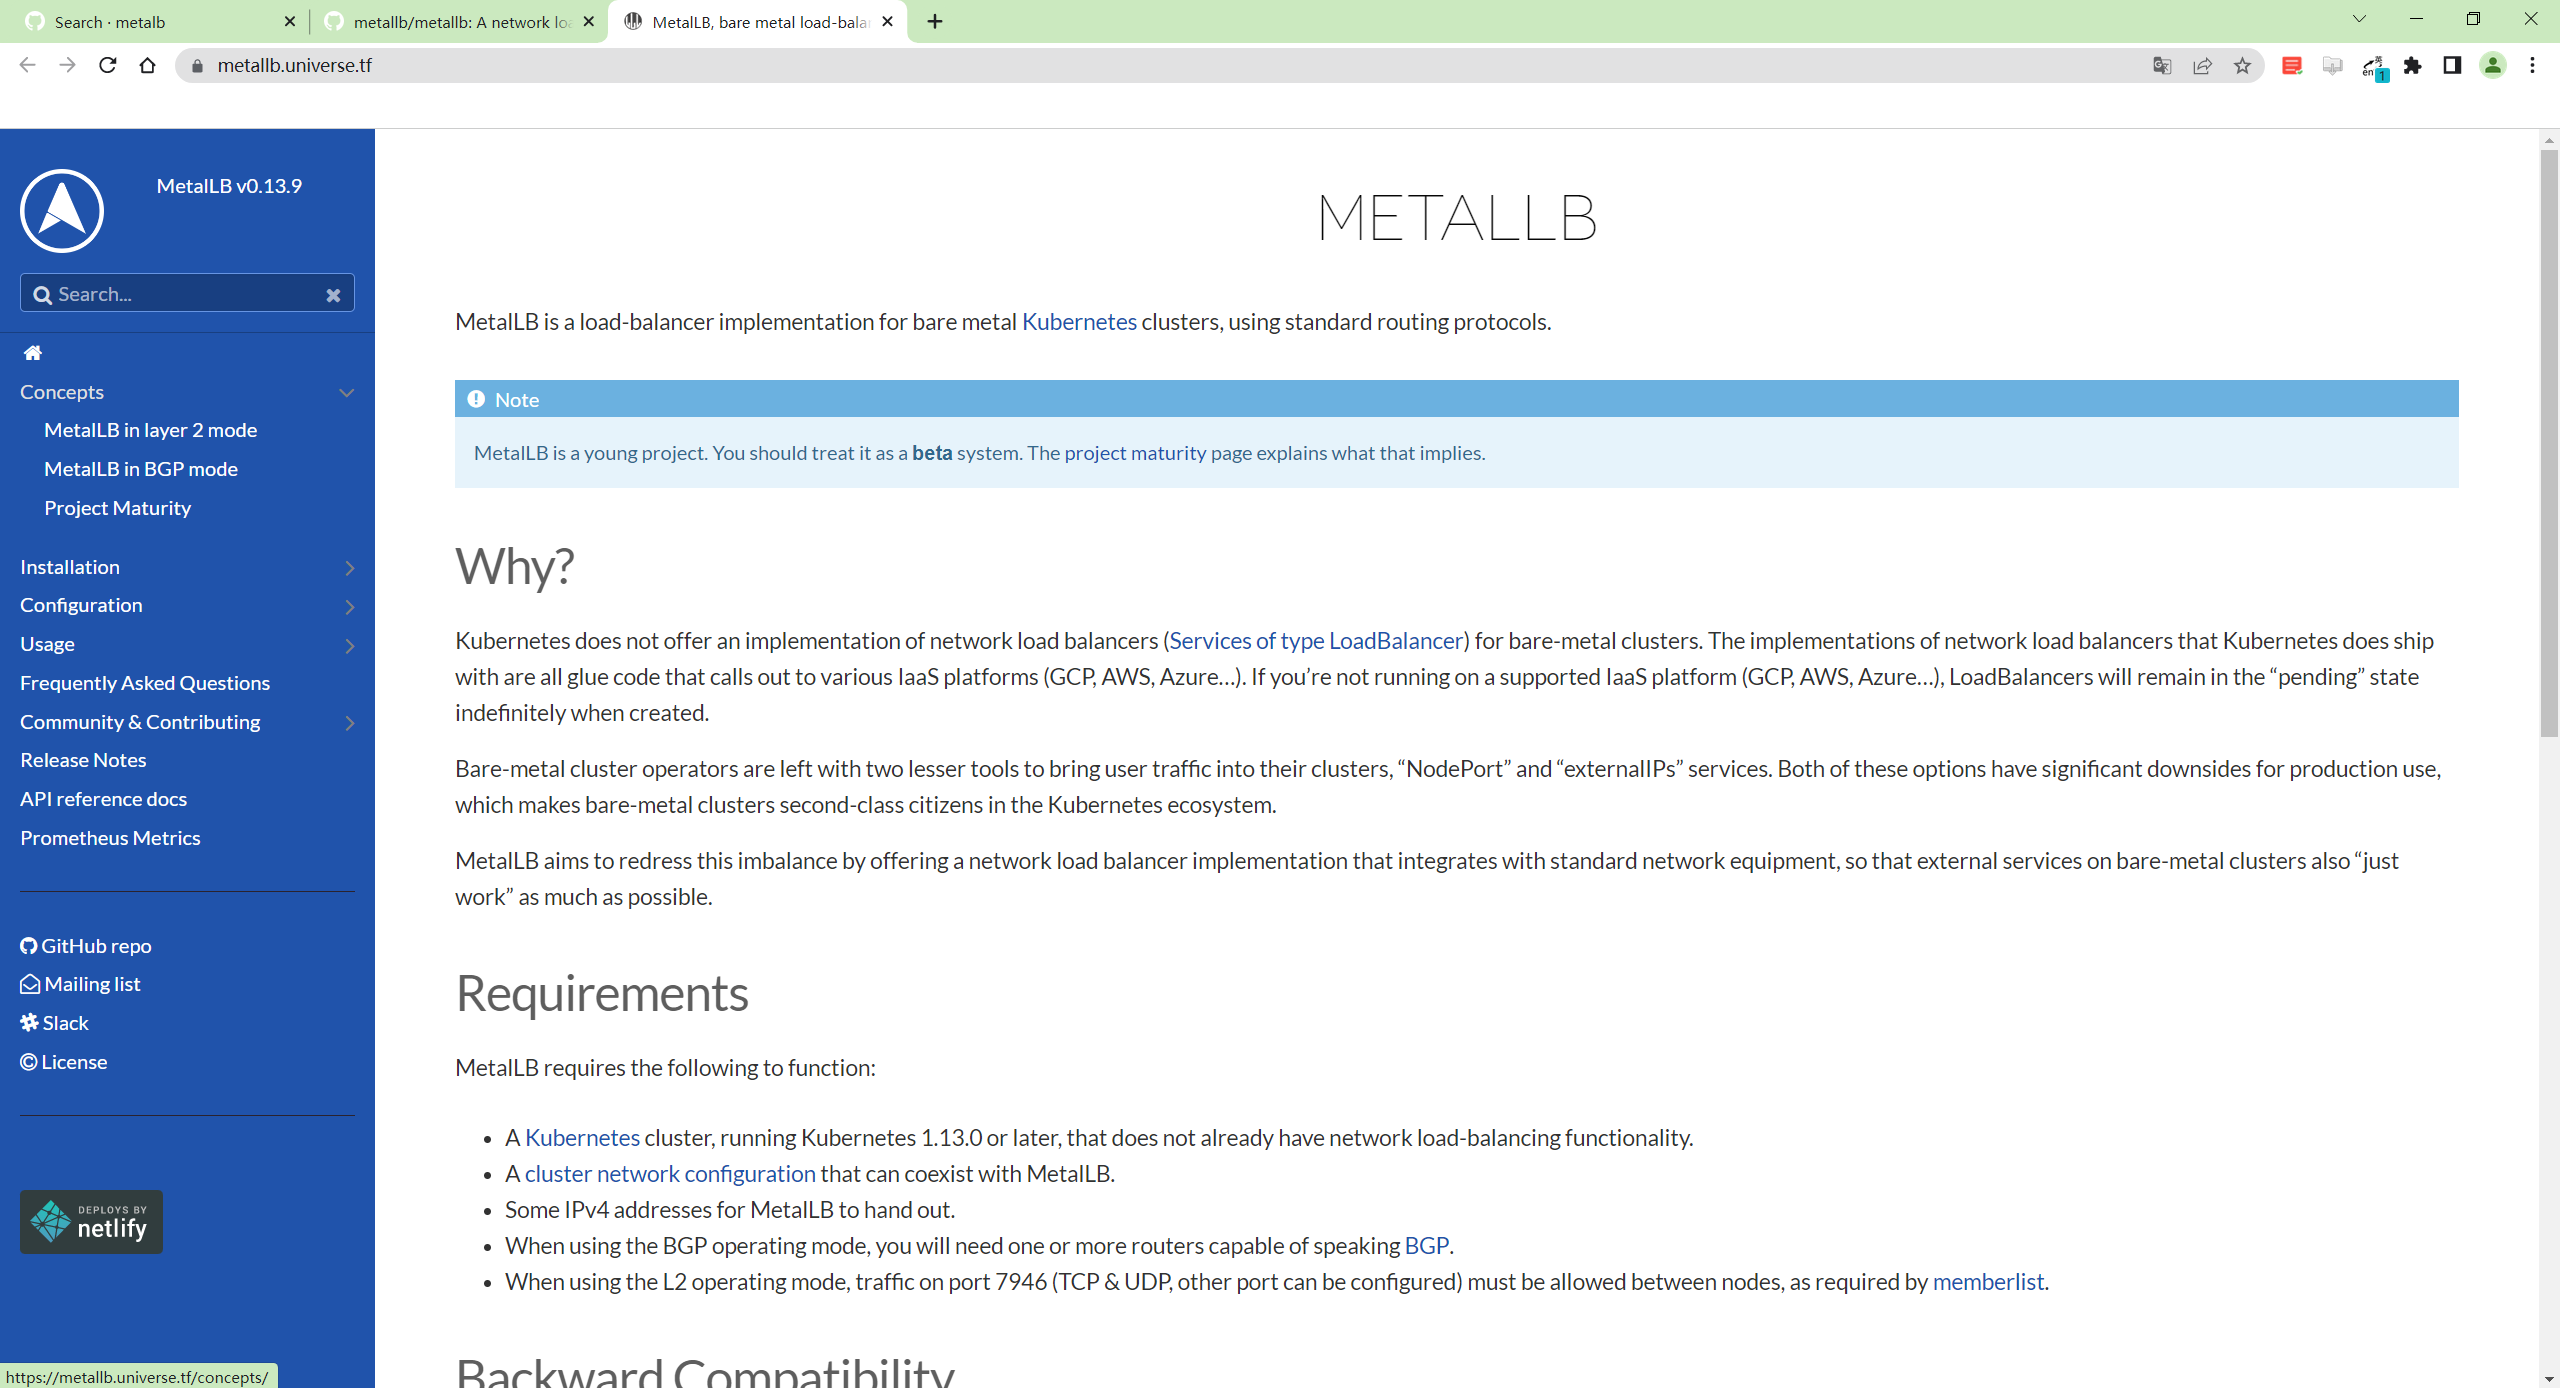
https://metallb.universe.tf/
1、前置条件
在开始部署 MetalLB 之前,我们需要确定部署环境能够满足最低要求:
- 一个 K8s 集群,要求版本不低于 1.13.0,且没有负载均衡器相关插件
- K8s 集群上的 CNI 组件和 MetalLB 兼容
- 预留一段 IPv4 地址给 MetalLB 作为 LoadBalance 的 VIP 使用
- 如果使用的是 MetalLB 的 BGP 模式,还需要路由器支持 BGP 协议
- 如果使用的是 MetalLB 的 Layer2 模式,因为使用了
memberlist算法来实现选主,因此需要确保各个 K8s 节点之间的 7946 端口可达(包括 TCP 和 UDP 协议),当然也可以根据自己的需求配置为其他端口
MetalLB 官方给出了对主流的一些 CNI 的兼容情况,MetalLB 主要还是利用了 K8s 自带的 kube-proxy 组件做流量转发,因此对大多数的 CNI 兼容情况都相当不错。
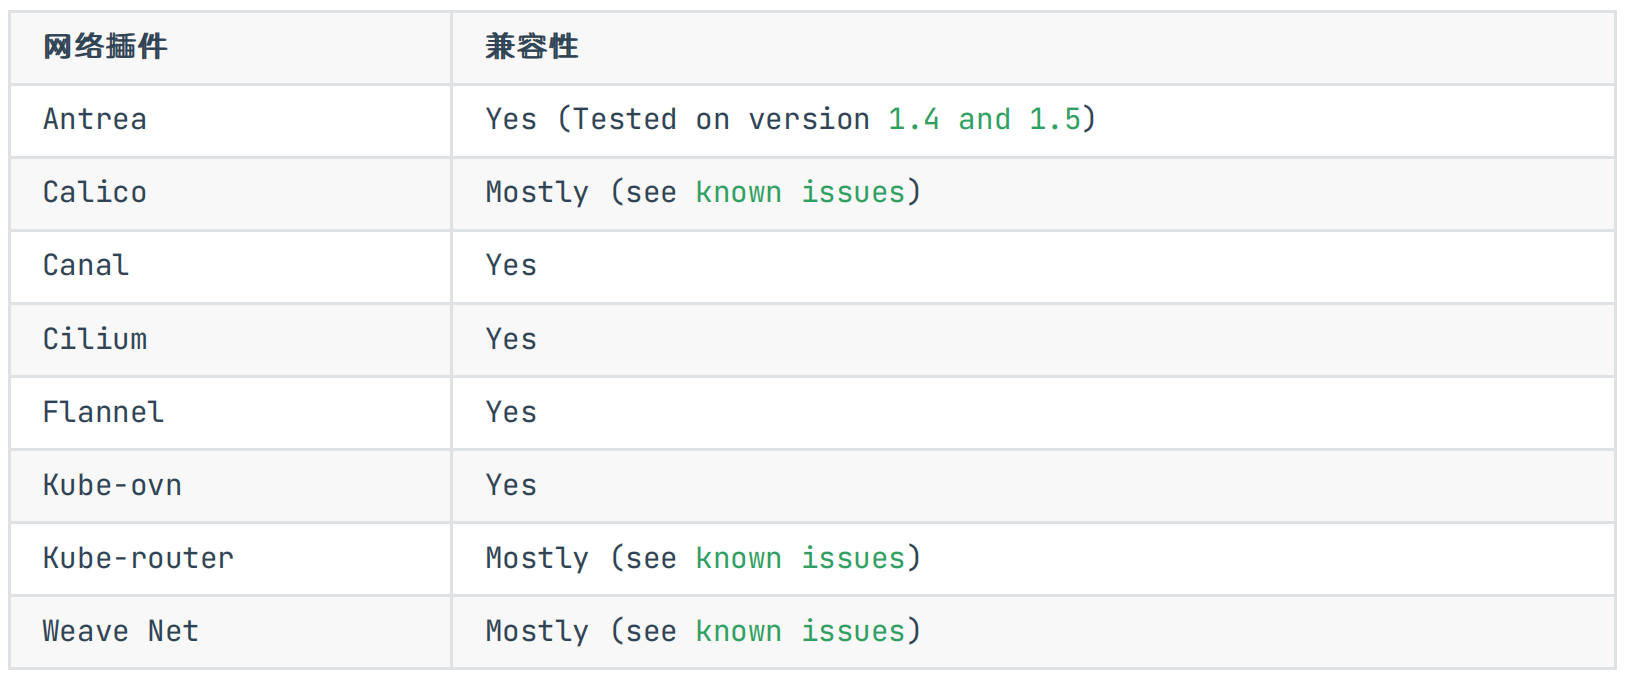
Antrea Yes (Tested on version 1.4 and 1.5):https://github.com/jayunit100/k8sprototypes/tree/master/kind/metallb-antrea
Calico Mostly (see known issues):https://metallb.universe.tf/configuration/calico/
Kube-router Mostly (see known issues):https://metallb.universe.tf/configuration/kube-router/
Weave Net Mostly (see known issues):https://metallb.universe.tf/configuration/weave/
2、安装
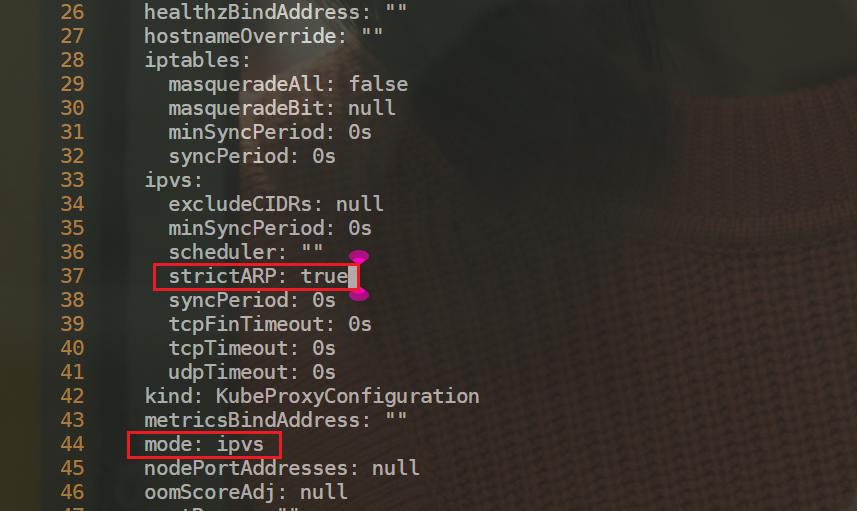
- 部署 Layer2 模式需要把 K8s 集群中的 ipvs 配置打开 strictARP,开启之后 K8s 集群中的 kube-proxy 会停止响应 kube-ipvs0 网卡之外的其他网卡的 arp 请求,而由 MetalLB 接手处理。我们只需要在 K8s 集群中编辑kube-proxy 配置即可:
注意:当前集群为v1.22.2,默认已经是ipvs模式了。
注意:如果kube-peoxy是iptables,也是可以直接使用MetaLB的;
[root@master1 ~]#kubectl edit configmap -n kube-system kube-proxy
#搜索ipvs
     33     ipvs:
     34       excludeCIDRs: null
     35       minSyncPeriod: 0s
     36       scheduler: ""
     37       strictARP: true
     38       syncPeriod: 0s
     39       tcpFinTimeout: 0s
     40       tcpTimeout: 0s
     41       udpTimeout: 0s
     42     kind: KubeProxyConfiguration
     43     metricsBindAddress: ""
     44     mode: ipvs
- 我们这里使用 Layer2 模式,直接使用下面的命令一键安装即可:
[root@master1 ~]#kubectl apply -f https://raw.githubusercontent.com/metallb/metallb/v0.13.7/config/manifests/metallb-native.yaml
namespace/metallb-system created
customresourcedefinition.apiextensions.k8s.io/addresspools.metallb.io created
customresourcedefinition.apiextensions.k8s.io/bfdprofiles.metallb.io created
customresourcedefinition.apiextensions.k8s.io/bgpadvertisements.metallb.io created
customresourcedefinition.apiextensions.k8s.io/bgppeers.metallb.io created
customresourcedefinition.apiextensions.k8s.io/communities.metallb.io created
customresourcedefinition.apiextensions.k8s.io/ipaddresspools.metallb.io created
customresourcedefinition.apiextensions.k8s.io/l2advertisements.metallb.io created
serviceaccount/controller created
serviceaccount/speaker created
role.rbac.authorization.k8s.io/controller created
role.rbac.authorization.k8s.io/pod-lister created
clusterrole.rbac.authorization.k8s.io/metallb-system:controller created
clusterrole.rbac.authorization.k8s.io/metallb-system:speaker created
rolebinding.rbac.authorization.k8s.io/controller created
rolebinding.rbac.authorization.k8s.io/pod-lister created
clusterrolebinding.rbac.authorization.k8s.io/metallb-system:controller created
clusterrolebinding.rbac.authorization.k8s.io/metallb-system:speaker created
secret/webhook-server-cert created
service/webhook-service created
deployment.apps/controller created
daemonset.apps/speaker created
validatingwebhookconfiguration.admissionregistration.k8s.io/metallb-webhook-configuration created
[root@master1 ~]#
上面的命令会创建一个 metallb-system 的命名空间,并会安装多个 CRD 资源(后续讲解):
- 查看
[root@master1 ~]# kubectl get pods -n metallb-system -owide
NAME                          READY   STATUS    RESTARTS   AGE   IP            NODE      NOMINATED NODE   READINESS GATES
controller-54b4fd6944-7h7xd   1/1     Running   0          98s   10.244.1.10   node1     <none>           <none>
speaker-r2fnq                 1/1     Running   0          98s   172.29.9.51   master1   <none>           <none>
speaker-rzdrp                 1/1     Running   0          98s   172.29.9.52   node1     <none>           <none>
speaker-zzkfx                 1/1     Running   0          98s   172.29.9.53   node2     <none>           <none>
到这里就部署成功了。对于 2 层模式的配置使用是最简单的,因为不需要什么特定的协议配置,只需要 IP 地址即可。L2模式不需要将 IP 与你的工作节点的网络接口绑定,它的工作方式是直接响应你本地网络上的 ARP 请求,把机器的 MAC地址给客户端。
3、使用
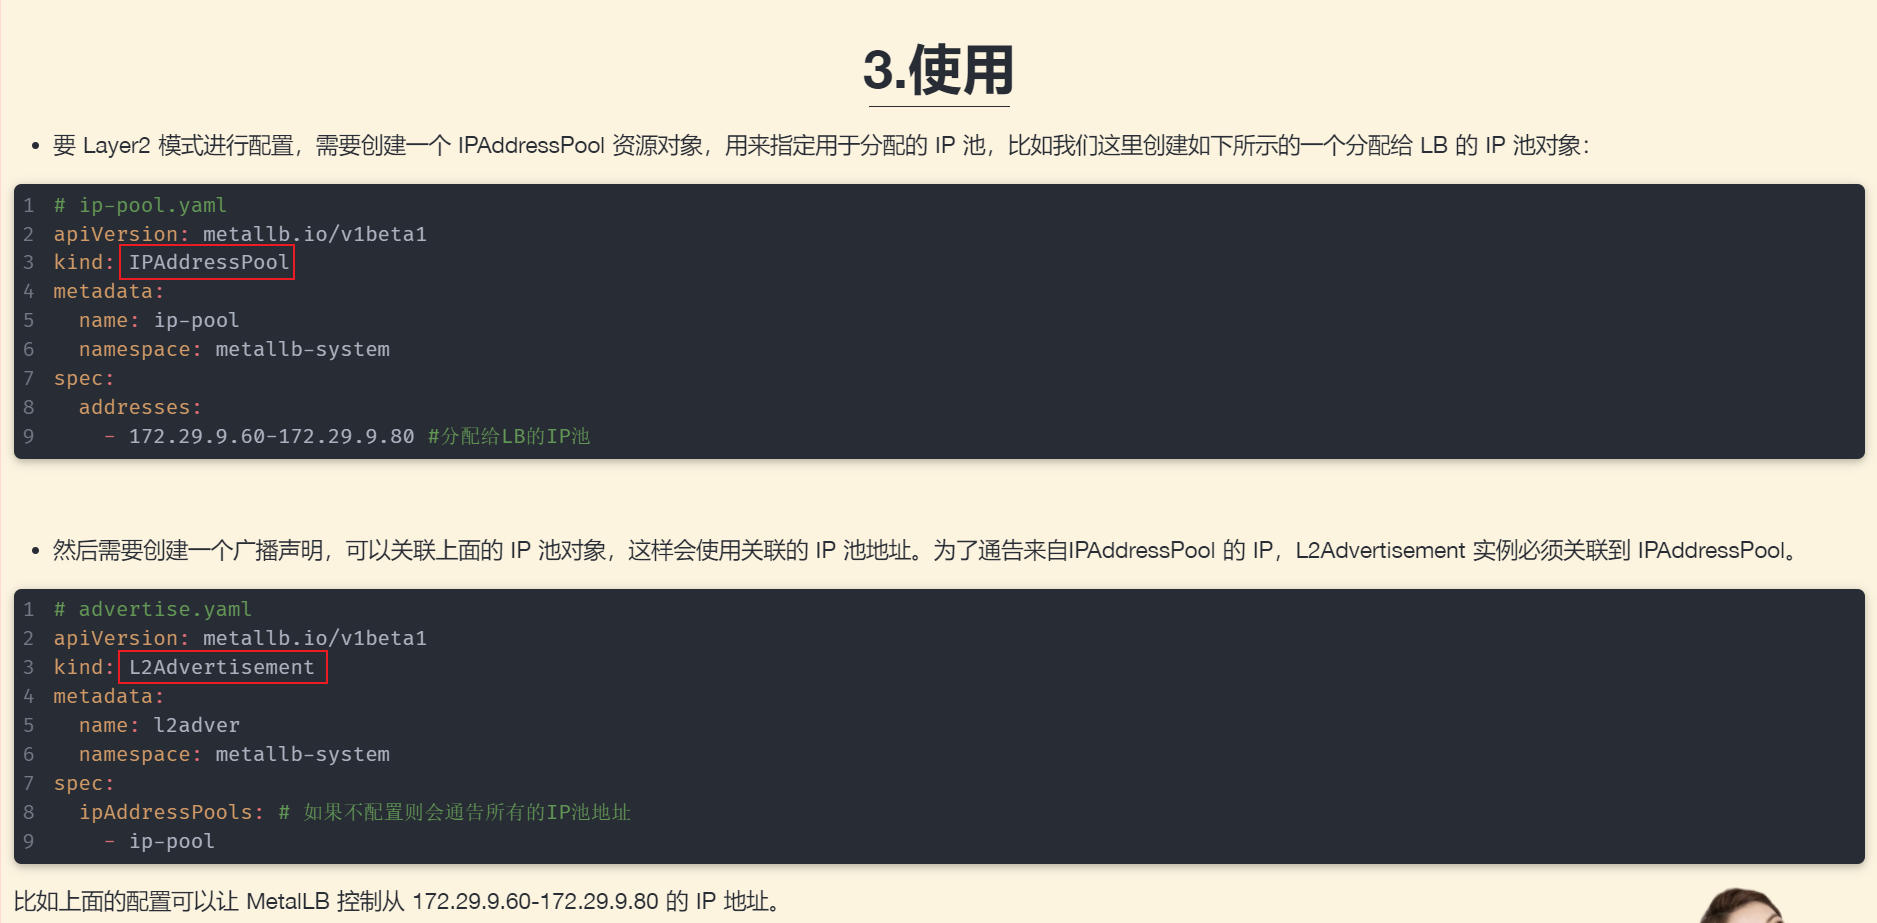
- 要 Layer2 模式进行配置,需要创建一个 IPAddressPool 资源对象,用来指定用于分配的 IP 池,比如我们这里创建如下所示的一个分配给 LB 的 IP 池对象:
# ip-pool.yaml
apiVersion: metallb.io/v1beta1
kind: IPAddressPool
metadata:
  name: ip-pool
  namespace: metallb-system
spec:
  addresses:
    - 172.29.9.60-172.29.9.80 #分配给LB的IP池,
注意:我们可以看出 MetalLB 的二层模式是非常简单的(另一种 BGP 模式需要路由器支持),只要保证 IP 地址池与集群是同一个网段即可。
- 然后需要创建一个广播声明,可以关联上面的 IP 池对象,这样会使用关联的 IP 池地址。为了通告来自IPAddressPool 的 IP,L2Advertisement 实例必须关联到 IPAddressPool。
# advertise.yaml
apiVersion: metallb.io/v1beta1
kind: L2Advertisement
metadata:
  name: l2adver
  namespace: metallb-system
spec:
  ipAddressPools: # 如果不配置则会通告所有的IP池地址
    - ip-pool
比如上面的配置可以让 MetalLB 控制从 172.29.9.60-172.29.9.80 的 IP 地址。
- 直接创建上面的两个资源对象:
 kubectl apply -f ip-pool.yaml
 kubectl apply -f advertise.yaml
这样我们就可以创建使用 LoadBalancer 类型的 Service 了。
1.创建ingress测试
- 前面我们安装的 ingress-nginx 默认创建的 Service 就是 LoadBalancer 类型的,现在我们再去看下该对象应该已经自动分配了一个 LB 地址:
[root@master1 ~]#kubectl get svc -ningress-nginx
NAME                                 TYPE           CLUSTER-IP      EXTERNAL-IP   PORT(S)                      AGE
ingress-nginx-controller             LoadBalancer   10.96.228.157   172.29.9.60   80:30933/TCP,443:31697/TCP   2d21h #172.29.9.60这里就是一个vip地址
ingress-nginx-controller-admission   ClusterIP      10.105.93.22    <none>        443/TCP                      2d21h
[root@master1 ~]#kubectl get po -ningress-nginx
NAME                                       READY   STATUS      RESTARTS   AGE
ingress-nginx-admission-create--1-xh62p    0/1     Completed   0          2d21h
ingress-nginx-admission-patch--1-dccjl     0/1     Completed   2          2d21h
ingress-nginx-controller-c66bc7c5c-pj2h8   1/1     Running     0          2d21h
可以看到,ingress-nginx-controllersvc的EXTERNAL-IP为172.29.9.60。
之前部署的第一个ingress案例的ADDRESS地址也为172.29.9.60了。
[root@master1 ~]#kubectl get ingress
NAME       CLASS   HOSTS                              ADDRESS       PORTS   AGE
my-nginx   nginx   first-ingress.172.29.9.52.nip.io   172.29.9.60   80      2d13h
[root@master1 ~]#
这样以后我们就可以通过将 Ingress 中的域名解析到 172.29.9.60 来对外暴露服务了,而且不需要带上 NodePort端口。
如下所示:
# lb-demo.yaml
apiVersion: apps/v1
kind: Deployment
metadata:
  name: lb-demo
spec:
  selector:
    matchLabels:
      app: lb-demo
  template:
    metadata:
      labels:
        app: lb-demo
    spec:
      containers:
      - name: lb-demo
        image: nginx
        ports:
        - containerPort: 80
---
apiVersion: v1
kind: Service
metadata:
  name: lb-demo
  labels:
    app: lb-demo
spec:
  ports:
  - port: 80
    protocol: TCP
    name: http
  selector:
    app: lb-demo
---
apiVersion: networking.k8s.io/v1
kind: Ingress
metadata:
  name: lb-demo
  namespace: default
spec:
  ingressClassName: nginx  # 使用 nginx 的 IngressClass(关联的 ingress-nginx 控制器)
  rules:
  - host: lb-demo.172.29.9.60.nip.io  # 将域名映射到 lb-demo 服务
    http:
      paths:
      - path: /
        pathType: Prefix
        backend:
          service:  # 将所有请求发送到 lb-demo 服务的 80 端口
            name: lb-demo
            port:
              number: 80
# 不过需要注意大部分Ingress控制器都不是直接转发到Service,而是只是通过Service来获取后端的Endpoints列表(因此这里的svc只起到了一个服务发现的作用),直接转发到Pod,这样可以减少网络跳转,提高性能!!!
我们创建了一个 Ingress 对象,使用了 nginx 这个 IngressClass,配置的域名是 lb-demo.172.29.9.60.nip.io(相当于直接映射到了 172.29.9.60地址),所以当我们访问该域名的时候,请求就会到 172.29.9.60 这个 VIP 地址,其实就是 ingress-nginx 控制器的 Service,最后到后面的控制器 Pod 进行处理。
- 部署
[root@master1 ~]#kubectl apply -f lb-demo.yaml
[root@master1 ~]# kubectl get ingress
NAME       CLASS   HOSTS                              ADDRESS       PORTS   AGE
lb-demo    nginx   lb-demo.172.29.9.60.nip.io         172.29.9.60   80      23s
- 测试
[root@master1 ~]#curl lb-demo.172.29.9.60.nip.io
curl: (7) Failed connect to lb-demo.172.29.9.60.nip.io:80; Connection refused
[root@node2 ~]#curl lb-demo.172.29.9.60.nip.io
curl: (7) Failed connect to lb-demo.172.29.9.60.nip.io:80; Connection refused
[root@node1 ~]#curl lb-demo.172.29.9.60.nip.io
<!DOCTYPE html>
<html>
<head>
<title>Welcome to nginx!</title>
<style>
html { color-scheme: light dark; }
body { width: 35em; margin: 0 auto;
font-family: Tahoma, Verdana, Arial, sans-serif; }
</style>
</head>
<body>
<h1>Welcome to nginx!</h1>
<p>If you see this page, the nginx web server is successfully installed and
working. Further configuration is required.</p>

<p>For online documentation and support please refer to
<a href="http://nginx.org/">nginx.org</a>.<br/>
Commercial support is available at
<a href="http://nginx.com/">nginx.com</a>.</p>

<p><em>Thank you for using nginx.</em></p>
</body>
</html>
[root@node1 ~]#
⚠️ 注意:此时通过curl测试,怎么只能在node1上访问呢,master1和node2上不能curl访问呢?这是什么原因?
原因如下图所示:
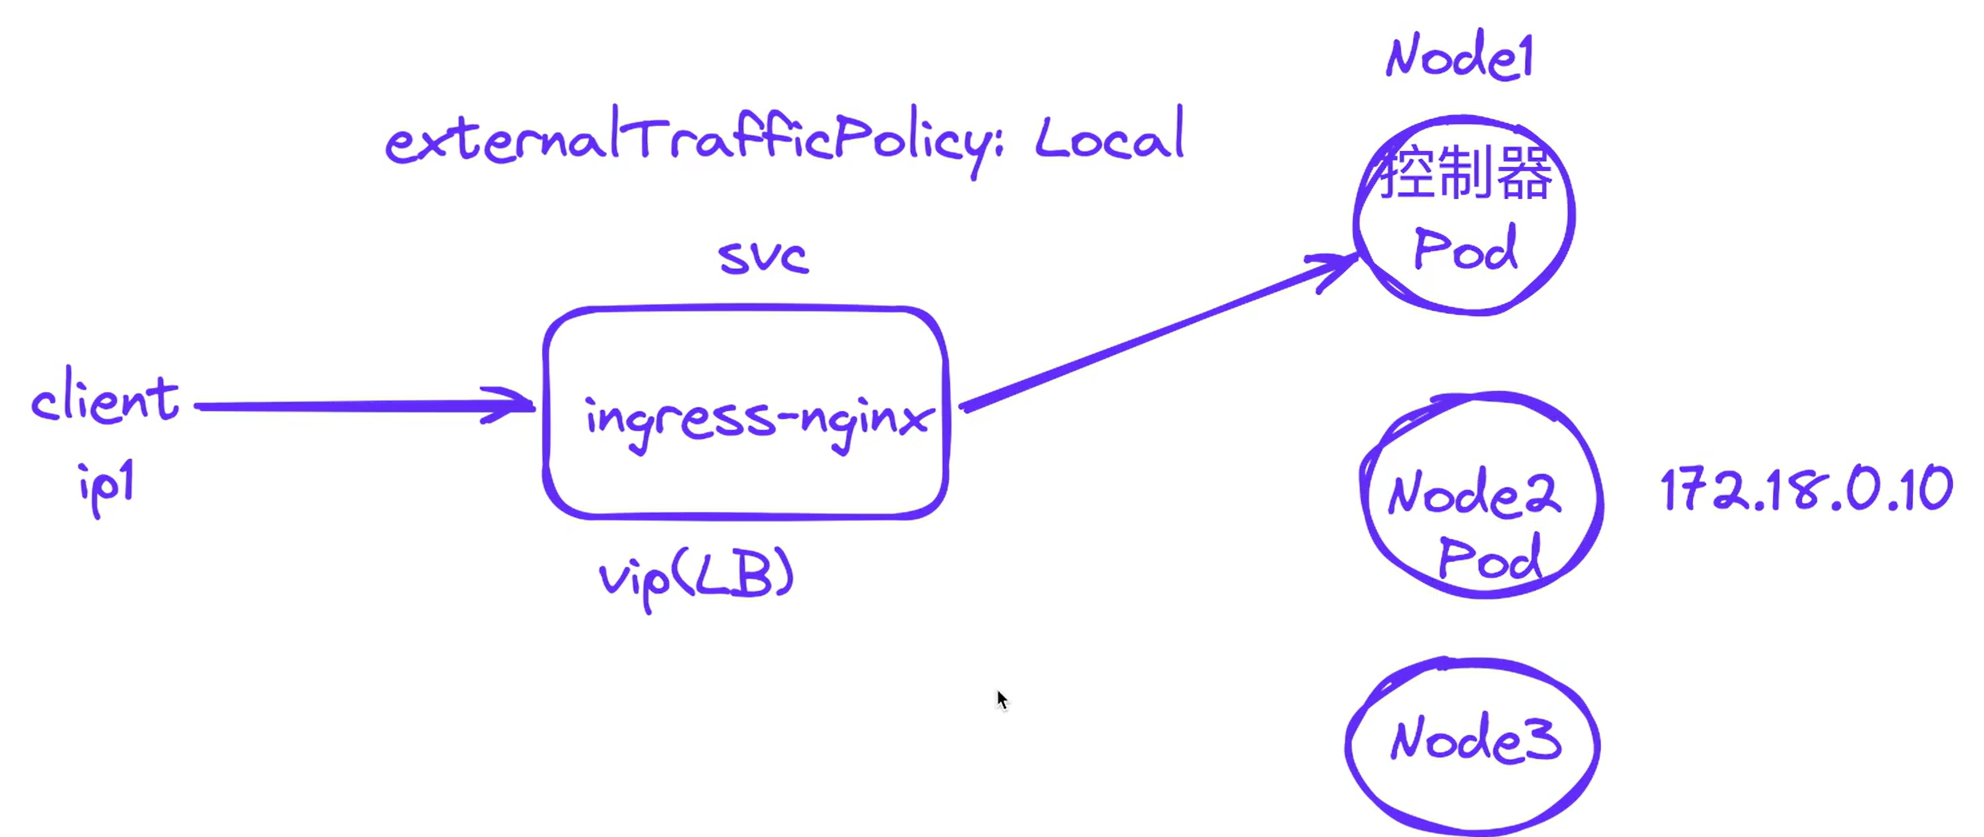
上面能通的情况:
当ingress-nginx控制器pod和LB分配的虚ip在同一个节点:

当ingress-nginx控制器pod和LB分配的虚ip没在同一个节点:
因为这个externalTrafficPolicy: Local选项
默认这个选项值为Cluster,那么是当流量到达node2时,是会通过kube-proxy来转到node1上的pod的。
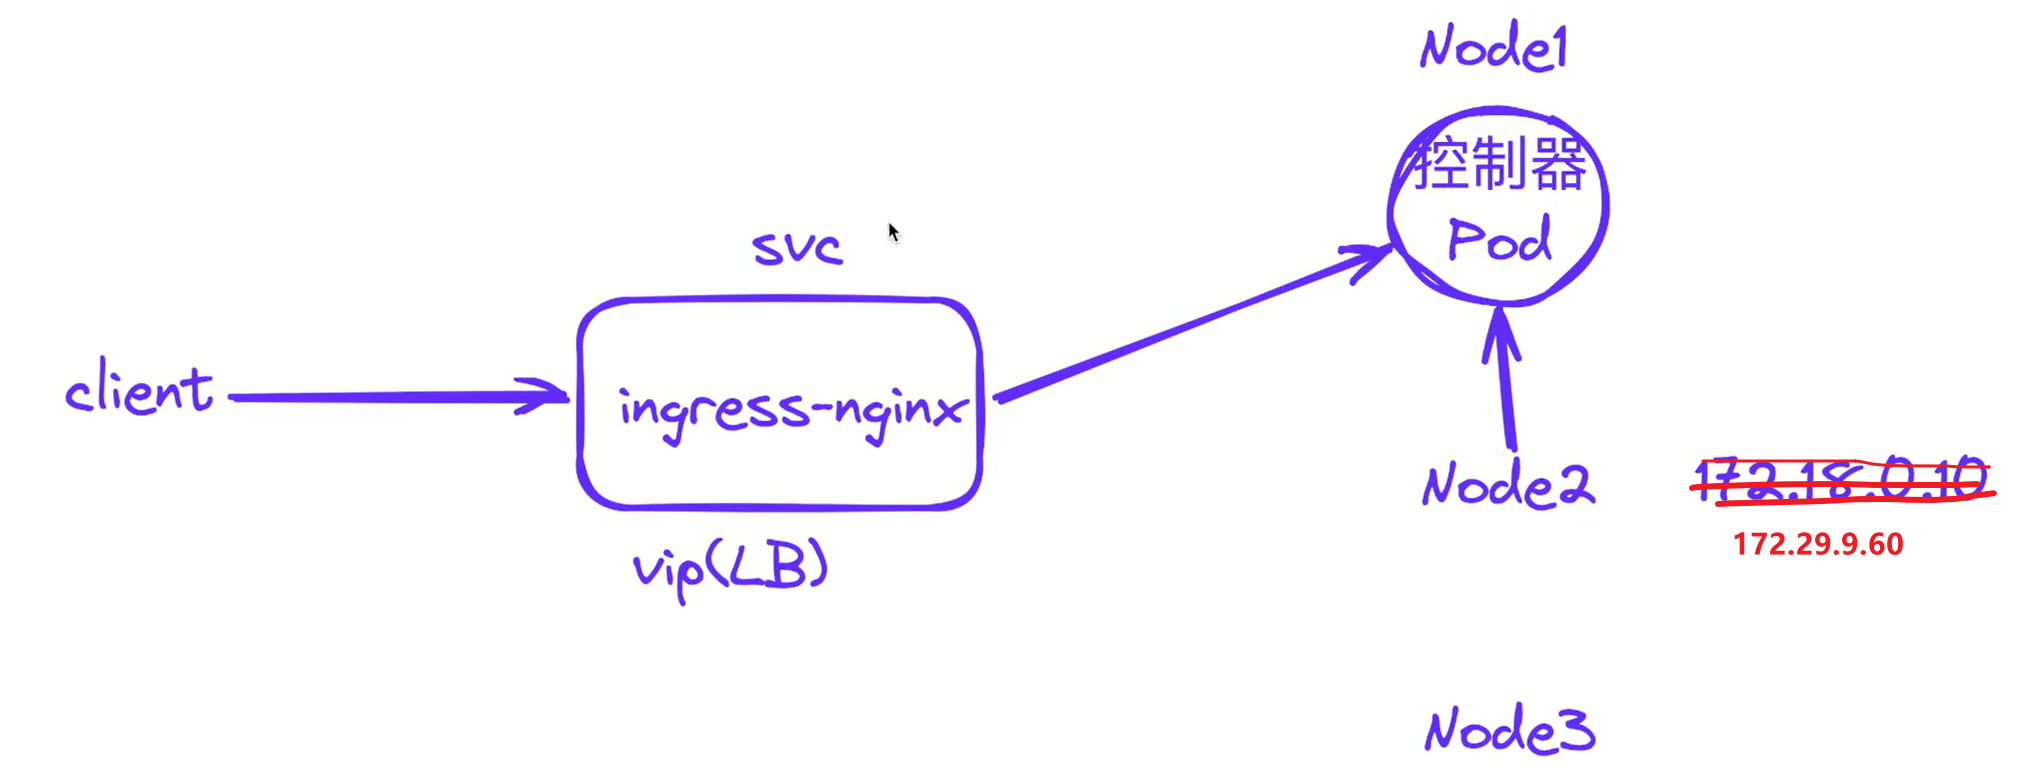
但是,ingress-nginx的svcingress-nginx-controller默认是Local的
[root@master1 ~]#kubectl get svc -ningress-nginx
NAME                                 TYPE           CLUSTER-IP      EXTERNAL-IP   PORT(S)                      AGE
ingress-nginx-controller             LoadBalancer   10.96.228.157   172.29.9.60   80:30933/TCP,443:31697/TCP   2d21h
ingress-nginx-controller-admission   ClusterIP      10.105.93.22    <none>        443/TCP                      2d21h
[root@master1 ~]#kubectl get svc ingress-nginx-controller -ningress-nginx -oyaml
apiVersion: v1
kind: Service
metadata:
……
spec:
  allocateLoadBalancerNodePorts: true
  clusterIP: 10.96.228.157
  clusterIPs:
  - 10.96.228.157
  externalTrafficPolicy: Local #注意:这里的参数为Local
  healthCheckNodePort: 30887
  internalTrafficPolicy: Cluster
  ……
  type: LoadBalancer
status:
  loadBalancer:
    ingress:
    - ip: 172.29.9.60

[root@master1 ~]#kubectl explain svc.spec.externalTrafficPolicy
KIND:     Service
VERSION:  v1

FIELD:    externalTrafficPolicy <string>

DESCRIPTION:
     externalTrafficPolicy denotes if this Service desires to route external
     traffic to node-local or cluster-wide endpoints. "Local" preserves the
     client source IP and avoids a second hop for LoadBalancer and Nodeport type
     services, but risks potentially imbalanced traffic spreading. "Cluster"
     obscures the client source IP and may cause a second hop to another node,
     but should have good overall load-spreading.
[root@master1 ~]#
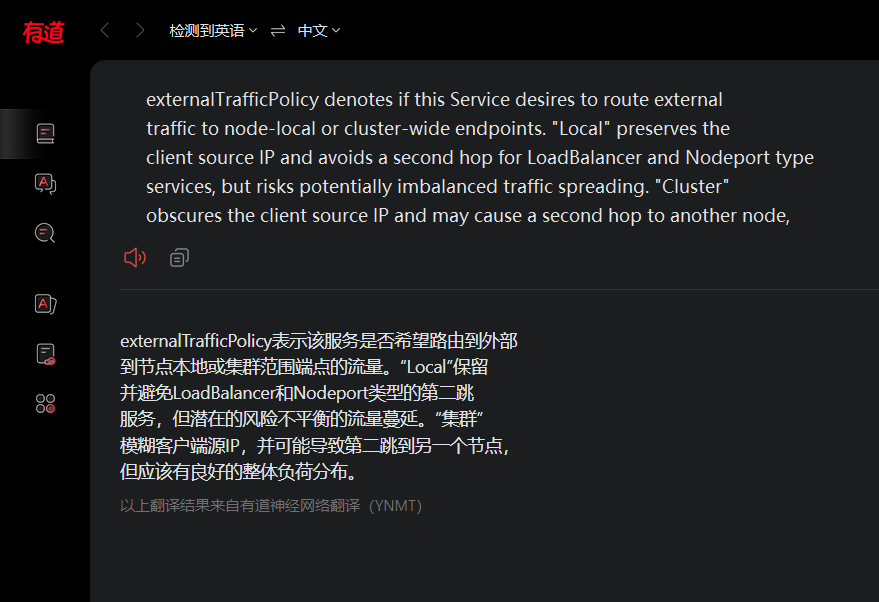
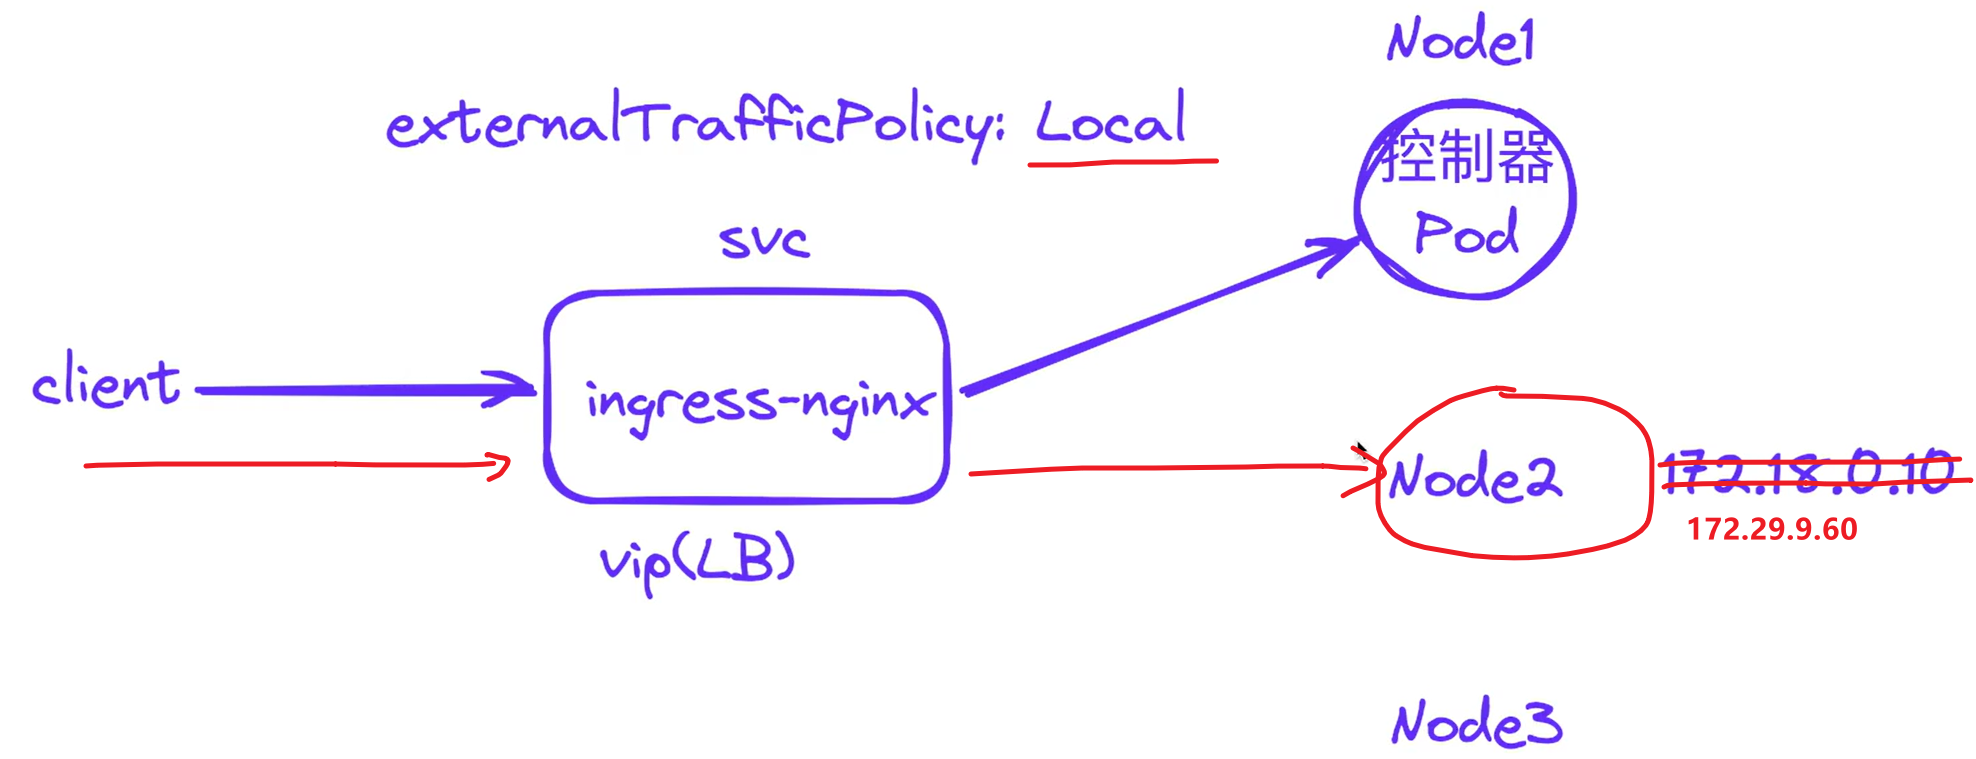
而这个Local选项含义是,进来的请求只会在这个本地节点上寻找pod,不会调转的,但本地node2上是没有ingress-nginx-controller pod的。
所以就出现了上面node2和master1不通,node1上通的现象。
可以看到ingress-nginx-controller也是部署在node1上的。

此时,该怎么解决呢?
解决办法1:将ingress-nginx-controller svc的externalTrafficPolicy修改为Cluster
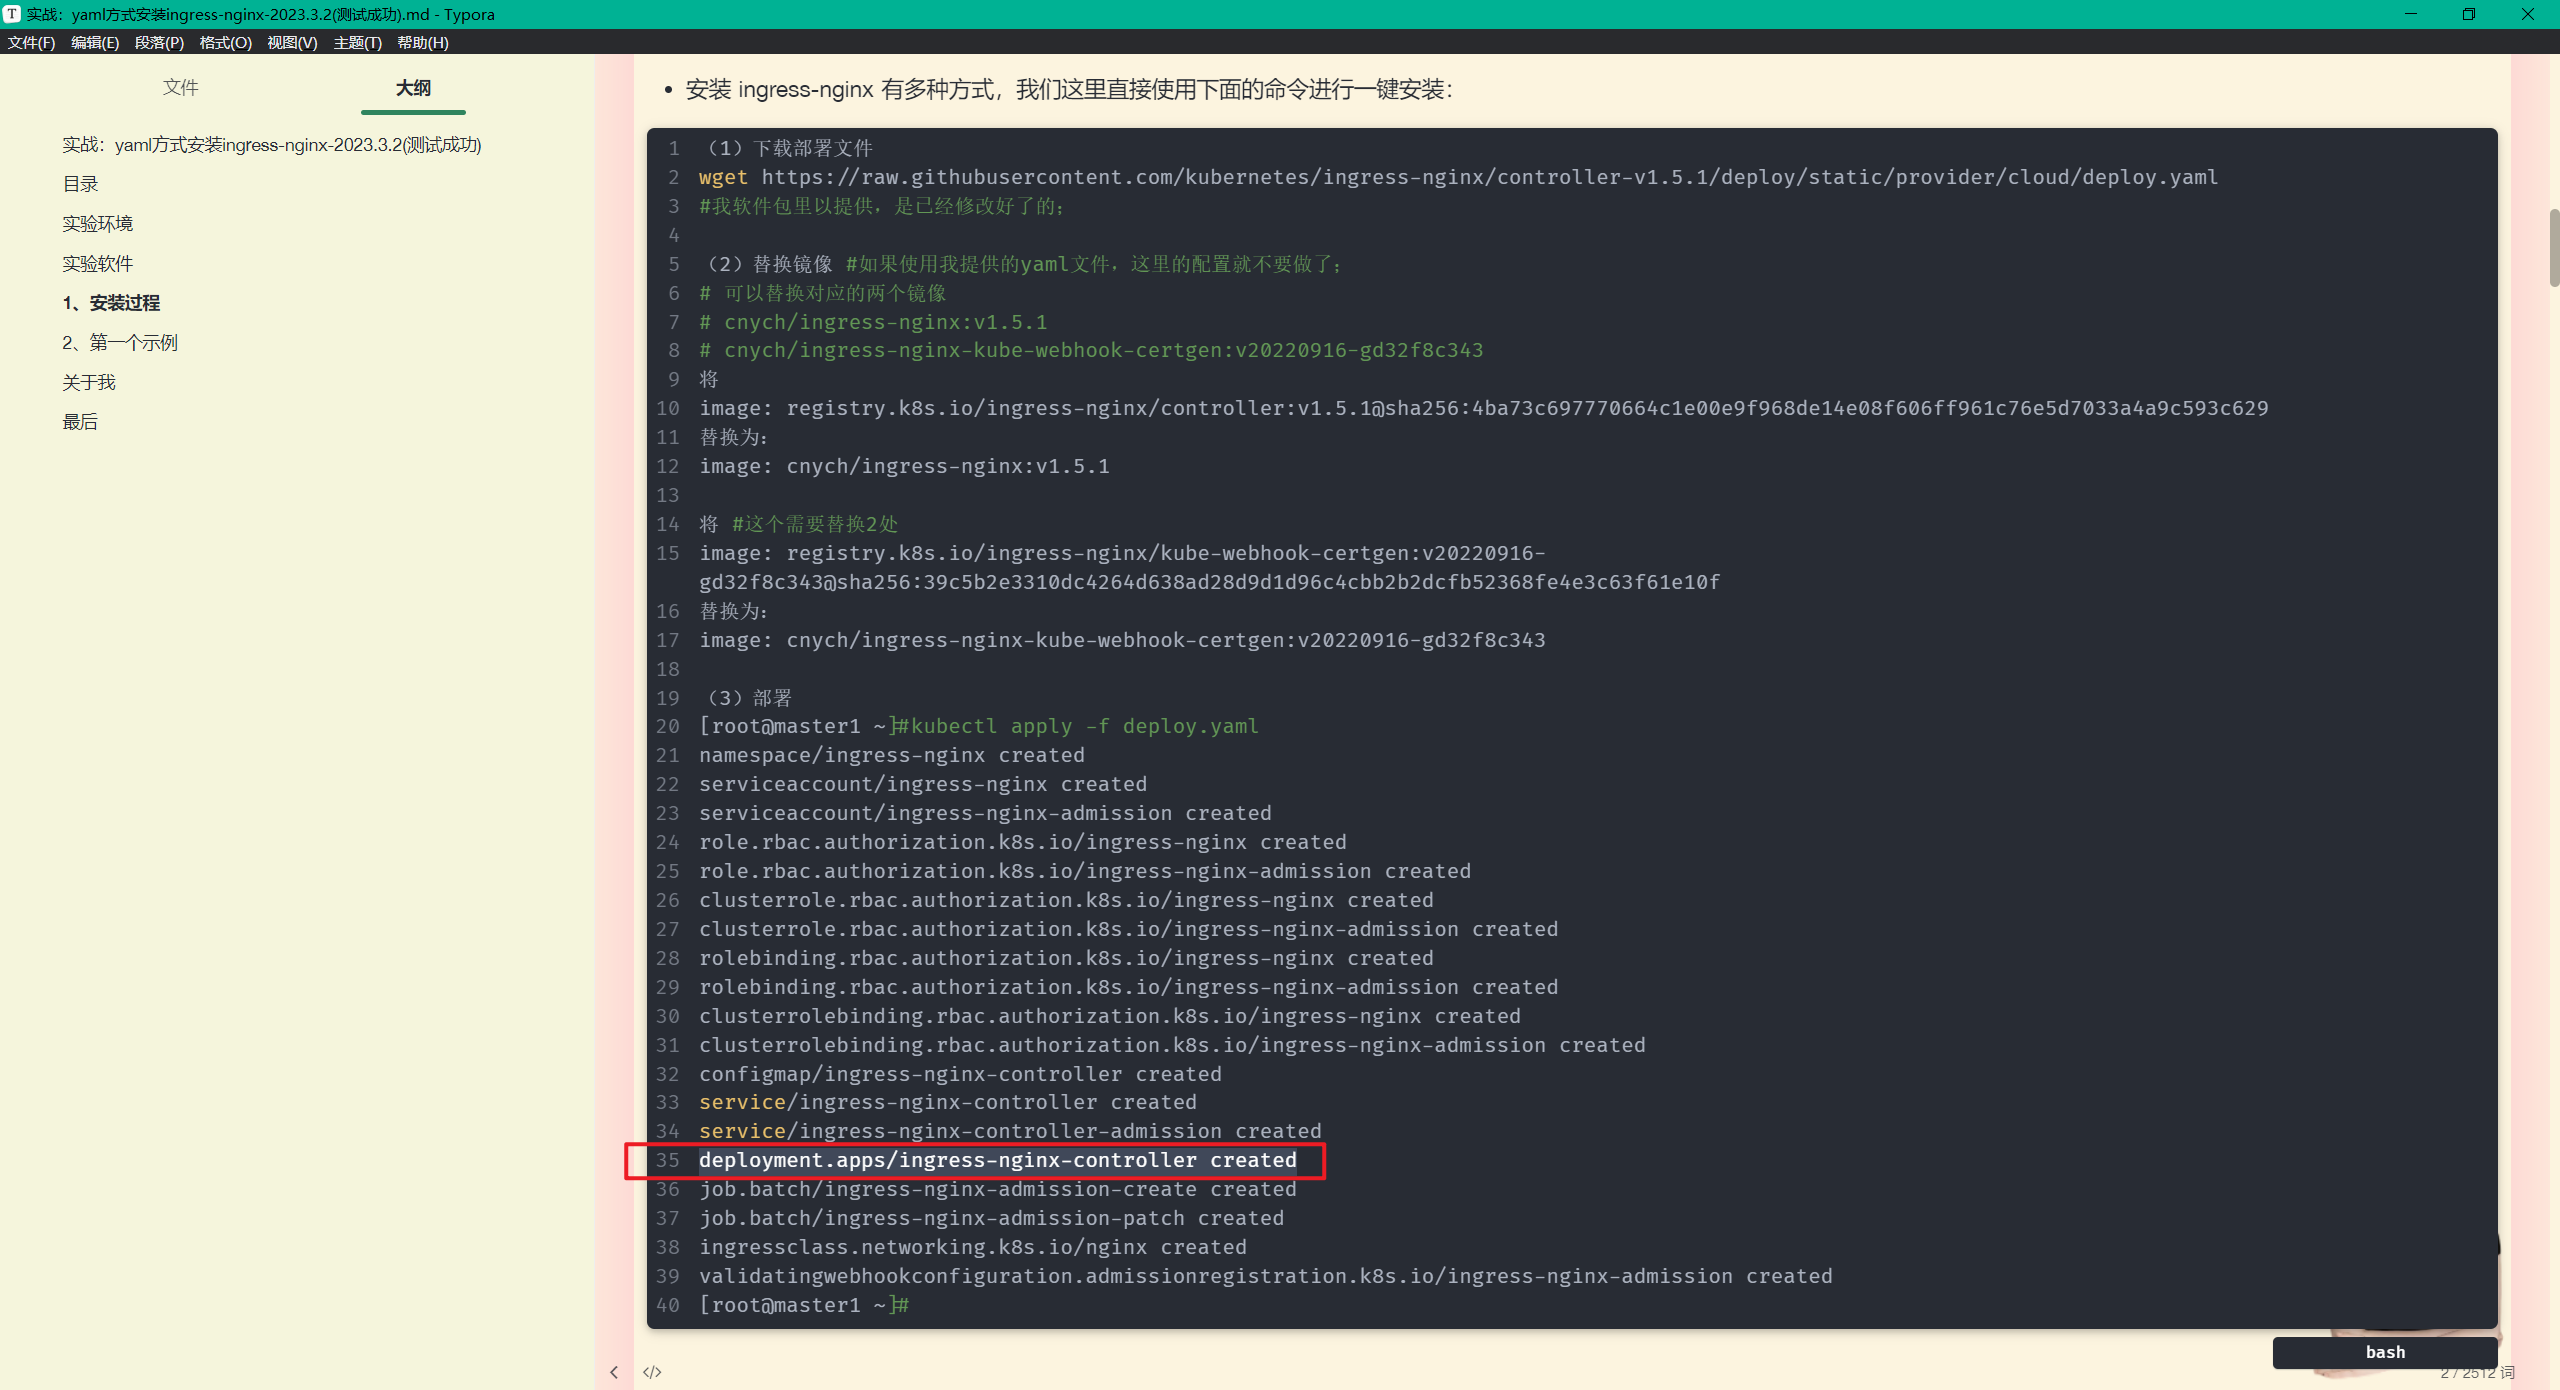
解决办法2:ingress-nginx-controller以daemonset方式部署。(ingress-nginx以daemonset形式部署+MetaLB方案就完美解决了)
那么,这里为什么ingress-nginx-controller svc的externalTrafficPolicy默认为``local`的呢?
当一个节点上访问另一个节点上的时候,这个时候是要做NAT的,此时我们想要在ingress-nginx-controller pod里获取我们的clinet ip地址不是一个真实的ip,而是node2的ip。
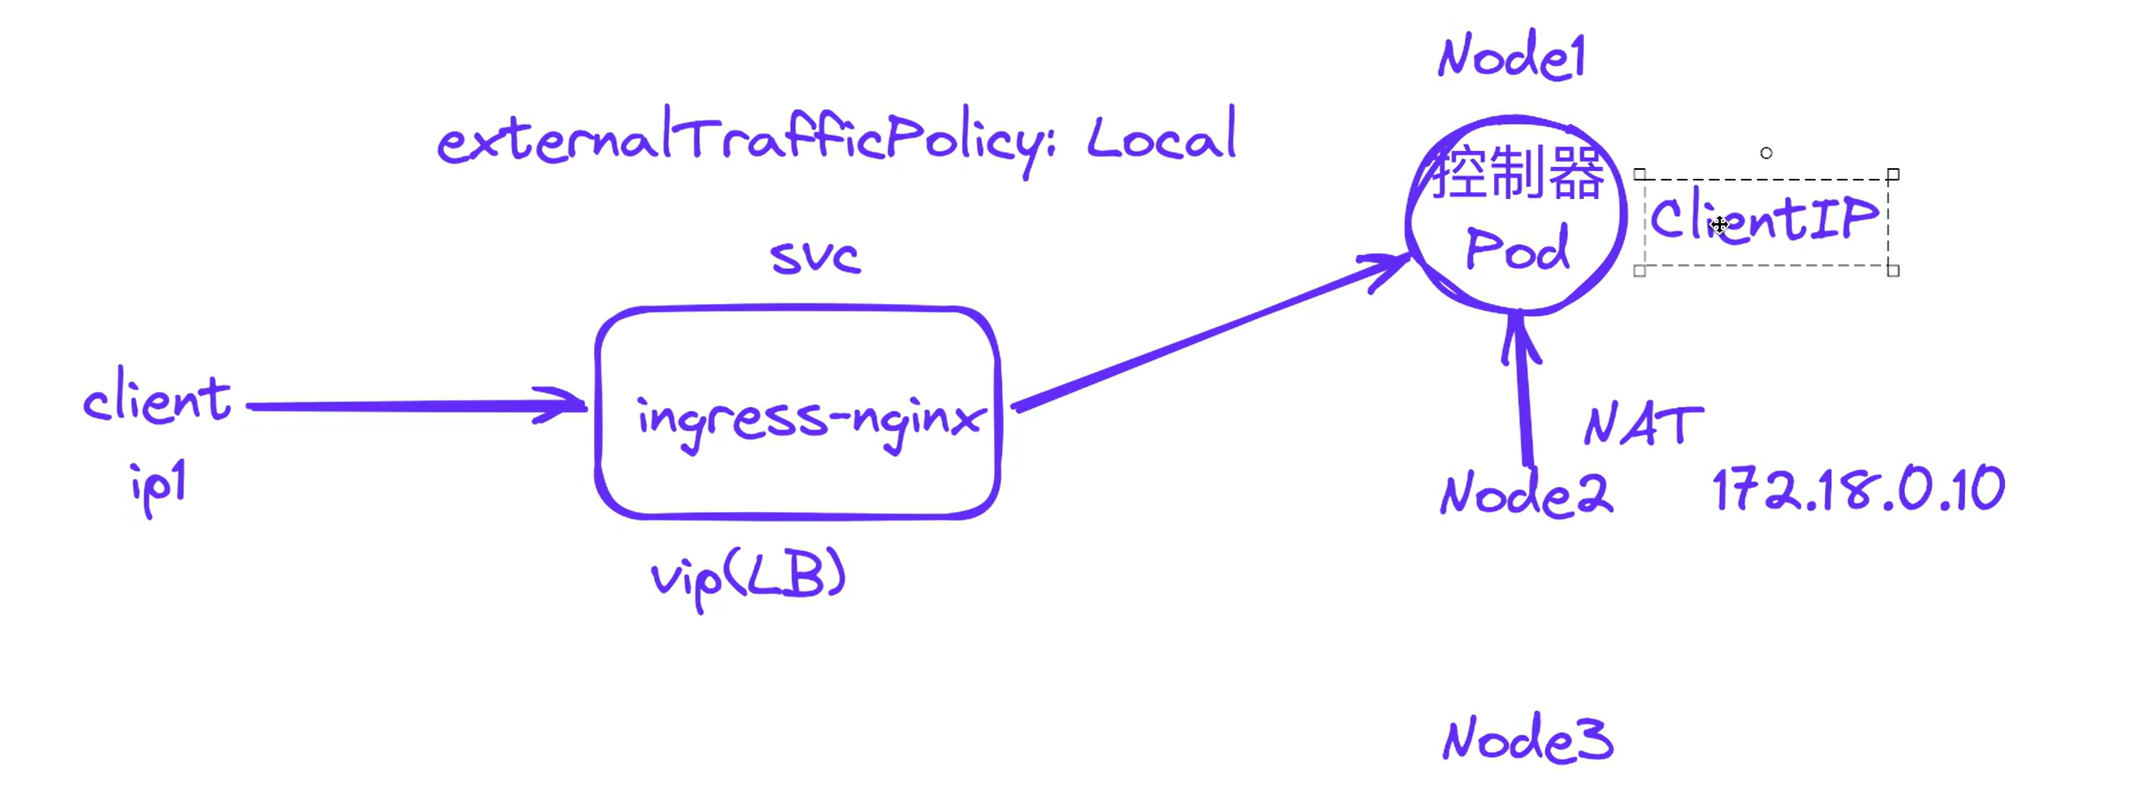
因此,实际环境里,很多同学在问,ingress-nginx-controller pod里获取我们的clinet ip地址不是一个真实的ip,这个该怎么搞呢?
所以,ingrexx-nginx官方将ingress-nginx-controller svc的externalTrafficPolicy默认为``local`,我们这里再采用ingress-nginx以daemonset形式部署+MetaLB方案就完美解决了。
- 这里使用第一种方法测试:
解决办法1:将ingress-nginx-controller svc的externalTrafficPolicy修改为Cluster
[root@master1 ~]#kubectl get svc -ningress-nginx
NAME                                 TYPE           CLUSTER-IP      EXTERNAL-IP   PORT(S)                      AGE
ingress-nginx-controller             LoadBalancer   10.96.228.157   172.29.9.60   80:30933/TCP,443:31697/TCP   3d11h
ingress-nginx-controller-admission   ClusterIP      10.105.93.22    <none>        443/TCP                      3d11h
[root@master1 ~]#kubectl edit svc ingress-nginx-controller -ningress-nginx
将
externalTrafficPolicy: Local
改为
externalTrafficPolicy: Cluster
[外链图片转存失败,源站可能有防盗链机制,建议将图片保存下来直接上传(img-IwRVwJpm-1677985346893)(https://bucket-hg.oss-cn-shanghai.aliyuncs.com/img/image-20230305105048560.png)]
再次测试:
[root@master1 ~]#curl lb-demo.172.29.9.60.nip.io
<!DOCTYPE html>
<html>
<head>
<title>Welcome to nginx!</title>
<style>
html { color-scheme: light dark; }
body { width: 35em; margin: 0 auto;
font-family: Tahoma, Verdana, Arial, sans-serif; }
</style>
</head>
<body>
<h1>Welcome to nginx!</h1>
<p>If you see this page, the nginx web server is successfully installed and
working. Further configuration is required.</p>

<p>For online documentation and support please refer to
<a href="http://nginx.org/">nginx.org</a>.<br/>
Commercial support is available at
<a href="http://nginx.com/">nginx.com</a>.</p>

<p><em>Thank you for using nginx.</em></p>
</body>
</html>
[root@master1 ~]#

[root@node1 ~]#curl lb-demo.172.29.9.60.nip.io
<!DOCTYPE html>
<html>
<head>
<title>Welcome to nginx!</title>
<style>
html { color-scheme: light dark; }
body { width: 35em; margin: 0 auto;
font-family: Tahoma, Verdana, Arial, sans-serif; }
</style>
</head>
<body>
<h1>Welcome to nginx!</h1>
<p>If you see this page, the nginx web server is successfully installed and
working. Further configuration is required.</p>

<p>For online documentation and support please refer to
<a href="http://nginx.org/">nginx.org</a>.<br/>
Commercial support is available at
<a href="http://nginx.com/">nginx.com</a>.</p>

<p><em>Thank you for using nginx.</em></p>
</body>
</html>
[root@node1 ~]#

[root@node2 ~]#curl lb-demo.172.29.9.60.nip.io
<!DOCTYPE html>
<html>
<head>
<title>Welcome to nginx!</title>
<style>
html { color-scheme: light dark; }
body { width: 35em; margin: 0 auto;
font-family: Tahoma, Verdana, Arial, sans-serif; }
</style>
</head>
<body>
<h1>Welcome to nginx!</h1>
<p>If you see this page, the nginx web server is successfully installed and
working. Further configuration is required.</p>

<p>For online documentation and support please refer to
<a href="http://nginx.org/">nginx.org</a>.<br/>
Commercial support is available at
<a href="http://nginx.com/">nginx.com</a>.</p>

<p><em>Thank you for using nginx.</em></p>
</body>
</html>
符合预期,此时,3个节点上都是可以正常访问的。
- 当然这里也是可以以daemonset方式部署ingress-nginx的。这里暂时不测试实验,知道即可。
2.创建svc测试
- 我们使用下面的资源对象来测试下:
# test-lb.yaml
apiVersion: apps/v1
kind: Deployment
metadata:
  name: nginx
spec:
  selector:
    matchLabels:
      app: nginx
  template:
    metadata:
      labels:
        app: nginx
    spec:
      containers:
      - name: nginx
        image: nginx
        ports:
        - containerPort: 80
---
apiVersion: v1
kind: Service
metadata:
  name: nginx
  labels:
    app: nginx
spec:
  type: LoadBalancer
  ports:
  - port: 80
    protocol: TCP
    name: http
  selector:
    app: nginx
- 直接应用上面的资源清单:
[root@master1 ~]# kubectl apply -f test-lb.yaml
deployment.apps/nginx created
service/nginx created
[root@master1 ~]# kubectl get pods -l app=nginx
NAME                     READY   STATUS    RESTARTS   AGE
nginx-7848d4b86f-qg49d   1/1     Running   0          41s
[root@master1 ~]# kubectl get svc nginx
NAME    TYPE           CLUSTER-IP      EXTERNAL-IP   PORT(S)        AGE
nginx   LoadBalancer   10.110.164.35   172.29.9.61   80:32692/TCP   46s
仔细观察上面的 Service 对象,其中的 EXTERNAL-IP 就是 MetalLB 为我们分配的 IP 地址。
- 我们可以直接通过该IP 地址来访问该服务:
[root@master1 ~]#curl 172.29.9.61 #在3个node节点上都是可以访问到的。
<!DOCTYPE html>
<html>
<head>
<title>Welcome to nginx!</title>
<style>
html { color-scheme: light dark; }
body { width: 35em; margin: 0 auto;
font-family: Tahoma, Verdana, Arial, sans-serif; }
</style>
</head>
<body>
<h1>Welcome to nginx!</h1>
<p>If you see this page, the nginx web server is successfully installed and
working. Further configuration is required.</p>

<p>For online documentation and support please refer to
<a href="http://nginx.org/">nginx.org</a>.<br/>
Commercial support is available at
<a href="http://nginx.com/">nginx.com</a>.</p>

<p><em>Thank you for using nginx.</em></p>
</body>
</html>
⚠️ 注意:为什么这里在3个节点上都是可以访问这个svc的vip的呢?
因为svc默认的
externalTrafficPolicy: Cluster的。
[root@master1 ~]#kubectl get svc nginx -oyaml
apiVersion: v1
kind: Service
metadata:
  annotations:
    kubectl.kubernetes.io/last-applied-configuration: |
      {"apiVersion":"v1","kind":"Service","metadata":{"annotations":{},"labels":{"app":"nginx"},"name":"nginx","namespace":"default"},"spec":{"ports":[{"name":"http","port":80,"protocol":"TCP"}],"selector":{"app":"nginx"},"type":"LoadBalancer"}}
  creationTimestamp: "2023-03-04T12:20:07Z"
  labels:
    app: nginx
  name: nginx
  namespace: default
  resourceVersion: "90098"
  uid: a2ded0db-469c-45fa-b274-00b7c99f7aaa
spec:
  allocateLoadBalancerNodePorts: true
  clusterIP: 10.110.164.35
  clusterIPs:
  - 10.110.164.35
  externalTrafficPolicy: Cluster #注意:这里默认是Cluster的;
  internalTrafficPolicy: Cluster
  ipFamilies:
  - IPv4
  ipFamilyPolicy: SingleStack
  ports:
  - name: http
    nodePort: 32692
    port: 80
    protocol: TCP
    targetPort: 80
  selector:
    app: nginx
  sessionAffinity: None
  type: LoadBalancer
status:
  loadBalancer:
    ingress:
    - ip: 172.29.9.61
[root@master1 ~]#
- 在每台 K8s 节点机器上面的 kube-ipvs0 网卡上面都能看到这个 LoadBalancer 的 VIP::
[root@master1 ~]#ip addr show kube-ipvs0
4: kube-ipvs0: <BROADCAST,NOARP> mtu 1500 qdisc noop state DOWN group default
    link/ether 7e:b7:17:53:60:8e brd ff:ff:ff:ff:ff:ff
……
    inet 172.29.9.61/32 scope global kube-ipvs0
       valid_lft forever preferred_lft forever
[root@master1 ~]#
⚠️ 注意:
- 上面我们创建的 Service 是自动从地址池中为我们分配的一个 IP 地址,此外我们也可以在 Service 对象中明确配置使用哪个 IP:
#test-lb-svc.yaml
apiVersion: v1
kind: Service
metadata:
  name: nginx2
spec:
  type: LoadBalancer
  loadBalancerIP: 172.29.9.62
  ports:
  - port: 80
    protocol: TCP
    name: http
  selector:
    app: nginx2
- 比如上面的对象我们可以通过 spec.loadBalancerIP 来明确指定需要使用的 IP 地址:
[root@master1 ~]#kubectl apply -f test-lb-svc.yaml
[root@master1 ~]# kubectl get svc nginx2
NAME     TYPE           CLUSTER-IP      EXTERNAL-IP   PORT(S)        AGE
nginx2   LoadBalancer   10.107.63.207   172.29.9.62   80:32039/TCP   25s
4、总结
我们可以看出 MetalLB 的二层模式是非常简单的(另一种 BGP 模式需要路由器支持),只要保证 IP 地址池与集群是同一个网段即可。当然缺点也很明显。
- 所有的流量都会在同一个节点上,该节点的容易成为流量的瓶颈当
- VIP 所在节点宕机之后,需要较长时间进行故障转移(一般在 10s),这主要是因为 MetalLB 使用了
memberlist来进行选主,当 VIP 所在节点宕机之后重新选主的时间要比传统的 keepalived 使用的 vrrp 协议要更长 - 难以定位 VIP 所在节点,MetalLB 并没有提供一个简单直观的方式让我们查看到底哪一个节点是 VIP 所属节点,基本只能通过抓包或者查看 pod 日志来确定,当集群规模变大的时候这会变得非常的麻烦
所以有条件的可以考虑使用 BGP 模式。
**MetalLB 项目目前处于 beta 阶段,但已被多个人员和公司用于生产和非生产集群中。**根据错误报告的频率,暂时未发现有较大的 BUG 出现。意思就是现在还没发布稳定版本,但是目前使用来看还是非常稳定的。

FAQ
2个crd
以前的配置还是比较麻烦的,现在是通过3个crd来实现的,还是很方便的。
nginx做代理
默认ingrexx-nginx svc是LoadBalancer模式的,这里是采用nodePort来访问的。我们访问域名要加上端口才行,当然这里使用nginx代理也行的,但是很麻烦。因此这里使用生产环境可以使用 LB + DaemonSet hostNetwork 模式就是最佳实践了。

关于我
我的博客主旨:
- 排版美观,语言精炼;
- 文档即手册,步骤明细,拒绝埋坑,提供源码;
- 本人实战文档都是亲测成功的,各位小伙伴在实际操作过程中如有什么疑问,可随时联系本人帮您解决问题,让我们一起进步!
? 微信二维码
x2675263825 (舍得), qq:2675263825。

? 微信公众号
《云原生架构师实战》

? 语雀
https://www.yuque.com/xyy-onlyone
? csdn
https://blog.csdn.net/weixin_39246554?spm=1010.2135.3001.5421

? 知乎
https://www.zhihu.com/people/foryouone

最后
好了,关于本次就到这里了,感谢大家阅读,最后祝大家生活快乐,每天都过的有意义哦,我们下期见!文章来源:https://uudwc.com/A/3wjb2
 文章来源地址https://uudwc.com/A/3wjb2
