目录
- 0.环境系统
- 1.安装es集群
- 2.配置es集群
- 2.1.修改es配置文件
- 2.2.修改JVM配置
- 3.系统配置
- 4.启动es集群
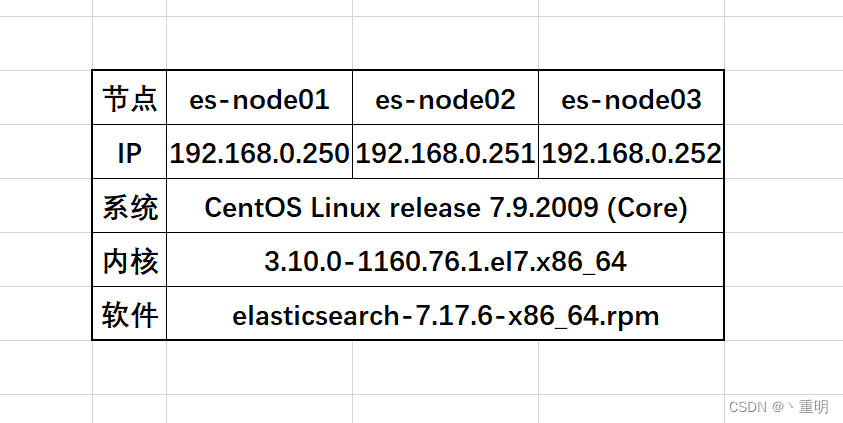
0.环境系统

1.安装es集群
- 下载及安装
wget https://artifacts.elastic.co/downloads/elasticsearch/elasticsearch-7.17.6-x86_64.rpm
wget https://artifacts.elastic.co/downloads/elasticsearch/elasticsearch-7.17.6-x86_64.rpm.sha512
yum install perl-Digest-SHA -y
shasum -a 512 -c elasticsearch-7.17.6-x86_64.rpm.sha512
rpm --install elasticsearch-7.17.6-x86_64.rpm
- 设置为系统启动时自动启动
systemctl daemon-reload
systemctl enable elasticsearch.service
- 服务启动与关闭(可以等修改完一些配置后再启动)
systemctl start elasticsearch.service
systemctl stop elasticsearch.service
- {如果你使用了密码保护es密钥库,则需要使用本地文件和系统环境变量提供密钥库密码}
mkdir /path/to -p
echo "espasswd" > /path/to/my_pwd_file.tmp
chmod 600 /path/to/my_pwd_file.tmp
chown elasticsearch.elasticsearch /path/to/my_pwd_file.tmp
systemctl set-environment ES_KEYSTORE_PASSPHRASE_FILE=/path/to/my_pwd_file.tmp
2.配置es集群
es服务有三个比较重要的文件:
es配置文件:elasticsearch.yml
JVM配置:jvm.options
日志记录配置:log4j2.properties
2.1.修改es配置文件
- 设置集群名称
cluster.name: my-es
- 设置节点名称(使用各自主机名)
node.name: es-node01
- 数据和日志存放路径(注意生产中不要使用默认路径,数据容易满)
path.data: /var/lib/elasticsearch
path.logs: /var/log/elasticsearch
- 网络设置
network.host: 0.0.0.0
- 集群设置(设置集群有多少节点)
discovery.seed_hosts: ["192.168.0.250", "192.168.0.251", "192.168.0.252"]
- 参与master选举设置
cluster.initial_master_nodes: ["192.168.0.250", "192.168.0.251", "192.168.0.252"]
2.2.修改JVM配置
- 限制内存大小(可以使用内存的一半,最大不超过32)
-Xms2g
-Xmx2g
对了,提一句,安装es会默认携带openjdk,如果使用自定义jdk请更改指向路径。
3.系统配置
- 设置文件句柄数(因为我使用阿里云主机,默认是配置好的)
vim /etc/security/limits.conf
root soft nofile 65535
root hard nofile 65535
* soft nofile 65535
* hard nofile 65535
- 禁用交换内存(阿里云同样没有这项)
sawpoff -a
# vim /etc/fstab 找到swap那行进行注释
- 设置虚拟内存
sysctl -w vm.max_map_count=262144

vim /etc/sysctl.conf
vm.max_map_count = 262144
sysctl -p
- 设置线程数
vim /etc/security/limits.conf
* soft nproc 4096
* hard nproc 4096
4.启动es集群
配置目前就先配置这么多了,还有很多配置可以参考官网
- 启动es集群
systemctl start elasticsearch.service
netstat -utpln
tcp6       0      0 :::9200                 :::*                    LISTEN      12535/java
tcp6       0      0 :::9300                 :::*                    LISTEN      12535/java
- 验证集群是否运行成功
es-node01:
curl 127.0.0.1:9200
{
  "name" : "es-node01",
  "cluster_name" : "my-es",
  "cluster_uuid" : "7_WxMzV4TjKE5xnyowvG3A",
  "version" : {
    "number" : "7.17.6",
    "build_flavor" : "default",
    "build_type" : "rpm",
    "build_hash" : "f65e9d338dc1d07b642e14a27f338990148ee5b6",
    "build_date" : "2022-08-23T11:08:48.893373482Z",
    "build_snapshot" : false,
    "lucene_version" : "8.11.1",
    "minimum_wire_compatibility_version" : "6.8.0",
    "minimum_index_compatibility_version" : "6.0.0-beta1"
  },
  "tagline" : "You Know, for Search"
}
es-node02:
curl 127.0.0.1:9200
{
  "name" : "es-node02",
  "cluster_name" : "my-es",
  "cluster_uuid" : "7_WxMzV4TjKE5xnyowvG3A",
  "version" : {
    "number" : "7.17.6",
    "build_flavor" : "default",
    "build_type" : "rpm",
    "build_hash" : "f65e9d338dc1d07b642e14a27f338990148ee5b6",
    "build_date" : "2022-08-23T11:08:48.893373482Z",
    "build_snapshot" : false,
    "lucene_version" : "8.11.1",
    "minimum_wire_compatibility_version" : "6.8.0",
    "minimum_index_compatibility_version" : "6.0.0-beta1"
  },
  "tagline" : "You Know, for Search"
}
es-node03:文章来源:https://uudwc.com/A/9X4V
curl 127.0.0.1:9200
{
  "name" : "es-node03",
  "cluster_name" : "my-es",
  "cluster_uuid" : "7_WxMzV4TjKE5xnyowvG3A",
  "version" : {
    "number" : "7.17.6",
    "build_flavor" : "default",
    "build_type" : "rpm",
    "build_hash" : "f65e9d338dc1d07b642e14a27f338990148ee5b6",
    "build_date" : "2022-08-23T11:08:48.893373482Z",
    "build_snapshot" : false,
    "lucene_version" : "8.11.1",
    "minimum_wire_compatibility_version" : "6.8.0",
    "minimum_index_compatibility_version" : "6.0.0-beta1"
  },
  "tagline" : "You Know, for Search"
}
- 查看哪个节点为主节点:*为主节点
curl http://192.168.0.250:9200/_cat/master
LnrA5H20Q8qtUeoxBAMrHQ 192.168.0.250 192.168.0.250 es-node01

curl http://192.168.0.250:9200/_cat/nodes
192.168.0.252 16 97 1 0.11 0.04 0.05 cdfhilmrstw - es-node03
192.168.0.250 18 96 2 0.03 0.05 0.09 cdfhilmrstw * es-node01
192.168.0.251 14 97 2 0.13 0.06 0.09 cdfhilmrstw - es-node02
因为是使用阿里云的内网部署的集群,所以在浏览器上看不到,可以部署kiana作为集群的前端页面来查看。文章来源地址https://uudwc.com/A/9X4V

