Docker镜像版nginx部署VUE前端项目(内网及外网步骤)
- 一:前端部署流程
- 1、准备资料:
- default.conf
- docker-compose.yml
- Dockerfile
- 2、开始部署
- 1、进入文件夹
- 2、打包前端镜像
- 3、启动容器
- 4、启动成功
- 参考:[Docker镜像+Nginx配置部署 Vue 项目](https://juejin.cn/post/6992848354753380389)
- 镜像版本部署流程:
- 1、原先的服务器镜像打包:
- 2、只需要将打包好的镜像放到新的服务器上
- 3、镜像部署 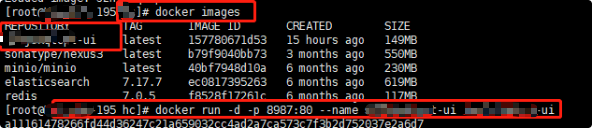
一:前端部署流程
1、准备资料:
将以下(除了nginx镜像)都放到一个新建的文件夹中
- 前端dist包
- default.conf配置文件
- docker-compose.yml配置
- Dockerfile 打包配置
- nginx镜像
default.conf
注意:
proxy_pass http://192.168.1.166:9999;
地址必须为写死的服务器地址
server {
    listen 80;
    server_name localhost;

    client_max_body_size 5M;

        location / {
                root /usr/share/nginx/html;
                index index.html;
                try_files $uri $uri/ /sys/$uri /index.html;
        }

    # 后端服务入口:注意维护新增微服务,gateway 路由前缀
    location ~* ^/(code|auth|admin|gen|inst|order|project) {
       proxy_pass http://192.168.1.166:9999;
       #proxy_set_header Host $http_host;
       proxy_connect_timeout 60s;
       proxy_send_timeout 60s;
       proxy_read_timeout 60s;
       proxy_set_header X-Real-IP $remote_addr;
       proxy_set_header X-Forwarded-For $proxy_add_x_forwarded_for;
       proxy_set_header X-Forwarded-Proto http;
    }
    # 避免端点安全问题
    if ($request_uri ~ "/actuator"){
        return 403;
    }

}
docker-compose.yml
version: '3'
services:

  admin-ui:
    image: admin-ui #镜像名称
    privileged: true
    restart: always
    container_name: admin-ui #容器名称
    networks:
      - pig_default
    external_links:
      - pig-gateway
    ports:
      - 80:80

# 加入到后端网络, 默认为 pig_default  | docker network ls   查看
networks:
  pig_default:
    external: true
Dockerfile
注意:
FROM admin-nginx:latest
必须为nginx镜像名称
FROM admin-nginx:latest
MAINTAINER admin # 维护者信息

# 将项目根目录下dist文件夹下的所有文件复制到镜像中 /usr/share/nginx/html/ 目录下
COPY admin-ui/ /usr/share/nginx/html/
COPY default.conf /etc/nginx/conf.d/default.conf
2、开始部署
1、进入文件夹
cd /home/hc
2、打包前端镜像
docker build -t admin-ui .
3、启动容器
docker run -d -p 80:80 --name admin-ui admin-ui
4、启动成功
参考:Docker镜像+Nginx配置部署 Vue 项目
镜像版本部署流程:
参考:镜像打包
1、原先的服务器镜像打包:
1、准备好需要打包的镜像及文件夹
2、打包:docker save -o admin-ui.tar admin-ui(通过nginx部署的需要把nginx也打包放上去)文章来源:https://uudwc.com/A/Ey4An
2、只需要将打包好的镜像放到新的服务器上

通过解压缩镜像命令 docker load <文章来源地址https://uudwc.com/A/Ey4An