学习博客:[iOS]-OC对象底层探索
1. 类与对象
1.1 类和对象的本质
1.1.1 对象
对象的本质是结构体。
@interface TestPerson : NSObject {
    // 成员变量
    // @public
    NSString *_age; // 4个字节
}
@property (nonatomic, copy) NSString *name; // 属性

@end

@implementation TestPerson

@end
分析编译生成的main.cpp文件。
#ifndef _REWRITER_typedef_TestPerson
#define _REWRITER_typedef_TestPerson
typedef struct objc_object TestPerson;
typedef struct {} _objc_exc_TestPerson;
#endif

extern "C" unsigned long OBJC_IVAR_$_TestPerson$_name;
struct TestPerson_IMPL {
	struct NSObject_IMPL NSObject_IVARS;
	NSString *_age;
	NSString *_name;
};

// @property (nonatomic, copy) NSString *name;
/* @end */

// @implementation TestPerson

static NSString * _I_TestPerson_name(TestPerson * self, SEL _cmd) { return (*(NSString **)((char *)self + OBJC_IVAR_$_TestPerson$_name)); }
extern "C" __declspec(dllimport) void objc_setProperty (id, SEL, long, id, bool, bool);

static void _I_TestPerson_setName_(TestPerson * self, SEL _cmd, NSString *name) { objc_setProperty (self, _cmd, __OFFSETOFIVAR__(struct TestPerson, _name), (id)name, 0, 1); }
// @end
通过这个TestPerson类我们发现:
- OC中的TestPerson类底层是struct TestPerson_IMPL结构体。
- OC中@interface TestPerson : NSObject,TestPerson继承NSObject底层是typedef struct objc_object TestPerson;这样体现的。
- 首先数入参TestPerson * self,SEL _cmd,所有OC方法都有这两个隐藏参数,所以我们可以在OC的方法中使用self指针,但是这两个参数对外是不显示的。
- 看到getter和setter里是通过首地址指针+对应成员变量的地址值指针的偏移量的方式取和存的,最终通过(*(NSString **)还原为string类型。取值的过程就是:先拿到当前成员变量的地址,再去取这个地址里面所存的值。
在TestPerson_IMPL结构体中定义有成员变量_age和_name。同时还定义了一个结构体struct NSObject_IMPL NSObject_IVARS;。
那么关于NSObject_IMPL的实现(runtime源码)是:
struct objc_object {
private:
    isa_t isa;

public:
....省略方法部分(该部分非常多)
这个结构体储存了一个isa_t类型的isa。
而isa_t这个类型只有一个成员变量,存储了对象所属类的信息[Class cls]
- TestPerson这个类在底层编译成了TestPerson_IMP结构体。
- 成员NSObjct_IVARS,这是一个结构体,里面只包含了isa。
- 成员age,是我们类里面的成员变量。
- 成员_name,是我们类里面的属性,编译成了带有_下划线的成员。
- 函数_I_TestPerson_name,实际上就是getter方法,包含两个默认参数self、_cmd。
- 函数_I_TestPerson_setName_,实际上就是setter方法,包含两个默认参数self、_cmd,与一个形参name。
根据编译,我们可以得出以下结论:
- 对象的本质在底层就是一个objc_object结构体。
- 属性与成员变量的区别,属性是由成员变量+getter方法+setter方法组成。
1.1.2 类结构
struct objc_class : objc_object {
  objc_class(const objc_class&) = delete;
  objc_class(objc_class&&) = delete;
  void operator=(const objc_class&) = delete;
  void operator=(objc_class&&) = delete;
    // Class ISA;
    Class superclass;
    cache_t cache;             // formerly cache pointer and vtable
    class_data_bits_t bits;    // class_rw_t * plus custom rr/alloc flags
objc_class继承于objc_object,即类的本质也是一个对象。其中isa指针式其继承自objc_object的,所以代码里才注释了// Class ISA(isa是结构体,其中会存储类的地址,其并不是指针,“isa指向”这句话严格来说是不正确的,但是方便理解);
- 方法缓存在cache中的bucket_t结构体里。
- 方法储存在class_rw_t中的method_array_t二维数组里。
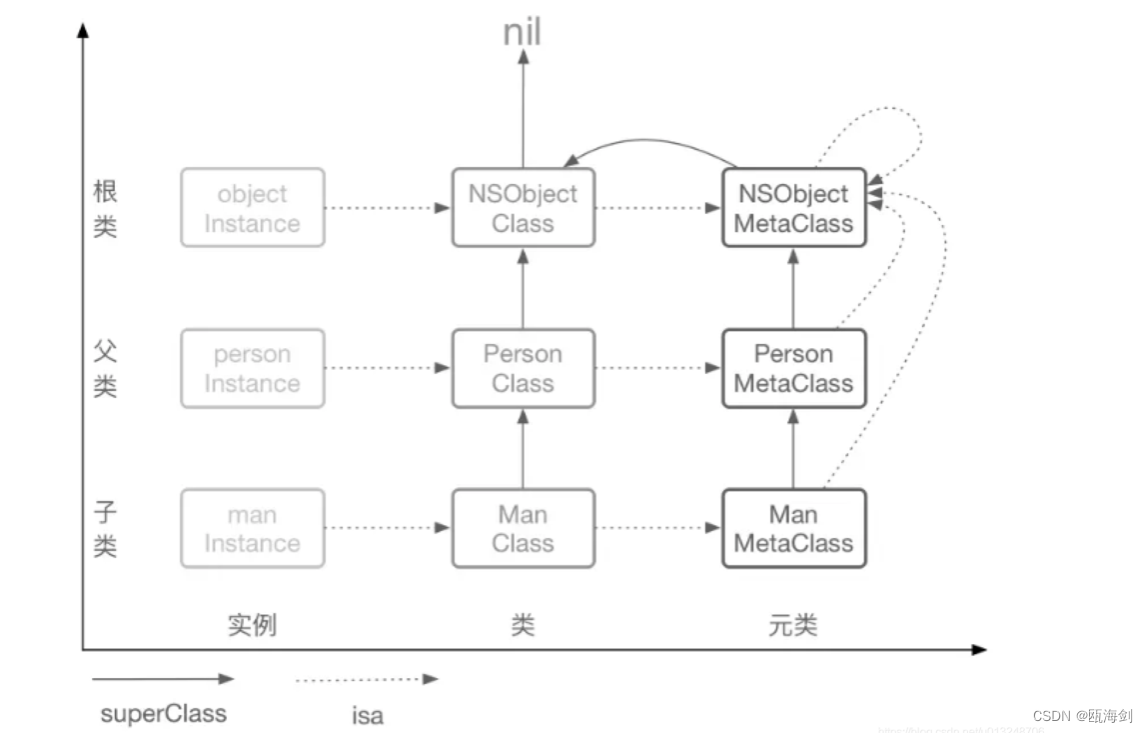
1.2 对象、类、父类、元类的关系
1.2.1 对象
对象的本质是一个结构体,而id,是指向这个结构体的指针。
1.2.2 类
类的本质也是个对象,其中isa指针式其继承自objc_object的。
1.2.3 元类
其原理就是OC对象在发送消息时,运行时库会追寻着对象的isa指针得到对象所属的类。这个类包含了能应用于这个类的所有实例方法以及指向父类的指针,以便可以找到父类的实例方法。运行时库检查这个类和其父类的方法列表,找到与消息对应的方法。编译器会将消息转换为消息函数objc_msgSend进行调用
我们有时也会有对类发送消息的情况:
NSString *string = [NSString stringFormFormat@"string"];
从此处我们可以知道,OC的类其实也是一个对象,一个对象就要有一个它属于的类,意味着类也要有一个isa指针,指向其所属的类。那么类的类是什么呢?就是我们所说的元类(MetaClass),所以,元类就是类对象的所属类。
所以从消息机制的层面来讲:
- 当你给对象发消息时,消息会寻找这个对象的类的方法列表
- 当你给类发消息时,消息是在寻找这个类的元类的方法列表
OC的类信息存放在哪里?
答:对象方法、属性、成员变量、协议信息,存放在class对象中
类方法存放在meta-class对象中(元类对象和class内存结构是一样的 但是用途不一样 主要有类方法的类信息 其他为空的)
成员变量的具体值存放在instance对象中
1.2.4 元类的类
即是根类
有一个问题,如果按类的类是元类这个逻辑理解,是否可以一直循环下去?
- 答案是肯定不行的,因为一定会有一个坐为最原始的那个类,那么这个类就是元类的类:所有的元类都使用根元类作为他们的类。根元类的 isa 指针指向了它自己。
1.2.5 关系图

2. isa详解
继承自objc_object的isa指针,不仅实例对象中有,类对象中也有。
2.1 isa_t结构体
这里我们来详解一下isa指针,即isa_t结构体
每个OC对象都含有一个isa指针,__arm64__之前,isa仅仅是一个指针,保存着对象或类对象内存地址,在__arm64__架构之后,apple对isa进行了优化,变成了一个共用体(union)结构,同时使用位域来存储更多的信息。
先看一下isa_t的代码定义:
union isa_t
{
    Class cls;
    uintptr_t bits;
    //bits的结构体
    struct {
         uintptr_t nonpointer        : 1;//->表示使用优化的isa指针
         uintptr_t has_assoc         : 1;//->是否包含关联对象
         uintptr_t has_cxx_dtor      : 1;//->是否设置了析构函数,如果没有,释放对象更快
         uintptr_t shiftcls          : 33; // MACH_VM_MAX_ADDRESS 0x1000000000 ->类的指针
         uintptr_t magic             : 6;//->固定值,用于判断是否完成初始化
         uintptr_t weakly_referenced : 1;//->对象是否被弱引用
         uintptr_t deallocating      : 1;//->对象是否正在销毁
         uintptr_t has_sidetable_rc  : 1;//1->在extra_rc存储引用计数将要溢出的时候,借助Sidetable(散列表)存储引用计数,has_sidetable_rc设置成1
        uintptr_t extra_rc          : 19;  //->存储引用计数,实际的引用计数减一,存储的是其对象以外的引用计数
    };
};
从isa_t的定义中可以看出
提供了两个成员,cls和bits,由联合体可知这两个成员是互斥的,也就意味着,当初始化isa指针时,有两种初始化方式。
- 通过
cls初始化,bits无默认值; - 通过
bits初始化,cls无默认值。

bits里的结构体变量:
-
nonpointer:用来标记这个对象是不是tagpointer类型的对象,因为iOS对oc对象进行了优化处理,有些对象是tagpointer类型的,因此这些对象是没有isa指针的,tagpointer的内存一般是在栈中的,而不是在堆里面;tagpointer对象一般是NSNumber类型的数值较小的数,或NSString类型的较小的字符串。 -
has_assoc:用来标记有没有关联对象。 -
has_cxx_dtor:该对象是否有C++或者Objc的析构器,如果有析构函数,则需要做析构逻辑,如果没有,则可以更快的释放对象。 -
shiftcls:存储的isa指针地址,也就是类对象的地址。 -
magic:用于调试器判断当前对象是真的对象还是没有初始化的空间。 -
weakly_referenced:对象是否被指向或者曾经指向一个ARC的弱变量,没有弱引用的对象可以更快释放。 -
deallocating:标志对象是否正在释放内存。 -
has_sidetable_rc:标记对象是否使用了Sidetable,当对象引用计数大于10时,则需要借用该变量存储进位。 -
extra_rc:当表示该对象的引用计数值,实际上是引用计数值减1, 例如:如果对象的引用计数为10,那么extra_rc为9。如果引用计数大于10,则需要使用到下面的has_sidetable_rc。
2.2 isa的初始化过程
看过了isa_t的底层结构,现在我们来看一下isa的初始化过程,来探索isa_t的底层实现,初始化过程发生在alloc方法的底层流程中的这一步:
    /// 将类和指针做绑定
    obj->initInstanceIsa(cls, hasCxxDtor);
此过程包含了 isa 的初始过程,要探究 isa 的底层实现,我们就从isa的创建开始:
inline void
objc_object::initInstanceIsa(Class cls, bool hasCxxDtor)
{
    ASSERT(!cls->instancesRequireRawIsa());
    ASSERT(hasCxxDtor == cls->hasCxxDtor());
	//下方函数调用就是isa的初始过程
    initIsa(cls, true, hasCxxDtor);
}
initIsa() 内容如下:
inline void
objc_object::initIsa(Class cls)
{
    initIsa(cls, false, false);
}

inline void
objc_object::initIsa(Class cls, bool nonpointer, UNUSED_WITHOUT_INDEXED_ISA_AND_DTOR_BIT bool hasCxxDtor)
{
    ASSERT(!isTaggedPointer());

    isa_t newisa(0);

    if (!nonpointer) {
        newisa.setClass(cls, this);
    } else {
        ASSERT(!DisableNonpointerIsa);
        ASSERT(!cls->instancesRequireRawIsa());


#if SUPPORT_INDEXED_ISA
        ASSERT(cls->classArrayIndex() > 0);
        newisa.bits = ISA_INDEX_MAGIC_VALUE;
        // isa.magic is part of ISA_MAGIC_VALUE
        // isa.nonpointer is part of ISA_MAGIC_VALUE
        newisa.has_cxx_dtor = hasCxxDtor;
        newisa.indexcls = (uintptr_t)cls->classArrayIndex();
#else
        newisa.bits = ISA_MAGIC_VALUE;
        // isa.magic is part of ISA_MAGIC_VALUE
        // isa.nonpointer is part of ISA_MAGIC_VALUE
#   if ISA_HAS_CXX_DTOR_BIT
        newisa.has_cxx_dtor = hasCxxDtor;
#   endif
        newisa.setClass(cls, this);
#endif
        newisa.extra_rc = 1;
    }

    // This write must be performed in a single store in some cases
    // (for example when realizing a class because other threads
    // may simultaneously try to use the class).
    // fixme use atomics here to guarantee single-store and to
    // guarantee memory order w.r.t. the class index table
    // ...but not too atomic because we don't want to hurt instantiation
    isa = newisa;
}
我们可以看到方法内创建了一个isa_t类型的 newisa 实例, 做了 赋值操作后,返回了 newisa。 那么,接着我们就来详细的看一下这个isa_t的底层实现。
下面我们来看一下runtime中的源码定义的isa_t共用体:
union isa_t {
    isa_t() { }
    isa_t(uintptr_t value) : bits(value) { }

    uintptr_t bits;

private:
    // Accessing the class requires custom ptrauth operations, so
    // force clients to go through setClass/getClass by making this
    // private.
    Class cls;

public:
#if defined(ISA_BITFIELD)
    struct {
        ISA_BITFIELD;  // defined in isa.h
    };

    bool isDeallocating() {
        return extra_rc == 0 && has_sidetable_rc == 0;
    }
    void setDeallocating() {
        extra_rc = 0;
        has_sidetable_rc = 0;
    }
#endif

    void setClass(Class cls, objc_object *obj);
    Class getClass(bool authenticated);
    Class getDecodedClass(bool authenticated);
};
isa_t 是一个联合体, 有两个成员变量一个是 bits, 还有一个 是 cls。我们知道 联合体 中各变量是互斥的, 它的优点是内存使用更为精细灵活。 所以,也就是说, isa_t 有两种初始化方式:
-
bits被赋值,cls没有值或者值被覆盖; -
cls被赋值,bits没有值或者值被覆盖。
2.3 ISA_BITFIELD
isa_t 中还有一个成员变量 是 结构体 ISA_BITFIELD, 这个宏定义对应 arm64 和 x86_64 即 iOS 和 MacOS 两个端的实现。 ISA_BITFIELD 通过位域存储信息,具体存储信息如下:
# if __arm64__
// ARM64 simulators have a larger address space, so use the ARM64e
// scheme even when simulators build for ARM64-not-e.
#   if __has_feature(ptrauth_calls) || TARGET_OS_SIMULATOR
#     define ISA_MASK        0x007ffffffffffff8ULL
#     define ISA_MAGIC_MASK  0x0000000000000001ULL
#     define ISA_MAGIC_VALUE 0x0000000000000001ULL
#     define ISA_HAS_CXX_DTOR_BIT 0
#     define ISA_BITFIELD                                                      \
        uintptr_t nonpointer        : 1;                                       \
        uintptr_t has_assoc         : 1;                                       \
        uintptr_t weakly_referenced : 1;                                       \
        uintptr_t shiftcls_and_sig  : 52;                                      \
        uintptr_t has_sidetable_rc  : 1;                                       \
        uintptr_t extra_rc          : 8
#     define RC_ONE   (1ULL<<56)
#     define RC_HALF  (1ULL<<7)
#   else
#     define ISA_MASK        0x0000000ffffffff8ULL
#     define ISA_MAGIC_MASK  0x000003f000000001ULL
#     define ISA_MAGIC_VALUE 0x000001a000000001ULL
#     define ISA_HAS_CXX_DTOR_BIT 1
#     define ISA_BITFIELD                                                      \
        uintptr_t nonpointer        : 1;                                       \
        uintptr_t has_assoc         : 1;                                       \
        uintptr_t has_cxx_dtor      : 1;                                       \
        uintptr_t shiftcls          : 33; /*MACH_VM_MAX_ADDRESS 0x1000000000*/ \
        uintptr_t magic             : 6;                                       \
        uintptr_t weakly_referenced : 1;                                       \
        uintptr_t unused            : 1;                                       \
        uintptr_t has_sidetable_rc  : 1;                                       \
        uintptr_t extra_rc          : 19
#     define RC_ONE   (1ULL<<45)
#     define RC_HALF  (1ULL<<18)
#   endif

# elif __x86_64__
#   define ISA_MASK        0x00007ffffffffff8ULL
#   define ISA_MAGIC_MASK  0x001f800000000001ULL
#   define ISA_MAGIC_VALUE 0x001d800000000001ULL
#   define ISA_HAS_CXX_DTOR_BIT 1
#   define ISA_BITFIELD                                                        \
      uintptr_t nonpointer        : 1;                                         \
      uintptr_t has_assoc         : 1;                                         \
      uintptr_t has_cxx_dtor      : 1;                                         \
      uintptr_t shiftcls          : 44; /*MACH_VM_MAX_ADDRESS 0x7fffffe00000*/ \
      uintptr_t magic             : 6;                                         \
      uintptr_t weakly_referenced : 1;                                         \
      uintptr_t unused            : 1;                                         \
      uintptr_t has_sidetable_rc  : 1;                                         \
      uintptr_t extra_rc          : 8
#   define RC_ONE   (1ULL<<56)
#   define RC_HALF  (1ULL<<7)

# else
#   error unknown architecture for packed isa
# endif

// SUPPORT_PACKED_ISA
#endif
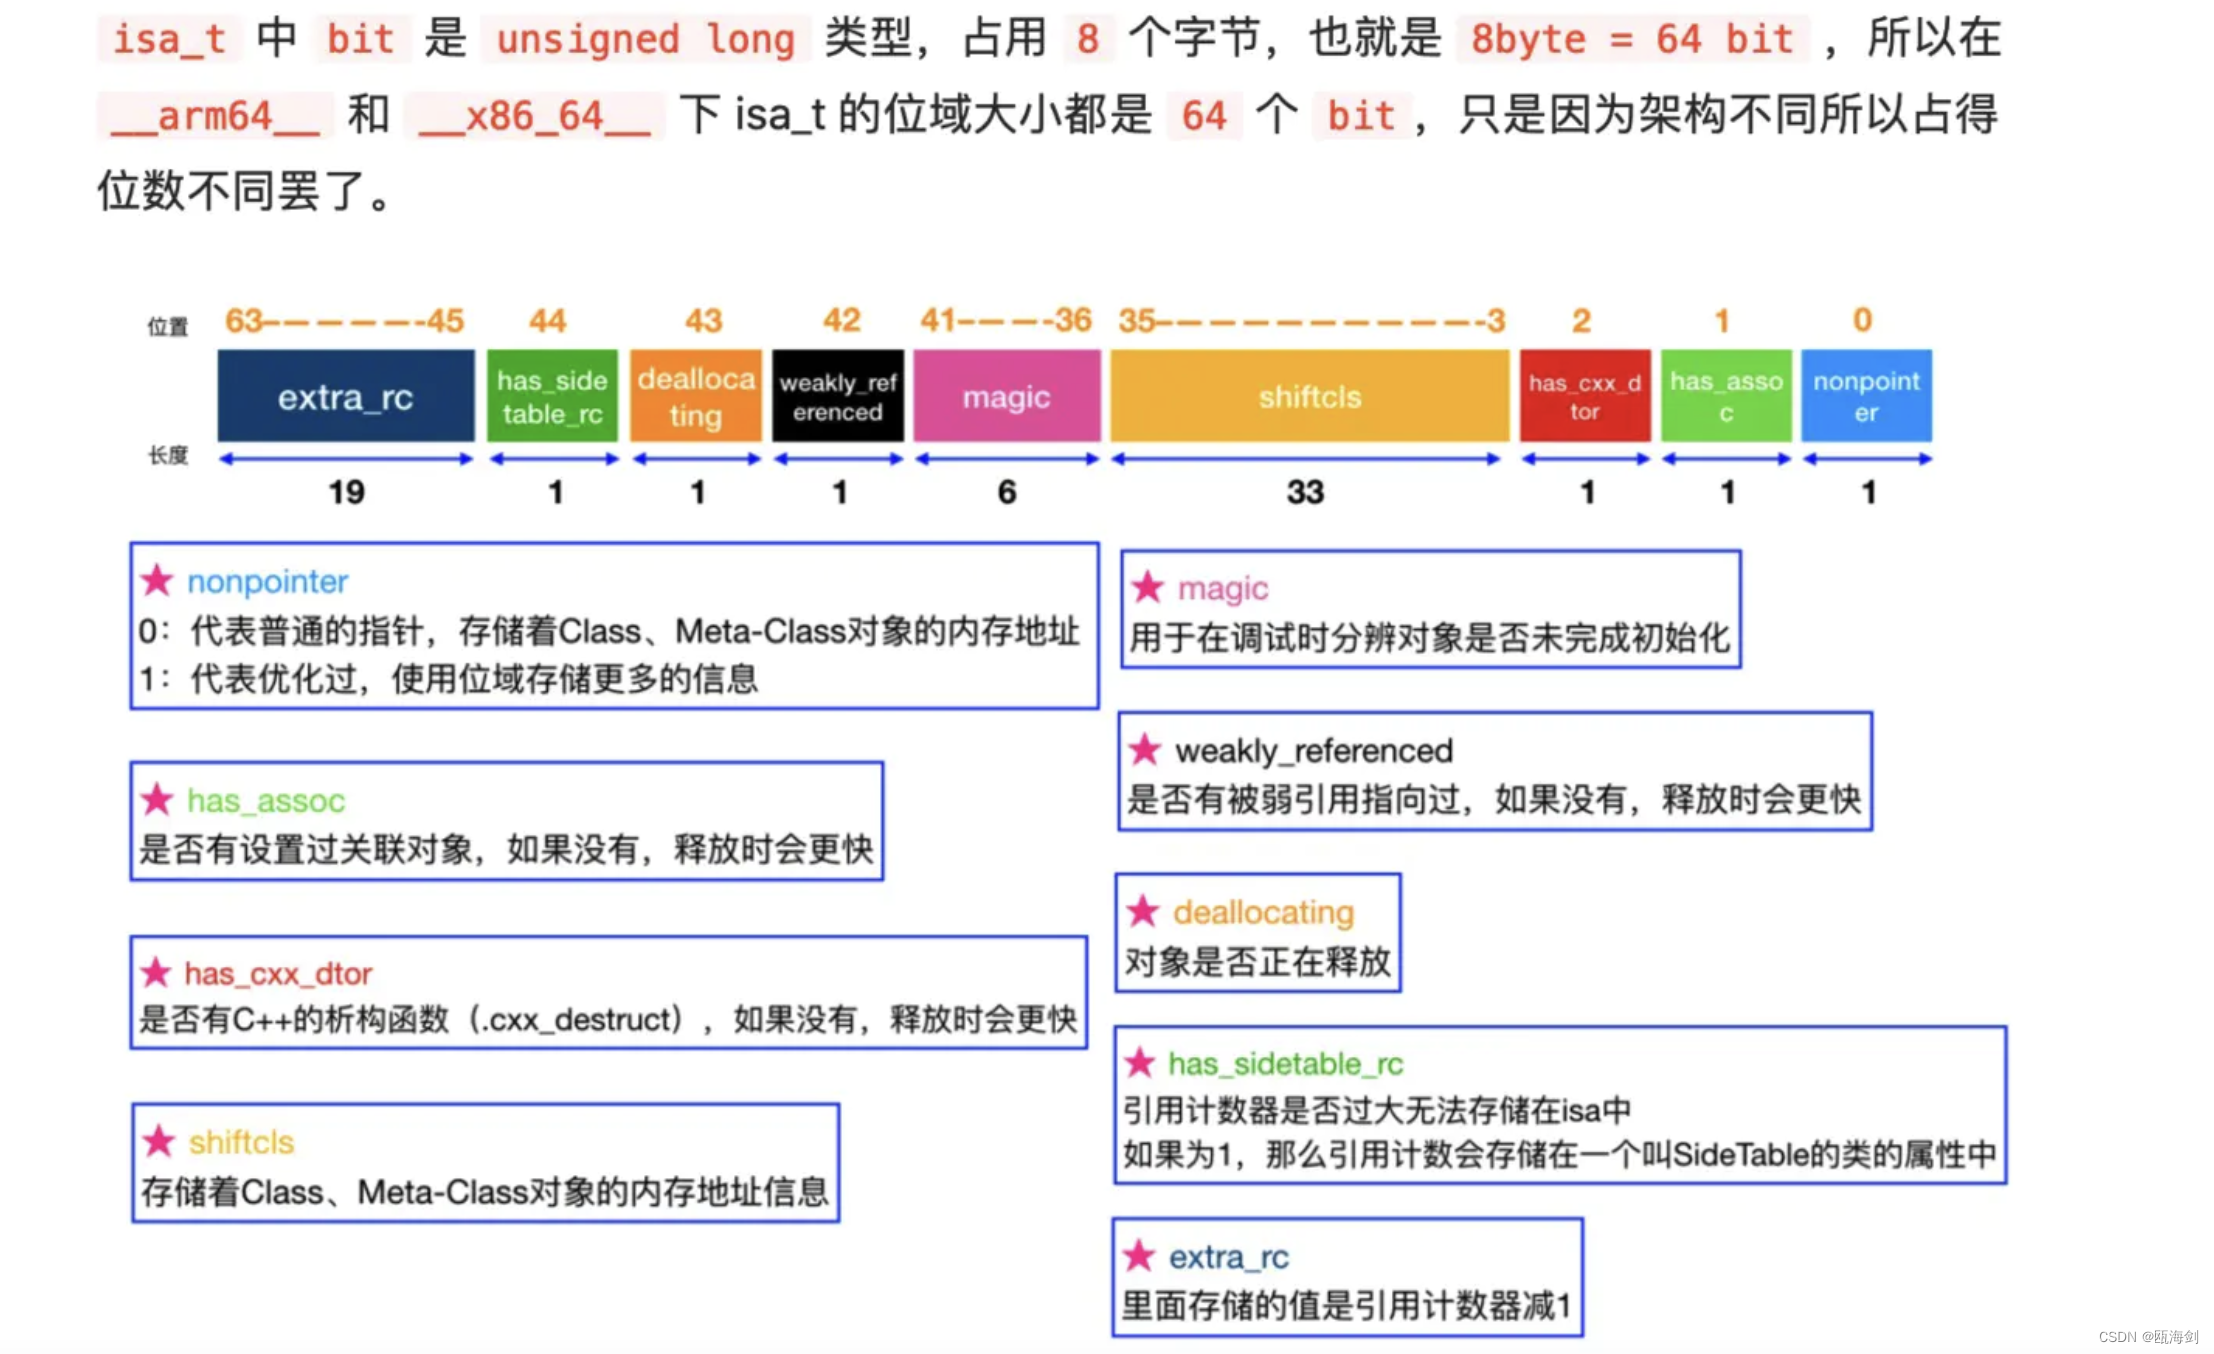
为来更直观的理解上面 位域 ISA_BITFIELD存储的信息, 我们画个图来解析一下以上这段很长的代码。
arm64架构下的isa:
x86_64架构下的isa:
另外,我们发现源码中经常会用到assert()函数,该函数的作用如下:
其作用是如果它的条件返回错误,则终止程序执行。
assert的作用是先计算表达式 expression ,如果其值为假(即为0),那么它先向stderr打印一条出错信息,然后通过调用 abort 来终止程序运行。
附加:初始化isa_t的代码为:
newisa.bits = ISA_INDEX_MAGIC_VALUE;
// isa.magic is part of ISA_MAGIC_VALUE
// isa.nonpointer is part of ISA_MAGIC_VALUE
这个里面说的很明白 news.bits初始化时候只设置了nonpointer,magic两个部分,其余部分都没有进行设置,故值都为0。
2.4 class方法
首先Class这里需要注意几点
-
class ObjectClass = [[nsobject class]class];返回的还是class对象,并不是meta-class对象。- (Class)class, +(Class)class返回的就是类对象 - 元类对象和
class内存结构是一样的 但是用途不一样 主要有类方法的类信息 其他为空的 - 类对象在内存中有且仅有一个对象 主要包括
isa指针super Class指针 类的属性信息 类的对象方法信息 类的协议信息 类的成员变量信息
//instance实例对象
        NSObject *object1 = [[NSObject alloc] init];
        NSObject *object2 = [[NSObject alloc] init];

        //class对象,类对象
        //objectClass1~5都是NSObject的类对象
        Class objectClass1 = [object1 class];
        Class objectClass2 = [object2 class];
        Class objectClass3 = [NSObject class];
        Class objectClass4 = object_getClass(object1);
        Class objectClass5 = object_getClass(object2);

        //元类对象(将类对象当作参数传入进去)
        Class objectMetaClass = object_getClass([NSObject class]);
        Class objectMetaClass2 = [[NSObject class] class];

        //判断是不是元类对象

        NSLog(@"instance - %p %p", object1, object2);
        NSLog(@"class - %p %p %p %p %p %d", objectClass1,objectClass2, objectClass3, objectClass4, objectClass5, class_isMetaClass(objectClass3 ));
        NSLog(@"mateClass - %p %p %d",objectMetaClass, objectMetaClass2, class_isMetaClass(objectMetaClass));

输出情况:
instance - 0x100511920 0x10050e840
class - 0x7fff91da2118 0x7fff91da2118 0x7fff91da2118 0x7fff91da2118 0x7fff91da2118 0
mateClass - 0x7fff91da20f0 0x7fff91da2118 1

无论多少次class方法得到的都还是类函数。
我们再来看一下objc_class的源码部分
struct objc_class : objc_object {
  objc_class(const objc_class&) = delete;
  objc_class(objc_class&&) = delete;
  void operator=(const objc_class&) = delete;
  void operator=(objc_class&&) = delete;
    // Class ISA;
    Class superclass;
    cache_t cache;              // 方法缓存 formerly cache pointer and vtable
    class_data_bits_t bits;    // 用于获取具体的类信息 class_rw_t * plus custom rr/alloc flagsflags
    ...
bits里面存储了类的方法列表等等的信息
这里的bits是class_data_bits_t类型的,上面objc_object的isa_t类型数据中也有一个uintptr_t类型的bits,但是这是两种结构。
我们先看bits的数据结构 class_data_bits_t
struct class_data_bits_t {
    friend objc_class;
    // Values are the FAST_ flags above.
    uintptr_t bits;
    public:
    class_rw_t* data() const {
        return (class_rw_t *)(bits & FAST_DATA_MASK);
    }
    // Get the class's ro data, even in the presence of concurrent realization.
    // fixme this isn't really safe without a compiler barrier at least
    // and probably a memory barrier when realizeClass changes the data field
    const class_ro_t *safe_ro() const {
        class_rw_t *maybe_rw = data();
        if (maybe_rw->flags & RW_REALIZED) {
            // maybe_rw is rw
            return maybe_rw->ro();
        } else {
            // maybe_rw is actually ro
            return (class_ro_t *)maybe_rw;
        }
    }
}
其实最最重要的是其中的2个方法。data 和 safe_ro,两个方法分别返回class_rw_t 和class_ro_t。
这里ro_t的获取也是通过data方法获取的,所有可以理解为rw_t也在ro_t之中。
struct class_data_bits_t {
    friend objc_class;
    // Values are the FAST_ flags above.
    uintptr_t bits;
    public:
    class_rw_t* data() const {
        return (class_rw_t *)(bits & FAST_DATA_MASK);
    }
    // Get the class's ro data, even in the presence of concurrent realization.
    // fixme this isn't really safe without a compiler barrier at least
    // and probably a memory barrier when realizeClass changes the data field
    const class_ro_t *safe_ro() const {
        class_rw_t *maybe_rw = data();
        if (maybe_rw->flags & RW_REALIZED) {
            // maybe_rw is rw
            return maybe_rw->ro();
        } else {
            // maybe_rw is actually ro
            return (class_ro_t *)maybe_rw;
        }
    }
}
class_rw_t和class_ro_t
bits里面有获取class_rw_t,class_ro_t的两个方法
class_rw_t
	上方代码省略...
    const method_array_t methods() const {
        auto v = get_ro_or_rwe();
        if (v.is<class_rw_ext_t *>()) {
            return v.get<class_rw_ext_t *>(&ro_or_rw_ext)->methods;
        } else {
            return method_array_t{v.get<const class_ro_t *>(&ro_or_rw_ext)->baseMethods()};
        }
    }

    const property_array_t properties() const {
        auto v = get_ro_or_rwe();
        if (v.is<class_rw_ext_t *>()) {
            return v.get<class_rw_ext_t *>(&ro_or_rw_ext)->properties;
        } else {
            return property_array_t{v.get<const class_ro_t *>(&ro_or_rw_ext)->baseProperties};
        }
    }

    const protocol_array_t protocols() const {
        auto v = get_ro_or_rwe();
        if (v.is<class_rw_ext_t *>()) {
            return v.get<class_rw_ext_t *>(&ro_or_rw_ext)->protocols;
        } else {
            return protocol_array_t{v.get<const class_ro_t *>(&ro_or_rw_ext)->baseProtocols};
        }
    }
};
在rw_t中可以 看到有这3个方法,通过这三个方法分别能获取到类的方法、属性、协议。
class_ro_t
再看class_ro_t的数据结构。
struct class_ro_t {
    uint32_t flags;
    uint32_t instanceStart;
    uint32_t instanceSize;
#ifdef __LP64__
    uint32_t reserved;
#endif

    union {
        const uint8_t * ivarLayout;
        Class nonMetaclass;
    };

    explicit_atomic<const char *> name;
    // With ptrauth, this is signed if it points to a small list, but
    // may be unsigned if it points to a big list.
    void *baseMethodList;
    protocol_list_t * baseProtocols;
    const ivar_list_t * ivars;

    const uint8_t * weakIvarLayout;
    property_list_t *baseProperties;

    // This field exists only when RO_HAS_SWIFT_INITIALIZER is set.
    _objc_swiftMetadataInitializer __ptrauth_objc_method_list_imp _swiftMetadataInitializer_NEVER_USE[0];

    _objc_swiftMetadataInitializer swiftMetadataInitializer() const {
        if (flags & RO_HAS_SWIFT_INITIALIZER) {
            return _swiftMetadataInitializer_NEVER_USE[0];
        } else {
            return nil;
        }
    }

    const char *getName() const {
        return name.load(std::memory_order_acquire);
    }
    //methodListPointerDiscriminator是 方法列表指针鉴别器
    static const uint16_t methodListPointerDiscriminator = 0xC310;
#if 0 // FIXME: enable this when we get a non-empty definition of __ptrauth_objc_method_list_pointer from ptrauth.h.
        static_assert(std::is_same<
                      void * __ptrauth_objc_method_list_pointer *,
                      void * __ptrauth(ptrauth_key_method_list_pointer, 1, methodListPointerDiscriminator) *>::value,
                      "Method list pointer signing discriminator must match ptrauth.h");
#endif

    method_list_t *baseMethods() const {
#if __has_feature(ptrauth_calls)
        method_list_t *ptr = ptrauth_strip((method_list_t *)baseMethodList, ptrauth_key_method_list_pointer);
        if (ptr == nullptr)
            return nullptr;

        // Don't auth if the class_ro and the method list are both in the shared cache.
        // This is secure since they'll be read-only, and this allows the shared cache
        // to cut down on the number of signed pointers it has.
        bool roInSharedCache = objc::inSharedCache((uintptr_t)this);
        bool listInSharedCache = objc::inSharedCache((uintptr_t)ptr);
        if (roInSharedCache && listInSharedCache)
            return ptr;

        // Auth all other small lists.
        if (ptr->isSmallList())
            ptr = ptrauth_auth_data((method_list_t *)baseMethodList,
                                    ptrauth_key_method_list_pointer,
                                    ptrauth_blend_discriminator(&baseMethodList,
                                                                methodListPointerDiscriminator));
        return ptr;
#else
        return (method_list_t *)baseMethodList;
#endif
    }
    下方代码省略...
可以看到有方法、属性、协议和成员变量。但方法、属性、协议的命名都是base开通的。
3 内存对齐规则
3.1 对齐系数
每个特定的平台上的编译器都有自己的默认“对齐系数”(也叫对齐模数)。我们可以通过预编译命令#pragma pack(n),n=1、2、4、8、16 来改变这一系数,其中的n就是要指定的“对齐系数”。我们iOS编译器Xcode的对齐系数就是8。
3.2 对齐规则
数据成员对齐规则:(Struct或者Union的数据成员)第一个数据成员放在偏移为0的位置。以后每个数据成员的位置为min(对齐系数,自身长度)的整数倍,下个位置不为本数据成员的整数倍位置的自动补齐。
数据成员为结构体:该数据成员的内最大长度的整数倍的位置开始存储。
整体对齐规则:数据成员按照1,2步骤对齐之后,其自身也要对齐,对齐原则是min(对齐系数,数据成员最大长度)的整数倍。
3.3 内存对齐在OC中的优点
有时候我们会思考为什么系统开辟的内存大小会大于我们申请的内存大小呢?按照8字节对齐的方式,申请的内存就可能已经存在多余的了。文章来源:https://uudwc.com/A/Lm96x
- 按照8字节对齐方式,对象内部里面的成员内存地址是绝对安全的。
我们无法确定申请多余的字节就在对象与对象之间,有可能会出现在对象内存段的内部某个位置,这个时候就可能会出现两个对象内存段是挨着的情况,没有那么的安全。系统开辟空间采取16字节方式,保证对象的内存空间会更大,对象与对象之间更加的安全。文章来源地址https://uudwc.com/A/Lm96x

