文章目录
- 版权声明
- 一 指令修饰符
- 1. 什么是指令修饰符?
- 2. 按键修饰符
- 3. v-model修饰符
- 4. 事件修饰符
- 二 v-bind对样式控制的增强-操作class
- 1. 语法:
- 2. 对象语法
- 3. 数组语法
- 4. 代码练习
- 三 京东秒杀-tab栏切换导航高亮
- 四 v-bind对有样式控制的增强-操作style
- 1.语法
- 2.代码练习
- 3.进度条案例
- 五 v-model在其他表单元素的使用
- 1. 讲解内容
- 2. 代码
- 六 computed计算属性
- 1. 概念
- 2. 语法
- 3. 注意
- 4. 案例
- 5. 代码
- 七 computed计算属性 VS methods方法
- 1.computed计算属性
- 2.methods计算属性
- 3.计算属性的优势
- 4.总结
- 八 计算属性的完整写法
- 九 综合案例-成绩案例
- 十 watch侦听器(监视器)
- 1.作用
- 2.语法
- 3.侦听器代码
- 十一 翻译案例-代码实现
- 十二 watch侦听器
- 1.语法
- 2.需求
- 3.代码实现
- 4.总结
- 十三 综合案例
版权声明
- 本博客的内容基于我个人学习黑马程序员课程的学习笔记整理而成。我特此声明,所有版权属于黑马程序员或相关权利人所有。本博客的目的仅为个人学习和交流之用,并非商业用途。
- 我在整理学习笔记的过程中尽力确保准确性,但无法保证内容的完整性和时效性。本博客的内容可能会随着时间的推移而过时或需要更新。
- 若您是黑马程序员或相关权利人,如有任何侵犯版权的地方,请您及时联系我,我将立即予以删除或进行必要的修改。
- 对于其他读者,请在阅读本博客内容时保持遵守相关法律法规和道德准则,谨慎参考,并自行承担因此产生的风险和责任。
一 指令修饰符
1. 什么是指令修饰符?
- 所谓指令修饰符就是通过“.”指明一些指令后缀 不同的后缀封装了不同的处理操作 —> 简化代码
2. 按键修饰符
- @keyup.enter —>当点击enter键的时候才触发
代码演示:
<!DOCTYPE html>
<html lang="en">
<head>
  <meta charset="UTF-8">
  <meta http-equiv="X-UA-Compatible" content="IE=edge">
  <meta name="viewport" content="width=device-width, initial-scale=1.0">
  <title>Document</title>
</head>
<body>
  <div id="app">
    <h3>@keyup.enter  →  监听键盘回车事件</h3>
    <input v-model="username" type="text" @keyup.enter>
  </div>
  <script src="https://cdn.jsdelivr.net/npm/vue@2/dist/vue.js"></script>
  <script>
    const app = new Vue({
      el: '#app',
      data: {
        username: ''
      },
      methods: {
        fn() {
          console.log(this.username)
        }
      }
    })
  </script>
</body>
</html>
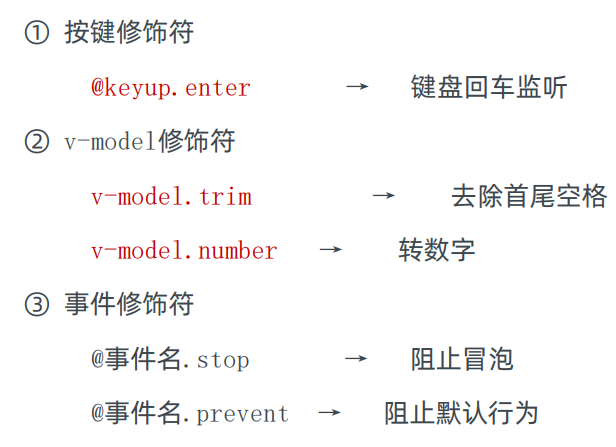
3. v-model修饰符
-
v-model.trim —>去除首位空格
-
v-model.number —>转数字
    <h3>v-model修饰符 .trim .number</h3>
    姓名:<input v-model.trim="username" type="text" ><br>
    年纪:<input v-model.number="age" type="text"><br>
4. 事件修饰符
- @事件名.stop —> 阻止冒泡
- @事件名.prevent —>阻止默认行为
- @事件名.stop.prevent —>可以连用 即阻止事件冒泡也阻止默认行为
<!DOCTYPE html>
<html lang="en">
<head>
  <meta charset="UTF-8">
  <meta http-equiv="X-UA-Compatible" content="IE=edge">
  <meta name="viewport" content="width=device-width, initial-scale=1.0">
  <title>Document</title>
  <style>
    .father {
      width: 200px;
      height: 200px;
      background-color: pink;
      margin-top: 20px;
    }
    .son {
      width: 100px;
      height: 100px;
      background-color: skyblue;
    }
  </style>
</head>
<body>
  <div id="app">
    <h3>v-model修饰符 .trim .number</h3>
    姓名:<input v-model.trim="username" type="text" ><br>
    年纪:<input v-model.number="age" type="text"><br>


    <h3>@事件名.stop     →  阻止冒泡</h3>
    <div @click="fatherFn" class="father" >
      <div @click.stop="sonFn" class="son" >儿子</div>
    </div>

    <h3>@事件名.prevent  →  阻止默认行为</h3>
    <a  href="http://www.baidu.com" @click.prevent >阻止默认行为</a>
  </div>
  <script src="https://cdn.jsdelivr.net/npm/vue@2/dist/vue.js"></script>
  <script>
    const app = new Vue({
      el: '#app',
      data: {
        username: '',
        age: '',
      },
      methods: {
        fatherFn () {
          alert('老父亲被点击了')
        },
        sonFn () {
          alert('儿子被点击了')
        }
      }
    })
  </script>
</body>
</html>
二 v-bind对样式控制的增强-操作class
- 为了方便开发者进行样式控制, Vue 扩展了 v-bind 的语法,可以针对 class 类名 和 style 行内样式 进行控制 。
1. 语法:
<div> :class = "对象/数组">这是一个div</div>
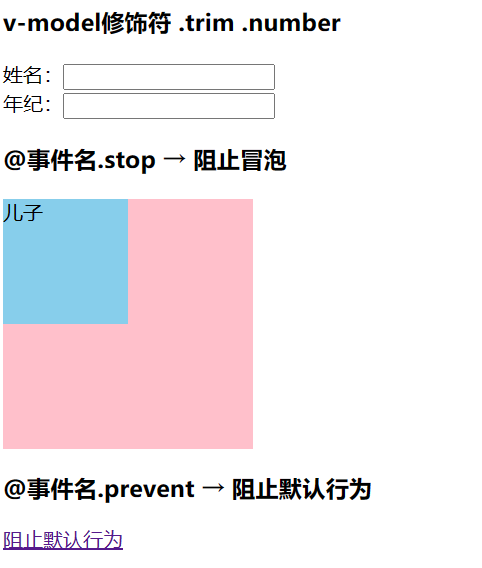
2. 对象语法
- 当class动态绑定的是对象时,键就是类名,值就是布尔值,如果值是true,就有这个类,否则没有这个类
<div class="box" :class="{ 类名1: 布尔值, 类名2: 布尔值 }"></div>
- 适用场景:一个类名,来回切换
<div class="box" :class="{ pink: true, big: true }">黑马程序员</div>
3. 数组语法
当class动态绑定的是数组时 → 数组中所有的类,都会添加到盒子上,本质就是一个 class 列表
<div class="box" :class="[ 类名1, 类名2, 类名3 ]"></div>
使用场景:批量添加或删除类
<div class="box" :class="['pink']">黑马程序员</div>
4. 代码练习
<!DOCTYPE html>
<html lang="en">
<head>
  <meta charset="UTF-8">
  <meta http-equiv="X-UA-Compatible" content="IE=edge">
  <meta name="viewport" content="width=device-width, initial-scale=1.0">
  <title>Document</title>
  <style>
    .box {
      width: 200px;
      height: 200px;
      border: 3px solid #000;
      font-size: 30px;
      margin-top: 10px;
    }
    .pink {
      background-color: pink;
    }
    .big {
      width: 300px;
      height: 300px;
    }
  </style>
</head>
<body>

  <div id="app">
    <div class="box" :class="{ pink: true, big: true }">黑马程序员</div>
    <div class="box" :class="['pink']">黑马程序员</div>
  </div>
  <script src="https://cdn.jsdelivr.net/npm/vue@2/dist/vue.js"></script>
  <script>
    const app = new Vue({
      el: '#app',
      data: {

      }
    })
  </script>
</body>
</html>
三 京东秒杀-tab栏切换导航高亮
- 需求:
- 当点击tab页签时,被点击tab页签就高亮
- 思路:
- 基于数据,动态渲染tab(v-for)
- 准备一个下标 记录高亮的是哪一个 tab
- 基于下标动态切换class的类名
- 案例演示
<!DOCTYPE html>
<html lang="en">
<head>
  <meta charset="UTF-8">
  <meta http-equiv="X-UA-Compatible" content="IE=edge">
  <meta name="viewport" content="width=device-width, initial-scale=1.0">
  <title>Document</title>
  <style>
    * {
      margin: 0;
      padding: 0;
    }
    ul {
      display: flex;
      border-bottom: 2px solid #e01222;
      padding: 0 10px;
    }
    li {
      width: 100px;
      height: 50px;
      line-height: 50px;
      list-style: none;
      text-align: center;
    }
    li a {
      display: block;
      text-decoration: none;
      font-weight: bold;
      color: #333333;
    }
    li a.active {
      background-color: #e01222;
      color: #fff;
    }

  </style>
</head>
<body>

  <div id="app">
    <ul>
      <li @click="activeIndex=index" v-for="(item,index) in list" :key="index" >
        <a :class="{active : activeIndex===index}" href="#">{{item.name}}</a>
      </li>
    </ul>
  </div>
  <script src="https://cdn.jsdelivr.net/npm/vue@2/dist/vue.js"></script>
  <script>
    const app = new Vue({
      el: '#app',
      data: {
        activeIndex: 2,
        list: [
          { id: 1, name: '京东秒杀' },
          { id: 2, name: '每日特价' },
          { id: 3, name: '品类秒杀' }
        ]

      }
    })
  </script>
</body>
</html>

四 v-bind对有样式控制的增强-操作style
1.语法
<div class="box" :style="{ CSS属性名1: CSS属性值, CSS属性名2: CSS属性值 }"></div>
2.代码练习
<!DOCTYPE html>
<html lang="en">
<head>
  <meta charset="UTF-8">
  <meta http-equiv="X-UA-Compatible" content="IE=edge">
  <meta name="viewport" content="width=device-width, initial-scale=1.0">
  <title>Document</title>
  <style>
    .box {
      width: 200px;
      height: 200px;
      background-color: rgb(187, 150, 156);
    }
  </style>
</head>
<body>
  <div id="app">
    <div class="box" :style="{width: '400px',backgroundColor: 'green'} "></div>
  </div>
  <script src="https://cdn.jsdelivr.net/npm/vue@2/dist/vue.js"></script>
  <script>
    const app = new Vue({
      el: '#app',
      data: {

      }
    })
  </script>
</body>
</html>

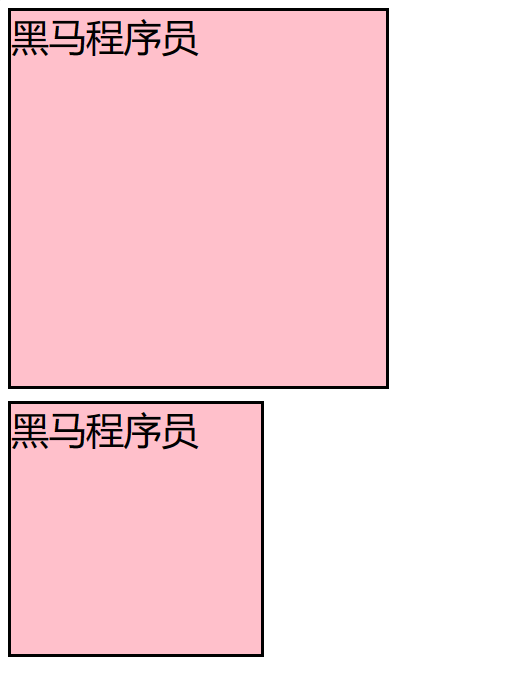
3.进度条案例
 <!DOCTYPE html>
<html lang="en">
<head>
  <meta charset="UTF-8">
  <meta http-equiv="X-UA-Compatible" content="IE=edge">
  <meta name="viewport" content="width=device-width, initial-scale=1.0">
  <title>Document</title>
  <style>
    .progress {
      height: 25px;
      width: 400px;
      border-radius: 15px;
      background-color: #272425;
      border: 3px solid #272425;
      box-sizing: border-box;
      margin-bottom: 30px;
    }
    .inner {
      width: 50%;
      height: 20px;
      border-radius: 10px;
      text-align: right;
      position: relative;
      background-color: #409eff;
      background-size: 20px 20px;
      box-sizing: border-box;
      transition: all 1s;
    }
    .inner span {
      position: absolute;
      right: -20px;
      bottom: -25px;
    }
  </style>
</head>
<body>
  <div id="app">
    <div class="progress">
      <div class="inner" :style="{ width: percent + '%' }">
        <span>{{percent}}%</span>
      </div>
    </div>
    <button @click="percent=25">设置25%</button>
    <button @click="percent=50">设置50%</button>
    <button @click="percent=75">设置75%</button>
    <button @click="percent=100">设置100%</button>
  </div>
  <script src="https://cdn.jsdelivr.net/npm/vue@2/dist/vue.js"></script>
  <script>
    const app = new Vue({
      el: '#app',
      data: {
        percent: 30
      }
    })
  </script>
</body>
</html>
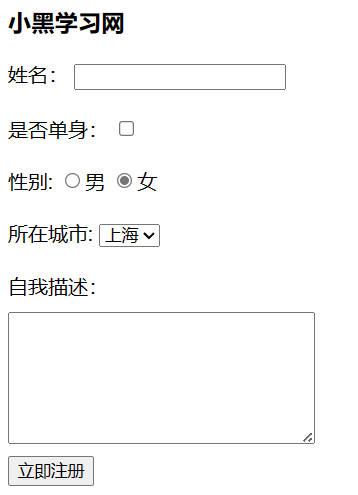
五 v-model在其他表单元素的使用
1. 讲解内容
- 常见的表单元素都可以用 v-model 绑定关联 → 快速 获取 或 设置 表单元素的值。它会根据 控件类型 自动选取 正确的方法 来更新元素
输入框  input:text   ——> value
文本域  textarea	 ——> value
复选框  input:checkbox  ——> checked
单选框  input:radio   ——> checked
下拉菜单 select    ——> value
...
2. 代码
<!DOCTYPE html>
<html lang="en">
<head>
  <meta charset="UTF-8">
  <meta http-equiv="X-UA-Compatible" content="IE=edge">
  <meta name="viewport" content="width=device-width, initial-scale=1.0">
  <title>Document</title>
  <style>
    textarea {
      display: block;
      width: 240px;
      height: 100px;
      margin: 10px 0;
    }
  </style>
</head>
<body>

  <div id="app">
    <h3>小黑学习网</h3>

    姓名:
      <input type="text" v-model="username">
      <br><br>

    是否单身:
      <input type="checkbox" v-model="isSingle">
      <br><br>

    <!--
      前置理解:
        1. name:  给单选框加上 name 属性 可以分组 → 同一组互相会互斥
        2. value: 给单选框加上 value 属性,用于提交给后台的数据
      结合 Vue 使用 → v-model
    -->
    性别:
      <input type="radio" name="gender" v-model="gender" value="1">男
      <input type="radio" name="gemder" v-model="gender" value="2">女
      <br><br>

    <!--
      前置理解:
        1. option 需要设置 value 值,提交给后台
        2. select 的 value 值,关联了选中的 option 的 value 值
      结合 Vue 使用 → v-model
    -->
    所在城市:
      <select v-model.trim="cityId">
        <option value="1" >北京</option>
        <option value="2">上海</option>
        <option value="3">成都</option>
        <option value="4">南京</option>
      </select>
      <br><br>

    自我描述:
      <textarea v-model="desc"></textarea>

    <button>立即注册</button>
  </div>
  <script src="https://cdn.jsdelivr.net/npm/vue@2/dist/vue.js"></script>
  <script>
    const app = new Vue({
      el: '#app',
      data: {
        username: '',
        isSingle: false,
        gender: "2",
        cityId: '102',
        desc: ""
      }
    })
  </script>
</body>
</html>
六 computed计算属性
1. 概念
- 基于现有的数据,计算出来的新属性。 依赖的数据变化,自动重新计算。
2. 语法
- 声明在 computed 配置项中,一个计算属性对应一个函数
- 使用起来和普通属性一样使用 {{ 计算属性名}}
3. 注意
- computed配置项和data配置项是同级的
- computed中的计算属性虽然是函数的写法,但他依然是个属性
- computed中的计算属性不能和data中的属性同名
- 使用computed中的计算属性和使用data中的属性是一样的用法
- computed中计算属性内部的this依然指向的是Vue实例
4. 案例
- 比如使用计算属性实现下面这个业务场景
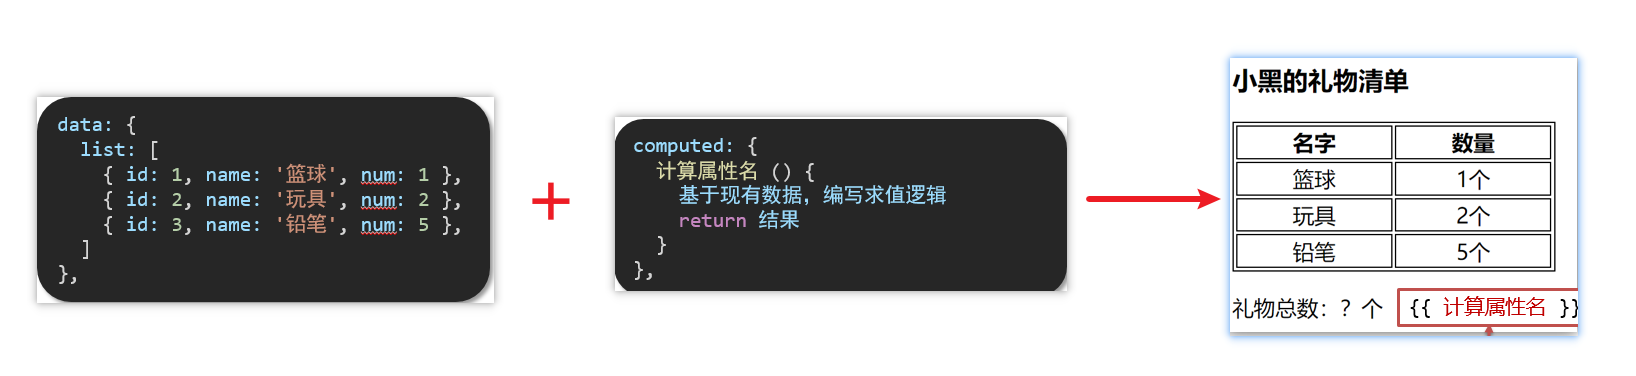
5. 代码
<!DOCTYPE html>
<html lang="en">
<head>
<meta charset="UTF-8">
<meta http-equiv="X-UA-Compatible" content="IE=edge">
<meta name="viewport" content="width=device-width, initial-scale=1.0">
<title>Document</title>
<style>
table {
border: 1px solid #000;
text-align: center;
width: 240px;
}
th,td {
border: 1px solid #000;
}
h3 {
position: relative;
}
</style>
</head>
<body>
<div id="app">
<h3>小黑的礼物清单</h3>
<table>
<tr>
<th>名字</th>
<th>数量</th>
</tr>
<tr v-for="(item, index) in list" :key="item.id">
<td>{{ item.name }}</td>
<td>{{ item.num }}个</td>
</tr>
</table>
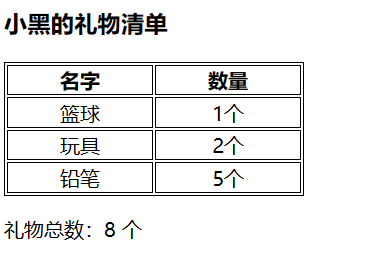
<!-- 目标:统计求和,求得礼物总数 -->
<p>礼物总数:{{count}} 个</p>
</div>
<script src="https://cdn.jsdelivr.net/npm/vue@2/dist/vue.js"></script>
<script>
const app = new Vue({
el: '#app',
data: {
// 现有的数据
list: [
{ id: 1, name: '篮球', num: 1 },
{ id: 2, name: '玩具', num: 2 },
{ id: 3, name: '铅笔', num: 5 },
]
},
computed:{
count() {
let total = this.list.reduce((sum, item) => sum + item.num, 0)
return total
}
}
})
</script>
</body>
</html>
七 computed计算属性 VS methods方法
1.computed计算属性
- 作用:封装了一段对于数据的处理,求得一个结果
语法:
- 写在computed配置项中
- 作为属性,直接使用
- js中使用计算属性: this.计算属性
- 模板中使用计算属性:{{计算属性}}
2.methods计算属性
作用:给Vue实例提供一个方法,调用以处理业务逻辑。
语法:
- 写在methods配置项中
- 作为方法调用
- js中调用:this.方法名()
- 模板中调用 {{方法名()}} 或者 @事件名=“方法名”
3.计算属性的优势
- 缓存特性(提升性能)
计算属性会对计算出来的结果缓存,再次使用直接读取缓存,
依赖项变化了,会自动重新计算 → 并再次缓存 - methods没有缓存特性
- 通过代码比较
<style>
    table {
      border: 1px solid #000;
      text-align: center;
      width: 300px;
    }
    th,td {
      border: 1px solid #000;
    }
    h3 {
      position: relative;
    }
    span {
      position: absolute;
      left: 145px;
      top: -4px;
      width: 16px;
      height: 16px;
      color: white;
      font-size: 12px;
      text-align: center;
      border-radius: 50%;
      background-color: #e63f32;
    }
  </style>

<div id="app">
    <h3>小黑的礼物清单?<span>?</span></h3>
    <table>
      <tr>
        <th>名字</th>
        <th>数量</th>
      </tr>
      <tr v-for="(item, index) in list" :key="item.id">
        <td>{{ item.name }}</td>
        <td>{{ item.num }}个</td>
      </tr>
    </table>

    <p>礼物总数:{{ totalCount }} 个</p>
  </div>
  <script src="https://cdn.jsdelivr.net/npm/vue@2/dist/vue.js"></script>
  <script>
    const app = new Vue({
      el: '#app',
      data: {
        // 现有的数据
        list: [
          { id: 1, name: '篮球', num: 3 },
          { id: 2, name: '玩具', num: 2 },
          { id: 3, name: '铅笔', num: 5 },
        ]
      },
      computed: {
        totalCount () {
          let total = this.list.reduce((sum, item) => sum + item.num, 0)
          return total
        }
      }
    })
  </script>
4.总结
-
computed有缓存特性,methods没有缓存
-
当一个结果依赖其他多个值时,推荐使用计算属性
-
当处理业务逻辑时,推荐使用methods方法,比如事件的处理函数
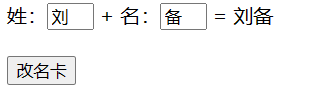
八 计算属性的完整写法
计算属性也是属性,能访问,应该也能修改
- 计算属性默认的简写,只能读取访问,不能 “修改”
- 如果要 “修改” → 需要写计算属性的完整写法
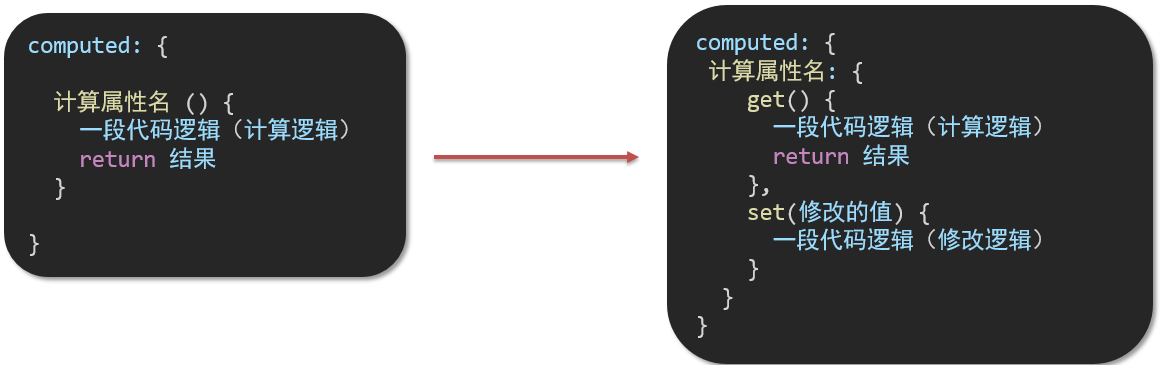
- 完整写法代码演示
<!DOCTYPE html>
<html lang="en">
<head>
  <meta charset="UTF-8">
  <meta http-equiv="X-UA-Compatible" content="IE=edge">
  <meta name="viewport" content="width=device-width, initial-scale=1.0">
  <title>Document</title>
  <style>
    input {
      width: 30px;
    }
  </style>
</head>
<body>

  <div id="app">
    姓:<input type="text" v-model="firstName"> +
    名:<input type="text" v-model="lastName"> =
    <span>{{ fullName }}</span><br><br>
    <button @click="changeName">改名卡</button>
  </div>
  <script src="https://cdn.jsdelivr.net/npm/vue@2/dist/vue.js"></script>
  <script>
    const app = new Vue({
      el: '#app',
      data: {
        firstName: '刘',
        lastName: '备',
      },
      methods: {
        changeName () {
          this.fullName = '黄忠'
        }
      },
      computed: {
        // 完整写法 → 获取 + 设置
        fullName: {
          // (1) 当fullName计算属性,被获取求值时,执行get(有缓存,优先读缓存)
          //     会将返回值作为,求值的结果
          get () {
            return this.firstName + this.lastName
          },
          // (2) 当fullName计算属性,被修改赋值时,执行set
          //     修改的值,传递给set方法的形参
          set (value) {
            this.firstName = value.slice(0, 1)
            this.lastName = value.slice(1)
          }
        }
      }
    })
  </script>
</body>
</html>
九 综合案例-成绩案例
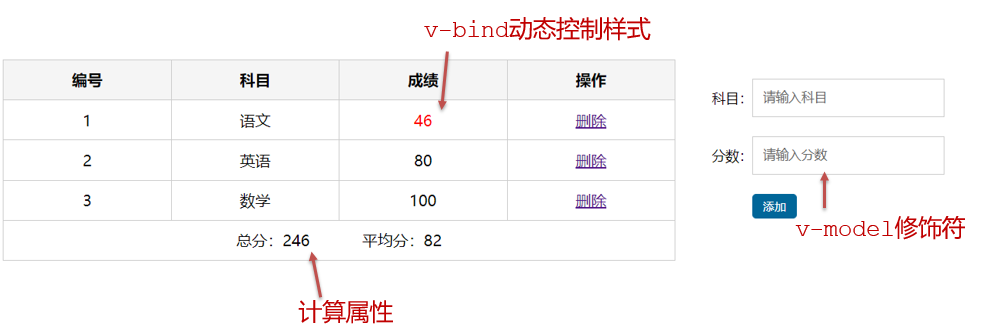
功能描述:
- 渲染功能
- 删除功能
- 添加功能
- 统计总分,求平均分
思路分析:
- 渲染功能 v-for :key v-bind:动态绑定class的样式
- 删除功能 v-on绑定事件, 阻止a标签的默认行为
- v-model的修饰符 .trim、 .number、 判断数据是否为空后 再添加、添加后清空文本框的数据
- 使用计算属性computed 计算总分和平均分的值
<!DOCTYPE html>
<html lang="en">
<head>
  <meta charset="UTF-8" />
  <meta http-equiv="X-UA-Compatible" content="IE=edge" />
  <meta name="viewport" content="width=device-width, initial-scale=1.0" />
  <link rel="stylesheet" href="./styles/index.css" />
  <title>Document</title>
  <style>
    a {
      text-decoration: none;
      color: #3f85ed;
    }
  </style>
</head>
<body>
  <div id="app" class="score-case">
    <div class="table">
      <table>
        <thead>
          <tr>
            <th>编号</th>
            <th>科目</th>
            <th>成绩</th>
            <th>操作</th>
          </tr>
        </thead>
        <tbody v-if="list.length > 0" >
          <tr v-for="(item, index) in list" :key="item.id">
            <td>{{index}}</td>
            <td>{{item.subject}}</td>
            <td :class="{red : item.score<60 }">{{item.score}}</td>
            <td><a href="#" @click.prevent="del(item.id)">删除</a></td>
          </tr>
        </tbody>

        <tbody v-else>
          <tr>
            <td colspan="5">
              <span class="none">暂无数据</span>
            </td>
          </tr>
        </tbody>

        <tfoot>
          <tr>
            <td colspan="5">
              <span>总分:{{ totalScore }}</span>
              <span style="margin-left: 50px" >平均分:{{averageScore}}</span>
            </td>
          </tr>
        </tfoot>
      </table>
    </div>
    <div class="form">
      <div class="form-item">
        <div class="label">科目:</div>
        <div class="input">
          <input
            type="text"
            placeholder="请输入科目"
            v-model.trim="subject"
          />
        </div>
      </div>
      <div class="form-item">
        <div class="label">分数:</div>
        <div class="input">
          <input
            type="text"
            placeholder="请输入分数"
            v-model.number="score"
          />
        </div>
      </div>
      <div class="form-item">
        <div class="label"></div>
        <div class="input">
          <button class="submit" @click="add" @keyup.enter="add">添加</button>
        </div>
      </div>
    </div>
  </div>
  <script src="https://cdn.jsdelivr.net/npm/vue@2/dist/vue.js"></script>

  <script>
    const app = new Vue({
      el: '#app',
      data: {
        list: [
          { id: 1, subject: '语文', score: 20 },
          { id: 7, subject: '数学', score: 99 },
          { id: 12, subject: '英语', score: 70 },
        ],
        subject: '',
        score: ''
      },
      methods:{
        del(id) {
          this.list = this.list.filter(item => item.id !== id)
        },
        add() {
          if (!this.subject) {
            alert('请输入科目')
            return
          }
          if (typeof this.score !== 'number') {
            alert('请输入正确的成绩')
            return
          }
          this.list.unshift({
            id: +new Date(),
            subject: this.subject,
            score: this.score
          })

          this.subject = ''
          this.score = ''
        }
      },
      computed:{
        totalScore(){
          return this.list.reduce((sum,item)=>sum+item.score,0)
        },
        averageScore () {
          if (this.list.length === 0) {
            return 0
          }
          return (this.totalScore / this.list.length).toFixed(2)
        }
      }
    })
  </script>
</body>
</html>
十 watch侦听器(监视器)
1.作用
- 监视数据变化,执行一些业务逻辑或异步操作
2.语法
- watch同样声明在跟data同级的配置项中
- 简单写法: 简单类型数据直接监视
- 完整写法:添加额外配置项
data: {
  words: '苹果',
  obj: {
    words: '苹果'
  }
},

watch: {
  // 该方法会在数据变化时,触发执行
  数据属性名 (newValue, oldValue) {
    一些业务逻辑 或 异步操作。
  },
  '对象.属性名' (newValue, oldValue) {
    一些业务逻辑 或 异步操作。
  }
}
3.侦听器代码
 <!DOCTYPE html>
<html lang="en">
  <head>
    <meta charset="UTF-8" />
    <meta http-equiv="X-UA-Compatible" content="IE=edge" />
    <meta name="viewport" content="width=device-width, initial-scale=1.0" />
    <title>Document</title>
    <style>
      * {
        margin: 0;
        padding: 0;
        box-sizing: border-box;
        font-size: 18px;
      }
      #app {
        padding: 10px 20px;
      }
      .query {
        margin: 10px 0;
      }
      .box {
        display: flex;
      }
      textarea {
        width: 300px;
        height: 160px;
        font-size: 18px;
        border: 1px solid #dedede;
        outline: none;
        resize: none;
        padding: 10px;
      }
      textarea:hover {
        border: 1px solid #1589f5;
      }
      .transbox {
        width: 300px;
        height: 160px;
        background-color: #f0f0f0;
        padding: 10px;
        border: none;
      }
      .tip-box {
        width: 300px;
        height: 25px;
        line-height: 25px;
        display: flex;
      }
      .tip-box span {
        flex: 1;
        text-align: center;
      }
      .query span {
        font-size: 18px;
      }

      .input-wrap {
        position: relative;
      }
      .input-wrap span {
        position: absolute;
        right: 15px;
        bottom: 15px;
        font-size: 12px;
      }
      .input-wrap i {
        font-size: 20px;
        font-style: normal;
      }
    </style>
  </head>
  <body>
    <div id="app">
      <!-- 条件选择框 -->
      <div class="query">
        <span>翻译成的语言:</span>
        <select>
          <option value="italy">意大利</option>
          <option value="english">英语</option>
          <option value="german">德语</option>
        </select>
      </div>

      <!-- 翻译框 -->
      <div class="box">
        <div class="input-wrap">
          <textarea v-model="obj.words"></textarea>
          <span><i>⌨️</i>文档翻译</span>
        </div>
        <div class="output-wrap">
          <div class="transbox">mela</div>
        </div>
      </div>
    </div>
    <script src="https://cdn.jsdelivr.net/npm/vue@2/dist/vue.js"></script>
    <script src="https://cdn.jsdelivr.net/npm/axios/dist/axios.min.js"></script>
    <script>
      // 接口地址:https://applet-base-api-t.itheima.net/api/translate
      // 请求方式:get
      // 请求参数:
      // (1)words:需要被翻译的文本(必传)
      // (2)lang: 需要被翻译成的语言(可选)默认值-意大利
      // -----------------------------------------------

      const app = new Vue({
        el: '#app',
        data: {
          // words: ''
          obj: {
            words: ''
          }
        },
        // 具体讲解:(1) watch语法 (2) 具体业务实现
        watch: {
          // 该方法会在数据变化时调用执行
          // newValue新值, oldValue老值(一般不用)
          // words (newValue) {
          //   console.log('变化了', newValue)
          // }

          'obj.words' (newValue) {
            console.log('变化了', newValue)
          }
        }
      })
    </script>
  </body>
</html>
十一 翻译案例-代码实现
 <!DOCTYPE html>
<html lang="en">
  <head>
    <meta charset="UTF-8" />
    <meta http-equiv="X-UA-Compatible" content="IE=edge" />
    <meta name="viewport" content="width=device-width, initial-scale=1.0" />
    <title>Document</title>
    <style>
      * {
        margin: 0;
        padding: 0;
        box-sizing: border-box;
        font-size: 18px;
      }
      #app {
        padding: 10px 20px;
      }
      .query {
        margin: 10px 0;
      }
      .box {
        display: flex;
      }
      textarea {
        width: 300px;
        height: 160px;
        font-size: 18px;
        border: 1px solid #dedede;
        outline: none;
        resize: none;
        padding: 10px;
      }
      textarea:hover {
        border: 1px solid #1589f5;
      }
      .transbox {
        width: 300px;
        height: 160px;
        background-color: #f0f0f0;
        padding: 10px;
        border: none;
      }
      .tip-box {
        width: 300px;
        height: 25px;
        line-height: 25px;
        display: flex;
      }
      .tip-box span {
        flex: 1;
        text-align: center;
      }
      .query span {
        font-size: 18px;
      }

      .input-wrap {
        position: relative;
      }
      .input-wrap span {
        position: absolute;
        right: 15px;
        bottom: 15px;
        font-size: 12px;
      }
      .input-wrap i {
        font-size: 20px;
        font-style: normal;
      }
    </style>
  </head>
  <body>
    <div id="app">
      <!-- 条件选择框 -->
      <div class="query">
        <span>翻译成的语言:</span>
        <select>
          <option value="italy">意大利</option>
          <option value="english">英语</option>
          <option value="german">德语</option>
        </select>
      </div>

      <!-- 翻译框 -->
      <div class="box">
        <div class="input-wrap">
          <textarea v-model="obj.words"></textarea>
          <span><i>⌨️</i>文档翻译</span>
        </div>
        <div class="output-wrap">
          <div class="transbox">{{ result }}</div>
        </div>
      </div>
    </div>
    <script src="https://cdn.jsdelivr.net/npm/vue@2/dist/vue.js"></script>
    <script src="https://cdn.jsdelivr.net/npm/axios/dist/axios.min.js"></script>
    <script>
      // 接口地址:https://applet-base-api-t.itheima.net/api/translate
      // 请求方式:get
      // 请求参数:
      // (1)words:需要被翻译的文本(必传)
      // (2)lang: 需要被翻译成的语言(可选)默认值-意大利
      // -----------------------------------------------

      const app = new Vue({
        el: '#app',
        data: {
          // words: ''
          obj: {
            words: ''
          },
          result: '', // 翻译结果
          // timer: null // 延时器id
        },
        // 具体讲解:(1) watch语法 (2) 具体业务实现
        watch: {
          // 该方法会在数据变化时调用执行
          // newValue新值, oldValue老值(一般不用)
          // words (newValue) {
          //   console.log('变化了', newValue)
          // }

          'obj.words' (newValue) {
            // console.log('变化了', newValue)
            // 防抖: 延迟执行 → 干啥事先等一等,延迟一会,一段时间内没有再次触发,才执行
            clearTimeout(this.timer)
            this.timer = setTimeout(async () => {
              const res = await axios({
                url: 'https://applet-base-api-t.itheima.net/api/translate',
                params: {
                  words: newValue
                }
              })
              this.result = res.data.data
              console.log(res.data.data)
            }, 300)
          }
        }
      })
    </script>
  </body>
</html>
十二 watch侦听器
1.语法
- 完整写法 —>添加额外的配置项
- deep:true 对复杂类型进行深度监听
- immdiate:true 初始化 立刻执行一次
data: {
  obj: {
    words: '苹果',
    lang: 'italy'
  },
},

watch: {// watch 完整写法
  对象: {
    deep: true, // 深度监视
    immdiate:true,//立即执行handler函数
    handler (newValue) {
      console.log(newValue)
    }
  }
}
2.需求
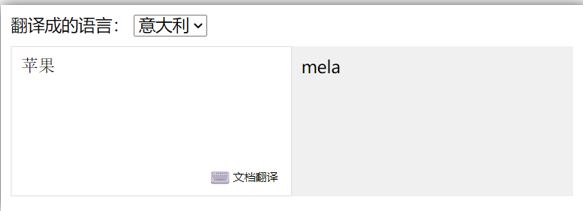
- 当文本框输入的时候 右侧翻译内容要时时变化
- 当下拉框中的语言发生变化的时候 右侧翻译的内容依然要时时变化
- 如果文本框中有默认值的话要立即翻译
3.代码实现
<!DOCTYPE html>
<html lang="en">
  <head>
    <meta charset="UTF-8" />
    <meta http-equiv="X-UA-Compatible" content="IE=edge" />
    <meta name="viewport" content="width=device-width, initial-scale=1.0" />
    <title>Document</title>
    <style>
      * {
        margin: 0;
        padding: 0;
        box-sizing: border-box;
        font-size: 18px;
      }
      #app {
        padding: 10px 20px;
      }
      .query {
        margin: 10px 0;
      }
      .box {
        display: flex;
      }
      textarea {
        width: 300px;
        height: 160px;
        font-size: 18px;
        border: 1px solid #dedede;
        outline: none;
        resize: none;
        padding: 10px;
      }
      textarea:hover {
        border: 1px solid #1589f5;
      }
      .transbox {
        width: 300px;
        height: 160px;
        background-color: #f0f0f0;
        padding: 10px;
        border: none;
      }
      .tip-box {
        width: 300px;
        height: 25px;
        line-height: 25px;
        display: flex;
      }
      .tip-box span {
        flex: 1;
        text-align: center;
      }
      .query span {
        font-size: 18px;
      }

      .input-wrap {
        position: relative;
      }
      .input-wrap span {
        position: absolute;
        right: 15px;
        bottom: 15px;
        font-size: 12px;
      }
      .input-wrap i {
        font-size: 20px;
        font-style: normal;
      }
    </style>
  </head>
  <body>
    <div id="app">
      <!-- 条件选择框 -->
      <div class="query">
        <span>翻译成的语言:</span>
        <select v-model="obj.lang">
          <option value="italy">意大利</option>
          <option value="english">英语</option>
          <option value="german">德语</option>
        </select>
      </div>

      <!-- 翻译框 -->
      <div class="box">
        <div class="input-wrap">
          <textarea v-model="obj.words"></textarea>
          <span><i>⌨️</i>文档翻译</span>
        </div>
        <div class="output-wrap">
          <div class="transbox">{{ result }}</div>
        </div>
      </div>
    </div>
    <script src="https://cdn.jsdelivr.net/npm/vue@2/dist/vue.js"></script>
    <script src="https://cdn.jsdelivr.net/npm/axios/dist/axios.min.js"></script>
    <script>
      const app = new Vue({
        el: '#app',
        data: {
          obj: {
            words: '小黑',
            lang: 'italy'
          },
          result: '', // 翻译结果
        },
        watch: {
          obj: {
            deep: true, // 深度监视
            immediate: true, // 立刻执行,一进入页面handler就立刻执行一次
            handler (newValue) {
              clearTimeout(this.timer)
              this.timer = setTimeout(async () => {
                const res = await axios({
                  url: 'https://applet-base-api-t.itheima.net/api/translate',
                  params: newValue
                })
                this.result = res.data.data
                console.log(res.data.data)
              }, 300)
            }
          }
        }
      })
    </script>
  </body>
</html>
4.总结
- watch侦听器的写法
- 简单写法
watch: {
  数据属性名 (newValue, oldValue) {
    一些业务逻辑 或 异步操作。
  },
  '对象.属性名' (newValue, oldValue) {
    一些业务逻辑 或 异步操作。
  }
}
- 完整写法
watch: {// watch 完整写法
  数据属性名: {
    deep: true, // 深度监视(针对复杂类型)
    immediate: true, // 是否立刻执行一次handler
    handler (newValue) {
      console.log(newValue)
    }
  }
}
十三 综合案例
- 购物车案例
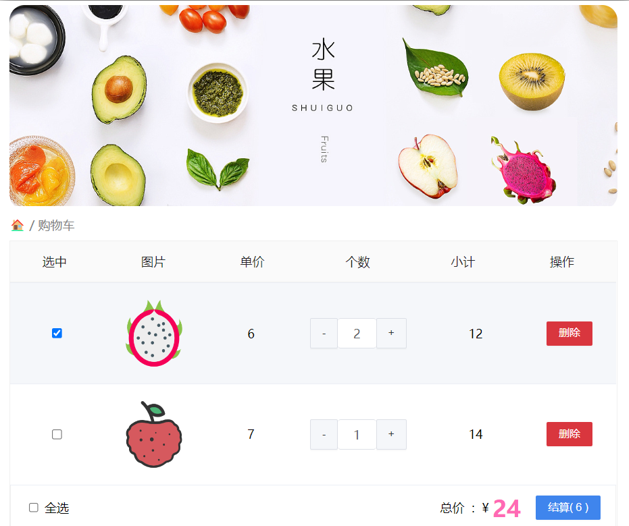
需求说明:
- 渲染功能
- 删除功能
- 修改个数
- 全选反选
- 统计 选中的 总价 和 总数量
- 持久化到本地
实现思路:
- 基本渲染: v-for遍历、:class动态绑定样式
- 删除功能 : v-on 绑定事件,获取当前行的id
- 修改个数 : v-on绑定事件,获取当前行的id,进行筛选出对应的项然后增加或减少
- 全选反选
- 必须所有的小选框都选中,全选按钮才选中 → every
- 如果全选按钮选中,则所有小选框都选中
- 如果全选取消,则所有小选框都取消选中
声明计算属性,判断数组中的每一个checked属性的值,看是否需要全部选
-
统计 选中的 总价 和 总数量 :通过计算属性来计算选中的总价和总数量文章来源:https://uudwc.com/A/XkoYZ
-
持久化到本地: 在数据变化时都要更新下本地存储 watch文章来源地址https://uudwc.com/A/XkoYZ
<!DOCTYPE html>
<html lang="en">
  <head>
    <meta charset="UTF-8" />
    <meta http-equiv="X-UA-Compatible" content="IE=edge" />
    <meta name="viewport" content="width=device-width, initial-scale=1.0" />
    <title>Document</title>
    <style>
      * {
        margin: 0;
        padding: 0;
        box-sizing: border-box;
        font-size: 18px;
      }
      #app {
        padding: 10px 20px;
      }
      .query {
        margin: 10px 0;
      }
      .box {
        display: flex;
      }
      textarea {
        width: 300px;
        height: 160px;
        font-size: 18px;
        border: 1px solid #dedede;
        outline: none;
        resize: none;
        padding: 10px;
      }
      textarea:hover {
        border: 1px solid #1589f5;
      }
      .transbox {
        width: 300px;
        height: 160px;
        background-color: #f0f0f0;
        padding: 10px;
        border: none;
      }
      .tip-box {
        width: 300px;
        height: 25px;
        line-height: 25px;
        display: flex;
      }
      .tip-box span {
        flex: 1;
        text-align: center;
      }
      .query span {
        font-size: 18px;
      }

      .input-wrap {
        position: relative;
      }
      .input-wrap span {
        position: absolute;
        right: 15px;
        bottom: 15px;
        font-size: 12px;
      }
      .input-wrap i {
        font-size: 20px;
        font-style: normal;
      }
    </style>
  </head>
  <body>
    <div id="app">
      <!-- 条件选择框 -->
      <div class="query">
        <span>翻译成的语言:</span>
        <select v-model="obj.lang">
          <option value="italy">意大利</option>
          <option value="english">英语</option>
          <option value="german">德语</option>
        </select>
      </div>

      <!-- 翻译框 -->
      <div class="box">
        <div class="input-wrap">
          <textarea v-model="obj.words"></textarea>
          <span><i>⌨️</i>文档翻译</span>
        </div>
        <div class="output-wrap">
          <div class="transbox">{{ result }}</div>
        </div>
      </div>
    </div>
    <script src="https://cdn.jsdelivr.net/npm/vue@2/dist/vue.js"></script>
    <script src="https://cdn.jsdelivr.net/npm/axios/dist/axios.min.js"></script>
    <script>
      // 需求:输入内容,修改语言,都实时翻译

      // 接口地址:https://applet-base-api-t.itheima.net/api/translate
      // 请求方式:get
      // 请求参数:
      // (1)words:需要被翻译的文本(必传)
      // (2)lang: 需要被翻译成的语言(可选)默认值-意大利
      // -----------------------------------------------

      const app = new Vue({
        el: '#app',
        data: {
          obj: {
            words: '小黑',
            lang: 'italy'
          },
          result: '', // 翻译结果
        },
        watch: {
          obj: {
            deep: true, // 深度监视
            immediate: true, // 立刻执行,一进入页面handler就立刻执行一次
            handler (newValue) {
              clearTimeout(this.timer)
              this.timer = setTimeout(async () => {
                const res = await axios({
                  url: 'https://applet-base-api-t.itheima.net/api/translate',
                  params: newValue
                })
                this.result = res.data.data
                console.log(res.data.data)
              }, 300)
            }
          }
    </script>
  </body>
</html>