背景:目前milvsu版本迭代至2.0,已经可以支持直接在docker环境下运行

目录
一、Milvus的基本情况
什么是 Milvus 向量数据库?
非结构化数据
特征向量
向量相似度检索
为什么选择使用 Milvus?
二、Milvus的下载安装
安装前提
硬件要求
软件要求
Milvus下载安装
Milvus矢量库的可视化管理工具
Java操作矢量数据库
版本控制
数据操作
数据操作中的遇到的坑
一、Milvus的基本情况
什么是 Milvus 向量数据库?
Milvus 于 2019 年开源,致力于存储、索引和管理由深度神经网络学习与其他机器学习模型生成的海量 Embedding 向量。
Milvus 向量数据库专为向量查询与检索设计,能够为万亿级向量数据建立索引。与现有的主要用作处理结构化数据的关系型数据库不同,Milvus 在底层设计上就是为了处理由各种非结构化数据转换而来的 Embedding 向量而生。
随着互联网不断发展,电子邮件、论文、物联网传感数据、社交媒体照片、蛋白质分子结构等非结构化数据已经变得越来越普遍。如果想要使用计算机来处理这些数据,需要使用 embedding 技术将这些数据转化为向量。随后,Milvus 会存储这些向量,并为其建立索引。Milvus 能够根据两个向量之间的距离来分析他们的相关性。如果两个向量十分相似,这说明向量所代表的源数据也十分相似。
非结构化数据
非结构化数据指的是数据结构不规则,没有统一的预定义数据模型,不方便用数据库二维逻辑表来表现的数据。非结构化数据包括图片、视频、音频、自然语言等,占所有数据总量的 80%。非结构化数据的处理可以通过各种人工智能(AI)或机器学习(ML)模型转化为向量数据进行。
特征向量
向量又称为 embedding vector,是指由 embedding 技术从离散变量(如图片、视频、音频、自然语言等等各种非结构化数据)转变而来的连续向量。在数学表示上,向量是一个由浮点数或者二值型数据组成的 n 维数组。通过现代的向量转化技术,比如各种人工智能(AI)或者机器学习(ML)模型,可以将非结构化数据抽象为 n 维特征向量空间的向量。这样就可以采用最近邻算法(ANN)计算非结构化数据之间的相似度。
向量相似度检索
相似度检索是指将目标对象与数据库中数据进行比对,并召回最相似的结果。同理,向量相似度检索返回的是最相似的向量数据。近似最近邻搜索(ANN)算法能够计算向量之间的距离,从而提升向量相似度检索的速度。如果两条向量十分相似,这就意味着他们所代表的源数据也十分相似。
为什么选择使用 Milvus?
- 高性能:性能高超,可对海量数据集进行向量相似度检索。
- 高可用、高可靠:Milvus 支持在云上扩展,其容灾能力能够保证服务高可用。
- 混合查询:Milvus 支持在向量相似度检索过程中进行标量字段过滤,实现混合查询。
- 开发者友好:支持多语言、多工具的 Milvus 生态系统。
二、Milvus的下载安装
安装前提
在安装 Milvus 之前,请检查你的硬件和软件是否满足要求。
使用 Docker Compose 安装使用 Kubernetes 安装
硬件要求
| 硬件 | 要求 | 建议配置 | 说明 |
|---|---|---|---|
| CPU | Intel CPU Sandy Bridge 或以上 |
|
当前版本的 Milvus 不支持 AMD 和 Apple M1 CPU。 |
| CPU 指令集 |
|
|
Milvus 中的向量相似度搜索和索引构建需要 CPU 支持单指令多数据 (SIMD) 扩展集。 请确保 CPU 至少支持一个列出的 SIMD 扩展集。 有关更多信息,请参阅 CPUs with AVX。 |
| RAM |
|
|
RAM 的大小取决于数据量。 |
| 硬盘 | SATA 3.0 SSD 或以上 | SATA 3.0 SSD 或以上 | 硬盘的大小取决于数据量。 |
软件要求
| 操作系统 | 软件 | 说明 |
|---|---|---|
| macOS 10.14 或以上 | Docker 桌面版 | Docker 虚拟机 (VM) 运行配置至少 2 个虚拟 CPU (vCPU) 和 8 GB 初始内存。否则,安装可能会失败。 有关更多信息,请参阅 Install Docker Desktop on Mac。 |
| Linux 发行版 |
|
有关更多信息,请参阅 Install Docker Engine 和 Install Docker Compose。 |
| 启用 WSL 2 的 Windows | Docker 桌面版 | 我们建议你将源代码和其他数据绑定存储到 Linux 文件系统中的 Linux 容器中,而不是 Windows 文件系统。 有关更多信息,请参阅 Install Docker Desktop on Windows with WSL 2 backend。 |
| 软件 | 版本 |
|---|---|
| etcd | 3.5.0 |
| MinIO | RELEASE.2020-11-06T23-17-07Z |
| Pulsar | 2.8.2 |
本文主要介绍其中的Docker 桌面版客户端的安装下载及遇到的相关问题
目前docker桌面版已经更新到4.90,但建议不要使用最新版,本机使用的docker桌面版4.4.4。
docker桌面版历史下载清单【Docker Desktop release notes | Docker Documentation】
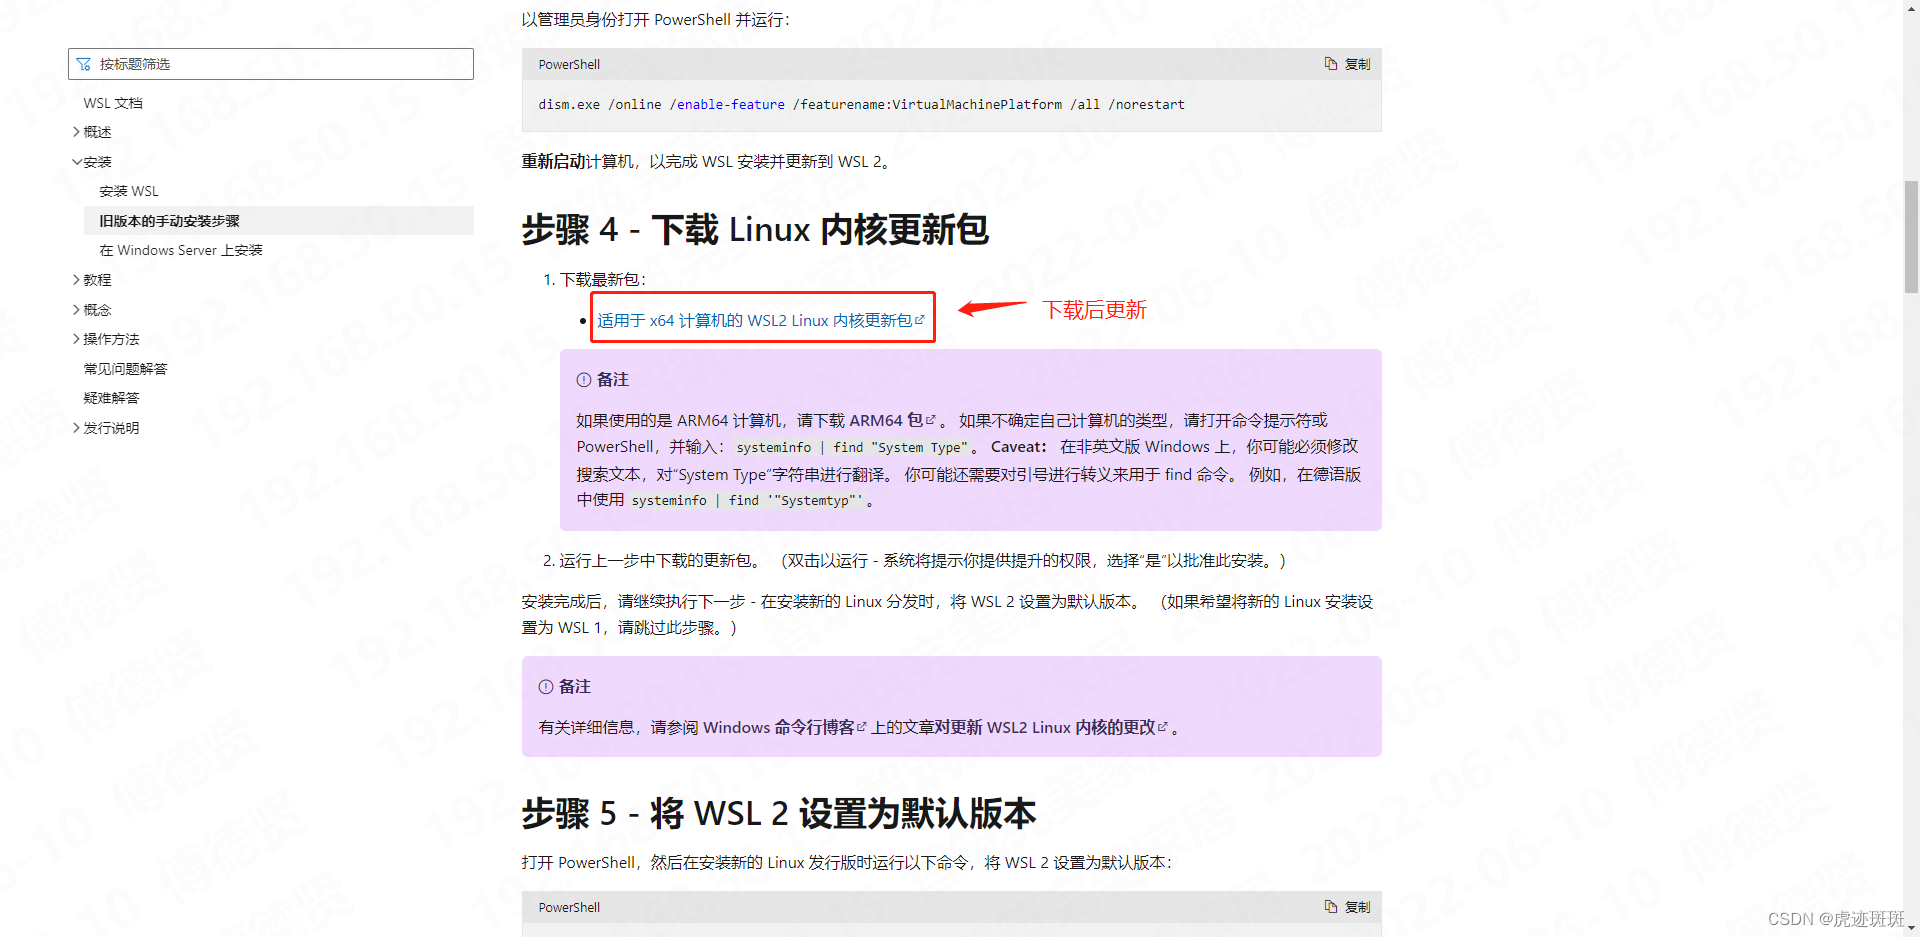
下载后直接启动docker即可,可能会报错提示启动失败的界面,可根据弹框提示更新WSL 2
更新WSL【旧版 WSL 的手动安装步骤 | Microsoft Docs】

更新后记得重启电脑,然后再次启动docker,弹出启动成功的界面后,则表示docker环境已经部署完毕,可以开始Milvus的下载安装啦!
Milvus下载安装
根据项目需求可安装单机版和分布式版 【安装 Milvus 单机版 - Milvus documentation】。
本机安装的为单机版
https://github.com/milvus-io/milvus/releases/download/v2.0.2/milvus-standalone-docker-compose.yml1. 将以上链接在浏览器打开,下载 milvus-standalone-docker-compose.yml
2. 下载完成后重命名为 docker-compose.yml
3. 新创建一个存放该配置的文件夹,比如:MilvusFolder,把yml文件放在该文件夹下面
4. 在yml文件当前路径下cmd黑窗口,执行以下命令进行矢量库的下载
docker-compose up -d5. 下载完毕后,再次打开docker,可以看到有 3 个 Docker 容器在运行(2 个为基础服务,1 个为 Milvus 服务)分别是:
sudo docker-compose ps
      Name                     Command                  State                          Ports
----------------------------------------------------------------------------------------------------------------
milvus-etcd         etcd -listen-peer-urls=htt ...   Up (healthy)   2379/tcp, 2380/tcp
milvus-minio        /usr/bin/docker-entrypoint ...   Up (healthy)   9000/tcp
milvus-standalone   /tini -- milvus run standalone   Up             0.0.0.0:19530->19530/tcp,:::19530->19530/tcp
Milvus矢量库的可视化管理工具
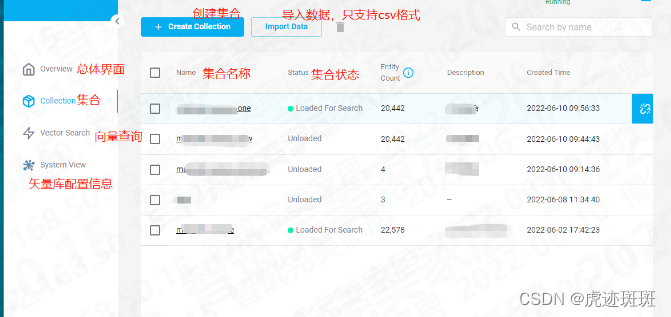
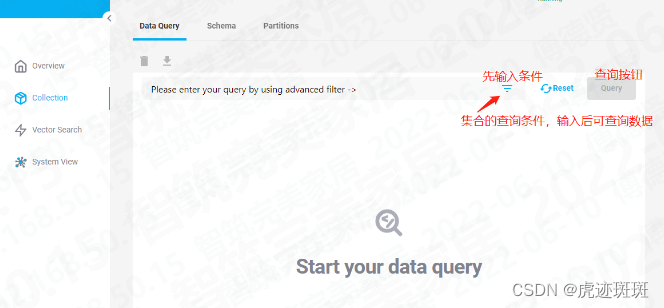
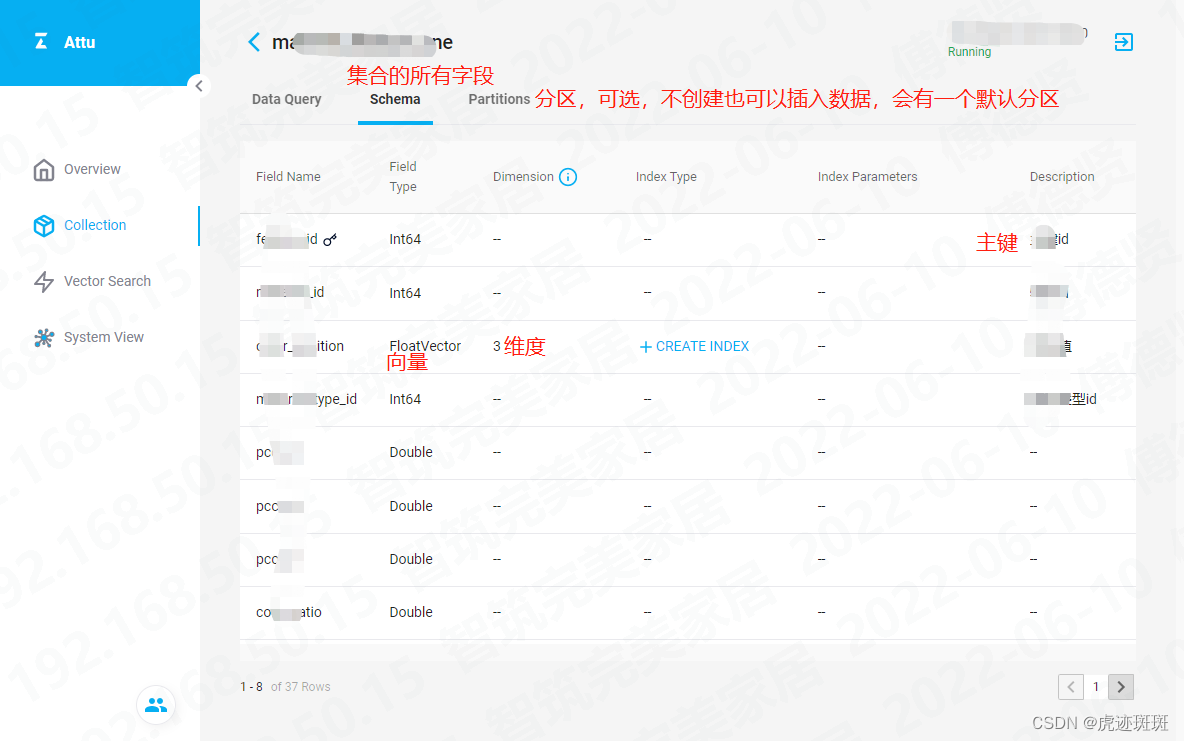
本文中介绍的可视化工具是attu,注意【Attu 只支持 Milvus 2.x】
本机采用的是安装包(Window)下载的方式进行安装【安装 Attu - Milvus documentation】
以下是安装后的图解:


Java操作矢量数据库
版本控制
- milvus-sdk-java版本
2.0.0 - SpringBoot版本
2.3.0.RELEASE
数据操作
1. pom.xml引入
<dependency>
<groupId>io.milvus</groupId>
<artifactId>milvus-sdk-java</artifactId>
<version>2.0.0</version>
</dependency>
2. MilvusServiceClient
需要跟milvus交互都需要调用MilvusServiceClient,我这里的做法是把它定义成一个Bean,需要用到的地方依赖注入
@Configuration
public class MilvusConfig {

    @Value("${milvus.host}")
    private String host; //milvus所在服务器地址
    @Value("${milvus.port}")
    private Integer port; //milvus端口

    @Bean
    public MilvusServiceClient milvusServiceClient() {
        ConnectParam connectParam = ConnectParam.newBuilder()
                .withHost(host)
                .withPort(port)
                .build();
        return new MilvusServiceClient(connectParam);
    }
}
3. 常用类
3.1 先记得创建一个常量类(用来存放这个集合需用到的参数)!!!
public class PushMaterielsConfig{
    /**
     * 集合名称(库名)
     */
    public static final String COLLECTION_NAME = "materiel_feature_one";
    /**
     * 分片数量
     */
    public static final Integer SHARDS_NUM = 8;
    /**
     * 分区数量
     */
    public static final Integer PARTITION_NUM = 16;

    /**
     * 分区前缀
     */
    public static final String PARTITION_PREFIX = "shards_";
    /**
     * 特征值长度
     */
    public static final Integer FEATURE_DIM = 256;

    /**
     * 字段
     */
    public static class Field {
        /**
         * 主键id
         */
        public static final String ARCHIVE_ID = "feature_id";
        /**
         * 物料id
         */
        public static final String ORG_ID = "materiel_id";
        /**
         * 特征值
         */
        public static final String COLOR_POSITION= "color_position";
    }


}
3.2 creatCollection(创建集合)
//创建集合
    public boolean creatCollection(String collectionName){
        MilvusServiceClient milvusClient = milvusConfig.milvusServiceClient();
        FieldType featureId = FieldType.newBuilder()
                .withName(PushMaterielsConfig.Field.FEATURE_ID)
                .withDescription("主键id")
                .withDataType(DataType.Int64)
                .withPrimaryKey(true)
                .withAutoID(false)
                .build();
        FieldType materielId = FieldType.newBuilder()
                .withName(PushMaterielsConfig.Field.MATERIEL_ID)
                .withDescription("物料id")
                .withDataType(DataType.Int64)
                .build();
        FieldType colorPosition = FieldType.newBuilder()
                .withName(PushMaterielsConfig.Field.COLOR_POSITION)
                .withDescription("特征值")
                .withDataType(DataType.FloatVector)
                .withDimension(PushMaterielsConfig.FEATURE_DIM)
                .build();
        FieldType materielTypeId = FieldType.newBuilder()
                .withName(PushMaterielsConfig.Field.MATERIEL_TYPE_ID)
                .withDescription("物料类型id")
                .withDataType(DataType.Int64)
                .build();
        CreateCollectionParam createCollectionReq = CreateCollectionParam.newBuilder()
                .withCollectionName(collectionName)
                .withDescription("特征集合")
                //.withShardsNum(PushMaterielsConfig.SHARDS_NUM)
                .addFieldType(featureId)
                .addFieldType(materielId)
                .addFieldType(colorPosition)
                .addFieldType(materielTypeId)
                .addFieldType(disorder)
                .build();
        R<RpcStatus> response = milvusClient.createCollection(createCollectionReq);
        LOGGER.info(PushMaterielsConfig.COLLECTION_NAME+"是否成功创建集合——>>"+response.getStatus());
        return PushMaterielsConfig.TURE.equals(response.getStatus()) ? true : false;
    }
3.3 isExitCollection(判断集合是否已经存在)
 //判断集合是否已经存在
    public boolean isExitCollection(String collectionName){
        MilvusServiceClient milvusClient = milvusConfig.milvusServiceClient();
        R<Boolean> response = milvusClient.hasCollection(
                HasCollectionParam.newBuilder()
                        .withCollectionName(collectionName)
                        .build());
        return PushMaterielsConfig.TURE.equals(response.getStatus()) ? true : false;
    }
3.4 createPartition(创建分区) 【可选,不创建则会选择默认分区进行数据存储】
    //创建分区
    public void createPartition(String collectionName, String partitionName){
        MilvusServiceClient milvusClient = milvusConfig.milvusServiceClient();
        R<RpcStatus> response = milvusClient.createPartition(CreatePartitionParam.newBuilder()
                .withCollectionName(collectionName) //集合名称
                .withPartitionName(partitionName) //分区名称
                .build());
    }

 /**
     * 先定义了分区总数PARTITION_NUM, 然后循环建立分区,在查询或者插入的时候根据里面的某个值进行取模,分到对应的分区里面去
     * PARTITION_NUM=10
     * */
    public void test(){
        for (int i = 0; i < 10; i++) {
            createPartition(PushMaterielsConfig.COLLECTION_NAME, PushMaterielsConfig.PARTITION_PREFIX + i);
        }
    }
3.5 createIndex(创建索引)
/**
     * 创建索引
     */
    public R<RpcStatus> createIndex(String collectionName, String fieldName) {
        MilvusServiceClient milvusClient = milvusConfig.milvusServiceClient();
        R<RpcStatus> response = milvusClient.createIndex(CreateIndexParam.newBuilder()
                .withCollectionName(collectionName)
                .withFieldName(fieldName)
                .withIndexType(IndexType.IVF_FLAT)
                .withMetricType(MetricType.IP)
                //nlist 建议值为 4 × sqrt(n),其中 n 指 segment 最多包含的 entity 条数。
                .withExtraParam("{\"nlist\":16384}")
                .withSyncMode(Boolean.FALSE)
                .build());
        LOGGER.info("createIndex-------------------->{}", response.toString());
        R<GetIndexBuildProgressResponse> idnexResp = milvusClient.getIndexBuildProgress(
                GetIndexBuildProgressParam.newBuilder()
                        .withCollectionName(collectionName)
                        .build());
        LOGGER.info("getIndexBuildProgress---------------------------->{}", idnexResp.toString());
        return response;
    }
3.6 insertPrepare(数据插入)
//数据插入
    public String insertPrepare(String collectionName) {
        //特征入Milvus前的数据处理
        List<Long> featureIdList = new ArrayList();
        List<Long> materielIdList = new ArrayList();
        List<List<Float>> colorPostation = new ArrayList<>();
        List<Long> materielTypeIdList = new ArrayList();


=====================================业务代码====================================
        //查询特征数据,拿到需要插入的数据
        List<FeatureColor> listColor = featureColorDao.list(new QueryWrapper<FeatureColor>().eq("is_included",PushMaterielsConfig.TURE));
        if (WebplusUtil.isEmpty(listColor))return "No featureColor data found";
        listColor.forEach(item->{
            Long materielId = item.getMaterielId();
            List<FeatureShape> shapeList = featureShapeDao.list(new QueryWrapper<FeatureShape>().eq("materiel_id",
                    materielId).eq("is_included", PushMaterielsConfig.TURE));
            List<FeatureTexture> textureList = featureTextureDao.list(new QueryWrapper<FeatureTexture>().eq("materiel_id",
                    materielId).eq("is_included", PushMaterielsConfig.TURE));
            //三缺一则跳过,不存入
            if(WebplusUtil.isAnyEmpty(shapeList,textureList))return;
            //过滤
            FeatureShape materielshape = shapeList.size()> 1 ? shapeList.stream().sorted(Comparator.comparing(a ->
                    a.getUpdateDatetime())).collect(Collectors.toList()).get(0) : shapeList.get(0);
            FeatureTexture materielTexture = textureList.size()> 1 ? textureList.stream().sorted(Comparator.comparing(a ->
                    a.getUpdateDatetime())).collect(Collectors.toList()).get(0) : textureList.get(0);

=====================================以上为业务代码====================================

            featureIdList.add(item.getId());
            materielIdList.add(item.getMaterielId());
            materielTypeIdList.add(item.getMaterielTypeId());
            List<Float> colorXYZ = new ArrayList<Float>();
            colorXYZ.add(item.getColorX().floatValue());
            colorXYZ.add(item.getColorY().floatValue());
            colorXYZ.add(item.getColorZ().floatValue());
            colorPostation.add(colorXYZ);

        });
        List<InsertParam.Field> fields = new ArrayList<>();
        fields.add(new InsertParam.Field(PushMaterielsConfig.Field.FEATURE_ID, DataType.Int64, featureIdList));
        fields.add(new InsertParam.Field(PushMaterielsConfig.Field.MATERIEL_ID, DataType.Int64, materielIdList));
        fields.add(new InsertParam.Field(PushMaterielsConfig.Field.COLOR_POSITION, DataType.FloatVector, colorPostation));
        fields.add(new InsertParam.Field(PushMaterielsConfig.Field.MATERIEL_TYPE_ID, DataType.Int64, materielTypeIdList));

        return insert(collectionName,fields);
    }


    public String insert(String collectionName, List<InsertParam.Field> fields ){
        MilvusServiceClient milvusClient = milvusConfig.milvusServiceClient();
        //插入
        InsertParam insertParam = InsertParam.newBuilder()
                .withCollectionName(collectionName)
                //.withPartitionName(partitionName)
                .withFields(fields)
                .build();
        R<MutationResult> insert = milvusClient.insert(insertParam);
        LOGGER.info("插入:{}", insert);
        return insert.getStatus().equals(PushMaterielsConfig.TURE) ? "InsertRequest successfully! Total number of " +
                "inserts:{"+insert.getData().getInsertCnt()+"} entities" : "InsertRequest failed!";
    }
3.7 loadCollection(加载集合,在插入数据前,如果集合未处于加载在内存中,则需要先加载集合和分区,分区加载为可选(如果是默认分区,则可以不加载分区))
    /**
     * 加载集合
     * */
    public boolean loadCollection(String collectionName) {
        MilvusServiceClient milvusClient = milvusConfig.milvusServiceClient();
        R<RpcStatus> response = milvusClient.loadCollection(LoadCollectionParam.newBuilder()
                //集合名称
                .withCollectionName(collectionName)
                .build());
        LOGGER.info("loadCollection------------->{}", response);
        return response.getStatus().equals(PushMaterielsConfig.TURE) ? true : false;
    }

    /**
     * 加载分区
     * */
    public void loadPartitions(String collectionName, String partitionsName) {
        MilvusServiceClient milvusClient = milvusConfig.milvusServiceClient();
        R<RpcStatus> response = milvusClient.loadPartitions(
                LoadPartitionsParam
                        .newBuilder()
                        //集合名称
                        .withCollectionName(collectionName)
                        //需要加载的分区名称
                        .withPartitionNames(Arrays.asList(partitionsName))
                        .build()
        );
        LOGGER.info("loadCollection------------->{}", response);
    }
3.8 releaseCollection(从内存中释放集合)
/**
     * 从内存中释放集合
     * */
    public void releaseCollection(String collectionName) {
        MilvusServiceClient milvusClient = milvusConfig.milvusServiceClient();
        R<RpcStatus> response = milvusClient.releaseCollection(ReleaseCollectionParam.newBuilder()
                .withCollectionName(collectionName)
                .build());
        LOGGER.info("releaseCollection------------->{}", response);
    }

    /**
     * 释放分区
     * */
    public void releasePartition(String collectionName, String partitionsName) {
        MilvusServiceClient milvusClient = milvusConfig.milvusServiceClient();
        R<RpcStatus> response = milvusClient.releasePartitions(ReleasePartitionsParam.newBuilder()
                .withCollectionName(collectionName)
                .addPartitionName(partitionsName)
                .build());
        LOGGER.info("releasePartition------------->{}", response);
    }
数据操作中的遇到的坑
1. 记住:attu作为可视化工具,可以用来做简单的查询和删除以及集合、分区创建的操作,但是对于复杂的操作,建议还是代码实现。
2. 插入数据到到矢量库后,并不会马上可以查询到插入后的数据(针对一次性插入1万条数据以上,只要insertf的status状态反馈为0,则表示插入成功。一般需要等待半个小时以内时间才可以,删除情况类型)
3. 矢量库不会永久性的删除数据,总数entities只会增加不会减少,但是删除的数据只要delete的status状态反馈为0,则表示删除成功。通过条件查询时,删除后的数据一定是查询无结果的。文章来源:https://uudwc.com/A/YXoJ
4. Int64类型只能用Long去对应存放文章来源地址https://uudwc.com/A/YXoJ

