一、串口调试
1.串口是什么?
串行接口简称串口,也称串行通信接口(通常指COM接口),是采用串行通信方式的扩展接口。
2.通信:串行通信,并行通信
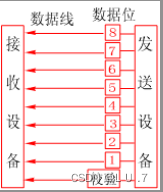
数字信号是8位二进制数,可以使用信号线传输,一种方案是使用一条数据线按照次序一个位一个位的传送,每传送完8位为一个字节,叫串行通信。另一种方法是使用8条数据线分别传送8位,一次传送一个字节,叫并行通信。
3.串行通信和并行通信区别
并行通信传输中有多个数据位,同时在两个设备之间传输。发送设备将这些数据位通过对应的数据线传送给接收设备,还可附加一位数据校验位。接收设备可同时接收到这些数据,不需要做任何变换就可直接使用。并行方式主要用于近距离通信。计算机内的总线结构就是并行通信的例子。这种方法的优点是传输速度快,处理简单。
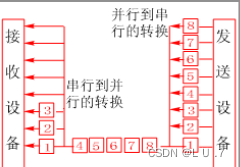
串行数据传输时,数据是一位一位地在通信线上传输的,先由具有几位总线的计算机内的发送设备,将几位并行数据经并--串转换硬件转换成串行方式,再逐位经传输线到达接收站的设备中,并在接收端将数据从串行方式重新转换成并行方式,以供接收方使用。串行数据传输的速度要比并行传输慢得多,但对于覆盖面极其广阔的公用电话系统来说具有更大的现实意义。
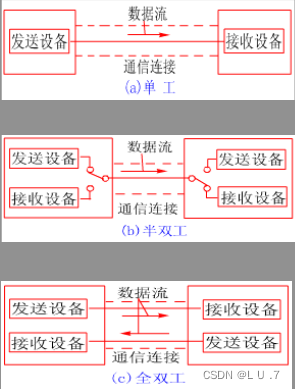
4.串行通信的三种方式
单工:只能发送或者只能接收
半双工:在同一时间只能发送或者接收
全双工:在同一时间既可以发送又可以接收
5.串口通信的两种最基本的方式:同步串行通信方式和异步串行通信方式
同步串行是指SPI(Serial Peripheral interface)的缩写,顾名思义就是串行外围设备接口。
所谓同步通信,是指数据传送是以数据块(一组字符)为单位,字符与字符之间、字符内部的位与位之间都同步,因为一次传输的数据块中包含的数据较多,所以接收时钟与发送进钟严格同步,通常要有同步时钟。
异步串行是指UART(Universal Asynchronous Receiver/Transmitter),通用异步接收/发送。UART是一个并行输入成为串行输出的芯片,通常集成在主板上。
所谓异步通信,是指数据传送以字符为单位,字符与字符间的传送是完全异步的,位与位之间的传送基本上是同步的。
6.串口通信的物理层
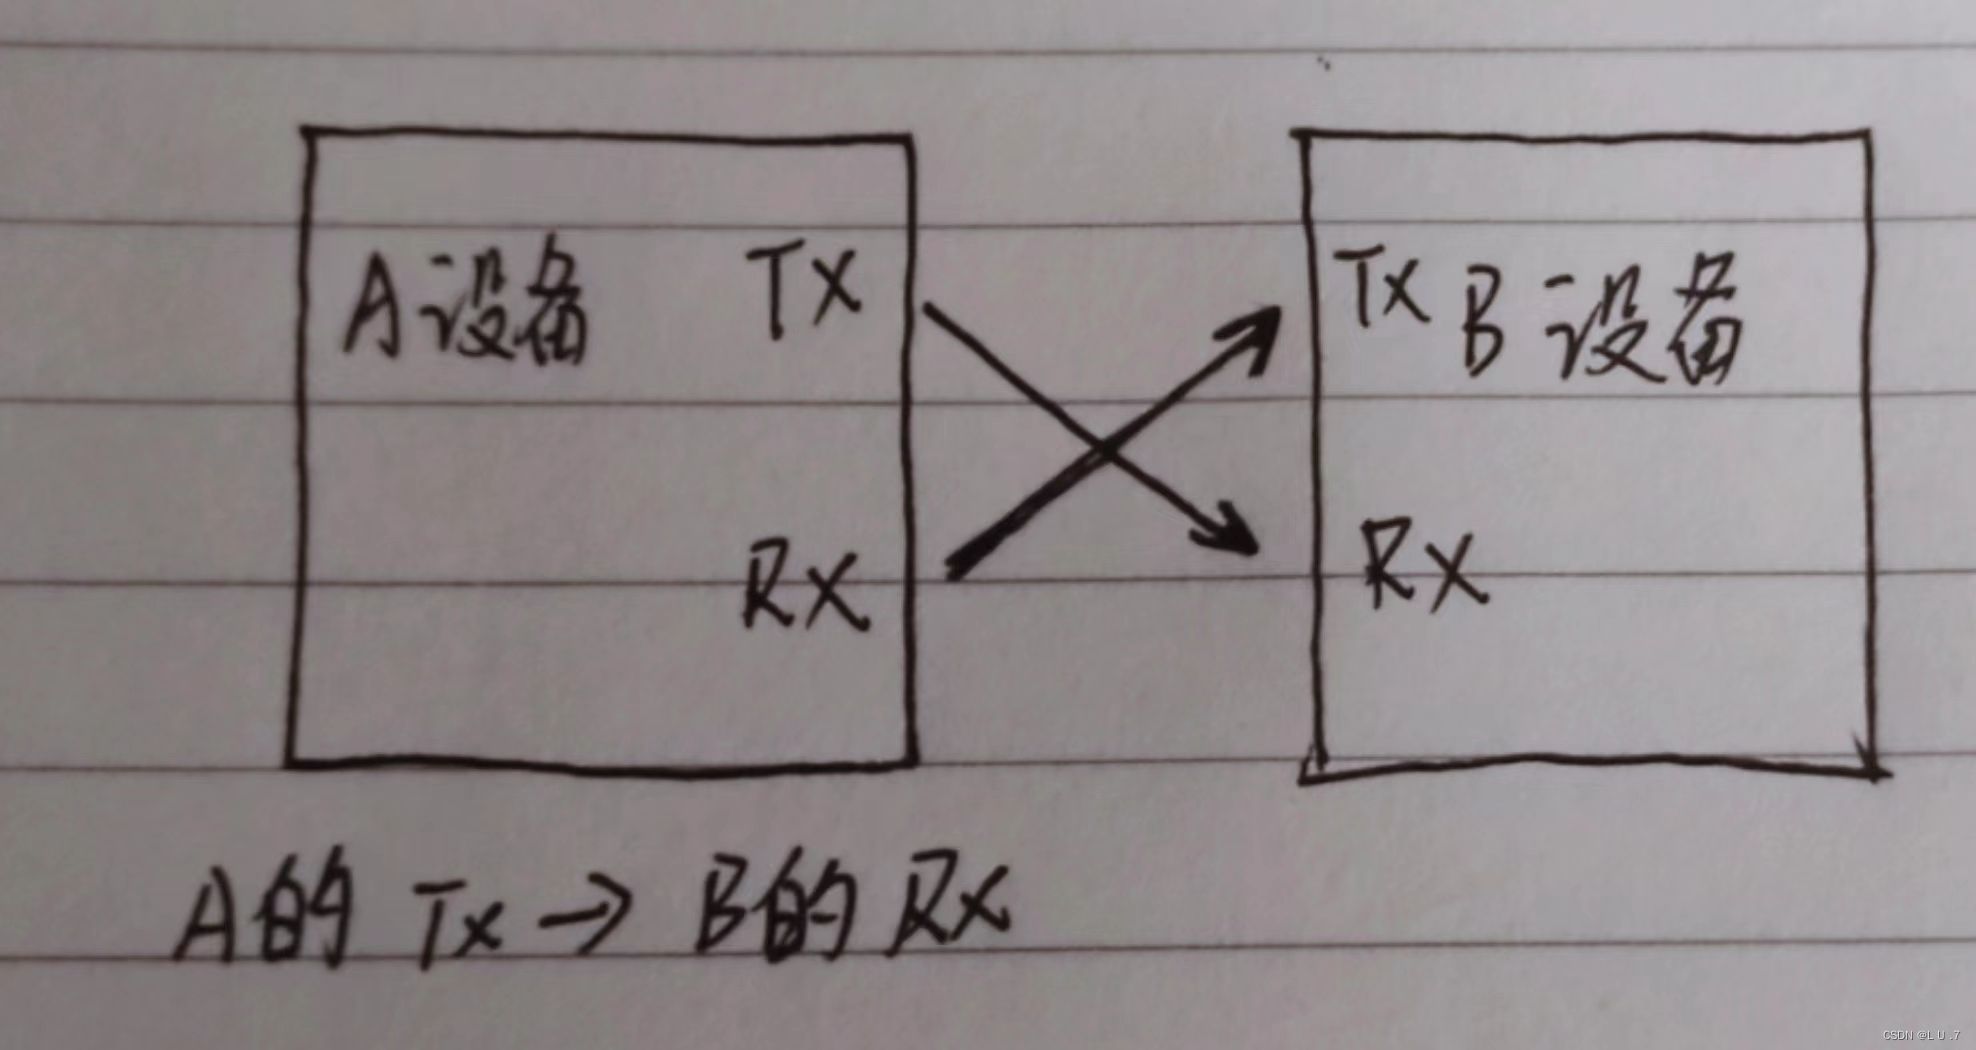
交叉相连
7. 位协议层-----RS232协议
一帧数据
起始位 数据位 奇偶校验位 停止位
1位 5-8 1/0 0.5/1/2
RS232: 起始位:1 位 数据位: 8 位 无奇偶校验位:0 停止位:1位
电平: 0 0/1 1
校验位:奇偶校验 CRC校验
奇校验:数据位+奇偶检验位 里面的1奇数个
偶校验:数据位+奇偶检验位 里面的1偶数个
8:串口打印
1)查看原理图用USART1-----在Tx--PA9 Rx--PA10

代码:
usart1.c文件*********************************************************************
#include "usart1.h"
//PA9 Tx 复用推挽
//PA10 Rx 浮空
void Usart1_Config(void)
{
//打开GPIOA引脚时钟
RCC_APB2PeriphClockCmd(RCC_APB2Periph_GPIOA, ENABLE);
//管脚配置
//Tx--PA9
GPIO_InitTypeDef GPIO_InitStructure={0};//定义结构体
GPIO_InitStructure.GPIO_Pin = GPIO_Pin_9; //引脚
GPIO_InitStructure.GPIO_Speed = GPIO_Speed_50MHz;//速度
GPIO_InitStructure.GPIO_Mode = GPIO_Mode_AF_PP;//模式---推挽输出
GPIO_Init(GPIOA, &GPIO_InitStructure);//初始化结构体
//Rx---PA10
GPIO_InitStructure.GPIO_Mode = GPIO_Mode_IN_FLOATING;//模式---浮空输入
GPIO_InitStructure.GPIO_Pin = GPIO_Pin_10; //引脚
GPIO_Init(GPIOA, &GPIO_InitStructure);
//打开串口的时钟
RCC_APB2PeriphClockCmd(RCC_APB2Periph_USART1, ENABLE);
USART_InitTypeDef USART_InitStructure={0};
USART_InitStructure.USART_BaudRate = 115200; //波特率4800 9600 115200
USART_InitStructure.USART_WordLength = USART_WordLength_8b;//数据位 8位
USART_InitStructure.USART_StopBits = USART_StopBits_1;//停止位 1位
USART_InitStructure.USART_Parity = USART_Parity_No;//校验位 --无
USART_InitStructure.USART_HardwareFlowControl =
USART_HardwareFlowControl_None;//不使用硬件流控制
USART_InitStructure.USART_Mode = USART_Mode_Tx | USART_Mode_Rx;//发送 接收
USART_Init(USART1, &USART_InitStructure);
USART_Cmd(USART1,ENABLE);//使能串口
}
//发送单个字符
void Usart_Tx(uint8_t ch)
{
while(!USART_GetFlagStatus(USART1,USART_FLAG_TXE));
USART_SendData(USART1,ch);
}
//发送字符串
void Usart_TxStr(char *buff)
{
while(buff != '\0')
{
Usart_Tx(*buff);
buff++;
}
}
//接收单个字符
uint8_t Usart_Rx(void)
{
uint8_t data=0;
while(!USART_GetFlagStatus(USART1,USART_FLAG_RXNE));//等待数据接收
data = USART_ReceiveData(USART1);
return data;
}
//加上之后能正常使用printf函数
int fputc(int c, FILE * p)
{
Usart_Tx(c);
return c;
}
usart1.h文件********************************************************************
#ifndef _USART1_H_
#define _USART1_H_
#include "stm32f10x.h"
void Usart1_Config(void);
void Usart_Tx(uint8_t ch);
uint8_t Usart_Rx(void);
#endif
main.c文件*************************************************************
#include"stm32f10x.h"
#include"usart1.h"
#include"stdio.h"
int main(void)
{
Usart1_Config();//初始化
while(1)
{
printf("usart1使用\n");
}
}
文章来源地址https://uudwc.com/A/nNq0
二、语音播报
1、语音播报模块用的是MY1680-12P

MY1680-12P 内置标准 UART 异步串口接口,为 3.3V TTL 电平接口。可通过 MAX3232 芯片转换成 RS232 电平或者通 过 USB 转 TTL 模块与 PC 通讯进行调试。
通讯数据格式是:起始位:1 位;数据位:8 位;奇偶位:无;停止位:1 位。
协议的命令格式:
语音模块使用前,要前往模块里下载语音文件。
代码:
#include "my1680.h"
VOICE_DEV voice1 = {.frame_head=0x7e,.frame_end=0xef};
uint8_t My1680_Buff[10] = {0x00,0x01,0x02,0x03,0x04,0x05,0x06,0x07,0x08,0x09};
// My1680_Buff[0] = 0x7e;
void My1680_Config(void)
{
//打开时钟
RCC_APB2PeriphClockCmd(RCC_APB2Periph_GPIOA, ENABLE);
GPIO_InitTypeDef GPIO_InitStructure={0};//定义结构体
GPIO_InitStructure.GPIO_Pin = GPIO_Pin_2; //引脚
GPIO_InitStructure.GPIO_Speed = GPIO_Speed_50MHz;//速度
GPIO_InitStructure.GPIO_Mode = GPIO_Mode_AF_PP;
GPIO_Init(GPIOA, &GPIO_InitStructure);
GPIO_InitStructure.GPIO_Mode = GPIO_Mode_IN_FLOATING;
GPIO_InitStructure.GPIO_Pin = GPIO_Pin_3; //引脚
GPIO_Init(GPIOA, &GPIO_InitStructure);
RCC_APB1PeriphClockCmd(RCC_APB1Periph_USART2, ENABLE);
USART_InitTypeDef USART_InitStructure={0};
USART_InitStructure.USART_BaudRate = 9600; //4800 9600 115200
USART_InitStructure.USART_WordLength = USART_WordLength_8b;//数据位
USART_InitStructure.USART_StopBits = USART_StopBits_1;//停止位
USART_InitStructure.USART_Parity = USART_Parity_No;//校验位
USART_InitStructure.USART_HardwareFlowControl =
USART_HardwareFlowControl_None;//不使用硬件流控制
USART_InitStructure.USART_Mode = USART_Mode_Tx | USART_Mode_Rx;//发送 接收
USART_Init(USART2, &USART_InitStructure);
USART_Cmd(USART2,ENABLE);
}
//发送单个字符
void My1680_Tx(uint8_t ch)
{
while(!USART_GetFlagStatus(USART2,USART_FLAG_TXE));
USART_SendData(USART2,ch);
}
//发送字符串
void My1680_TxStr(char *buff)
{
while(buff != '\0')
{
My1680_Tx(*buff);
buff++;
}
}
//发送已知长度的字符串
void My1680_TxBuff(char *buff,uint8_t lenth)
{
for(uint8_t i=0;i<lenth;i++)
{
My1680_Tx(buff[i]);
}
}
/********************************************************
*函数名称:Voice_XorCheck
*函数功能:^检测
*函数传参:
* *pdata -- 校准参数
* lenth -- 参数的个数
*函数返回值:^后的数
********************************************************/
u8 Voice_XorCheck(u8 *pdata,u8 lenth)
{
u8 r_value = *pdata;
u8 i = 0;
for(i=1;i<lenth;i++)
{
r_value ^= pdata[i];
}
return r_value;
}
/**********************************************************
*函数名称:Voice_SendCmd
*函数功能:发送命令
*函数传参:
* cmd -- 操作码
* arg1 -- 第一个参数
* arg2 -- 第二个参数
* arg_lenth -- 参数个数
*函数返回值:无
**********************************************************/
void Voice_SendCmd(u8 cmd,u8 arg1,u8 arg2,u8 arg_lenth)
{
//给voice1传递参数
//命令填充
voice1.cmd = cmd;
//参数填充
voice1.arg[0] = arg1;
voice1.arg[1] = arg2;
voice1.arg[2] = arg_lenth;
//长度填充
voice1.lenth = 3+arg_lenth;//长度 + cmd + 校验值 + 参数长度
voice1.xorcheck = Voice_XorCheck(&voice1.lenth,2+arg_lenth);//lenth+cmd + 参数
//发送
My1680_TxBuff((char *)&voice1.frame_head,3);//帧起始+长度+命令
My1680_TxBuff((char *)voice1.arg,arg_lenth);//发送参数
My1680_TxBuff((char *)&voice1.xorcheck,2);//异或值+帧尾
}
//播放指定目录文件下的音乐
//directorynum:目录编号
//musicnum:音乐编号
void Voice_PlayDirectoryMusic(u8 directorynum, u8 musicnum)
{
//上一首播报完毕
// while(VoicePlay_Busy);
Voice_SendCmd(CMD_CHOOSE_MUSIC,directorynum,musicnum,2);
}
//播放两位数
void Play_Num(uint8_t num)
{
uint8_t a=0,b=0;
a = num/10;
b = num%10;
if((a!=0) && (b!=0))
{
Voice_PlayDirectoryMusic(0x02,My1680_Buff[a]);
Voice_PlayDirectoryMusic(0x02,0x0a);
Voice_PlayDirectoryMusic(0x02,My1680_Buff[b]);
}
else if((a==0) && (b!=0))
{
Voice_PlayDirectoryMusic(0x02,My1680_Buff[b]);
}
else if((a!=0) && (b==0))
{
Voice_PlayDirectoryMusic(0x02,My1680_Buff[a]);
Voice_PlayDirectoryMusic(0x02,0x0a);
}
}
文章来源:https://uudwc.com/A/nNq0
