一、背景
在SpringBoot Mybatis 项目中,需要连接 多个数据源,连接多个数据库,需要连接一个MySQL数据库和一个Oracle数据库和一个Redis
二、依赖 pom.xml
 <dependencies>
        <dependency>
            <groupId>org.springframework.boot</groupId>
            <artifactId>spring-boot-starter-web</artifactId>
        </dependency>

        <dependency>
            <groupId>org.springframework.boot</groupId>
            <artifactId>spring-boot-starter-test</artifactId>
            <scope>test</scope>
        </dependency>
        <!-- MySQL -->
        <dependency>
            <groupId>mysql</groupId>
            <artifactId>mysql-connector-java</artifactId>
            <version>8.0.26</version>
        </dependency>
        <dependency>
            <groupId>org.springframework.boot</groupId>
            <artifactId>spring-boot-starter-jdbc</artifactId>
        </dependency>

        <dependency>
            <groupId>org.mybatis.spring.boot</groupId>
            <artifactId>mybatis-spring-boot-starter</artifactId>
            <version>1.3.2</version>
        </dependency>
        <!-- Oracle -->
        <dependency>
            <groupId>com.oracle.database.jdbc</groupId>
            <artifactId>ojdbc8</artifactId>
            <version>19.8.0.0</version>
        </dependency>

        <!-- Redis -->
        <dependency>
            <groupId>org.springframework.boot</groupId>
            <artifactId>spring-boot-starter-data-redis</artifactId>
            <version>2.4.4</version>
        </dependency>
        <!-- lombok -->
        <dependency>
            <groupId>org.projectlombok</groupId>
            <artifactId>lombok</artifactId>
            <version>1.18.16</version>
            <scope>provided</scope>
        </dependency>
        <dependency>
            <groupId>javax.persistence</groupId>
            <artifactId>javax.persistence-api</artifactId>
            <version>2.2</version>
        </dependency>
        <!--swagger2-->
        <dependency>
            <groupId>io.springfox</groupId>
            <artifactId>springfox-swagger2</artifactId>
            <version>2.9.2</version>
        </dependency>
        <!--swagger-ui-->
        <dependency>
            <groupId>io.springfox</groupId>
            <artifactId>springfox-swagger-ui</artifactId>
            <version>2.9.2</version>
        </dependency>


        <!-- https://mvnrepository.com/artifact/cn.easyproject/orai18n -->
        <dependency>
            <groupId>cn.easyproject</groupId>
            <artifactId>orai18n</artifactId>
            <version>12.1.0.2.0</version>
        </dependency>

    </dependencies>
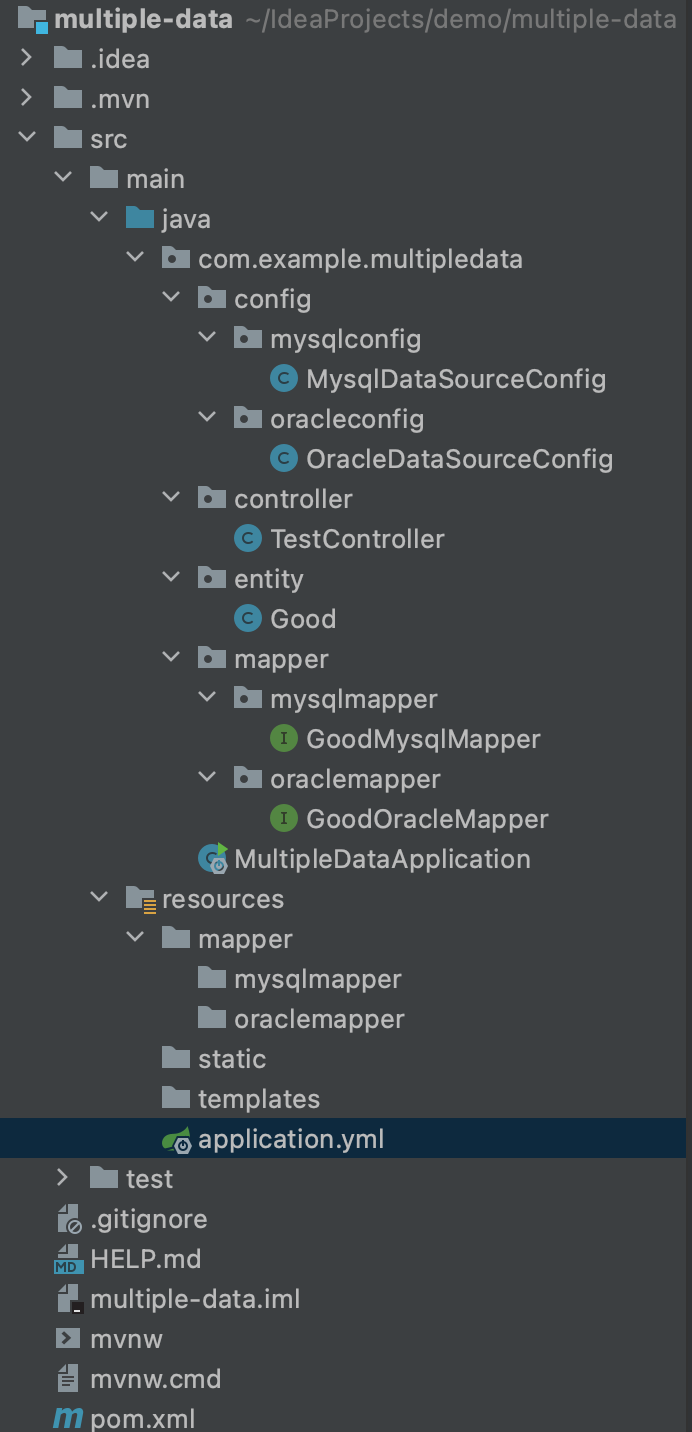
三、项目结构

文章来源地址https://uudwc.com/A/od0LJ
四、application.yml
spring.datasource.url数据库的JDBC URL
spring.datasource.jdbc-url用来重写自定义连接池
Hikari没有url属性,但是有jdbcUrl属性,在这中情况下必须使用jdbc_url
server:
  port: 8080

spring:
  datasource:
    primary:
      jdbc-url: jdbc:mysql://localhost:3306/database_name
      username: root
      password: 123456
      driver-class-name: com.mysql.cj.jdbc.Driver

    secondary:
      jdbc-url: jdbc:oracle:thin:@localhost:1521/ORCL
      username: root
      password: 123456
      driver-class-name: oracle.jdbc.driver.OracleDriver
五、MySQL配置类
MysqlDataSourceConfig
使用注解@Primary配置默认数据源
package com.example.multipledata.config.mysqlconfig;

import org.apache.ibatis.session.SqlSessionFactory;
import org.mybatis.spring.SqlSessionFactoryBean;
import org.mybatis.spring.annotation.MapperScan;
import org.springframework.beans.factory.annotation.Qualifier;
import org.springframework.boot.context.properties.ConfigurationProperties;
import org.springframework.boot.jdbc.DataSourceBuilder;
import org.springframework.context.annotation.Bean;
import org.springframework.context.annotation.Configuration;
import org.springframework.context.annotation.Primary;
import org.springframework.core.io.support.PathMatchingResourcePatternResolver;
import org.springframework.jdbc.datasource.DataSourceTransactionManager;

import javax.sql.DataSource;


@Configuration
@MapperScan(basePackages = MysqlDataSourceConfig.PACKAGE, sqlSessionFactoryRef = "mysqlSqlSessionFactory")
public class MysqlDataSourceConfig {

    static final String PACKAGE = "com.example.multipledata.mapper.mysqlmapper";

    static final String MAPPER_LOCATION = "classpath*:mapper/mysqlmapper/*.xml";

    @Primary
    @Bean(name = "mysqlDataSource")
    @ConfigurationProperties(prefix = "spring.datasource.primary")
    public DataSource mysqlDataSource() {
        return DataSourceBuilder.create().build();
    }

    @Primary
    @Bean(name = "mysqlTransactionManager")
    public DataSourceTransactionManager mysqlTransactionManager() {
        return new DataSourceTransactionManager((mysqlDataSource()));
    }

    @Primary
    @Bean(name = "mysqlSqlSessionFactory")
    public SqlSessionFactory mysqlSqlSessionFactory(@Qualifier("mysqlDataSource") DataSource mysqlDatasource) throws Exception {
        final SqlSessionFactoryBean sessionFactory = new SqlSessionFactoryBean();
        sessionFactory.setDataSource(mysqlDatasource);
        sessionFactory.setMapperLocations(
                new PathMatchingResourcePatternResolver().getResources(MysqlDataSourceConfig.MAPPER_LOCATION)
        );
        return sessionFactory.getObject();
    }
}
文章来源:https://uudwc.com/A/od0LJ
六、Oracle配置类
OracleDataSourceConfig
package com.example.multipledata.config.oracleconfig;

import org.apache.ibatis.session.SqlSessionFactory;
import org.mybatis.spring.SqlSessionFactoryBean;
import org.mybatis.spring.annotation.MapperScan;
import org.springframework.beans.factory.annotation.Qualifier;
import org.springframework.boot.context.properties.ConfigurationProperties;
import org.springframework.boot.jdbc.DataSourceBuilder;
import org.springframework.context.annotation.Bean;
import org.springframework.context.annotation.Configuration;
import org.springframework.core.io.support.PathMatchingResourcePatternResolver;
import org.springframework.jdbc.datasource.DataSourceTransactionManager;

import javax.sql.DataSource;

@Configuration
@MapperScan(basePackages = OracleDataSourceConfig.PACKAGE, sqlSessionFactoryRef = "oracleSqlSessionFactory")
public class OracleDataSourceConfig {

    static final String PACKAGE = "com.example.multipledata.mapper.oraclemapper";

    static final String MAPPER_LOCATION = "classpath*:mapper/oraclemapper/*.xml";

    @Bean(name = "oracleDataSource")
    @ConfigurationProperties(prefix = "spring.datasource.secondary")
    public DataSource oracleDataSource() {
        return DataSourceBuilder.create().build();
    }

    @Bean(name = "oracleTransactionManager")
    public DataSourceTransactionManager oracleTransactionManager() {
        return new DataSourceTransactionManager(oracleDataSource());
    }

    @Bean(name = "oracleSqlSessionFactory")
    public SqlSessionFactory oracleSqlSessionFactory(@Qualifier("oracleDataSource") DataSource oracleDataSource) throws Exception {
        final SqlSessionFactoryBean sessionFactory = new SqlSessionFactoryBean();
        sessionFactory.setDataSource(oracleDataSource);
        sessionFactory.setMapperLocations(
                new PathMatchingResourcePatternResolver().getResources(OracleDataSourceConfig.MAPPER_LOCATION)
        );
        return sessionFactory.getObject();
    }
}
原文地址:
https://www.cnblogs.com/windy-xmwh/p/14748567.html
七、增加Redis连接
注意,我的Redis连接,使用了密码
7.1 新增依赖 pom.xml
pom.xml
        <!-- Redis -->
        <dependency>
            <groupId>org.springframework.boot</groupId>
            <artifactId>spring-boot-starter-data-redis</artifactId>
            <version>2.4.4</version>
        </dependency>
        <dependency>
            <groupId>io.lettuce</groupId>
            <artifactId>lettuce-core</artifactId>
        </dependency>
7.2 配置Redis连接 application.yml
  spring:
    redis:
        host: host
        port: 6379
        password: 1
7.3 Redis 配置文件 RedisConfig
在config目录下,新增RedisConfig文件
package com.example.kyjjserver.config;

import org.springframework.beans.factory.annotation.Value;
import org.springframework.context.annotation.Bean;
import org.springframework.context.annotation.Configuration;
import org.springframework.data.redis.connection.RedisConnectionFactory;
import org.springframework.data.redis.core.RedisTemplate;
import org.springframework.data.redis.serializer.GenericJackson2JsonRedisSerializer;
import org.springframework.data.redis.serializer.StringRedisSerializer;
import org.springframework.data.redis.connection.lettuce.LettuceConnectionFactory;

@Configuration
public class RedisConfig {

    @Value("${spring.redis.host}")
    private String redisHost;

    @Value("${spring.redis.port}")
    private int redisPort;

    @Value("${spring.redis.password}")
    private String redisPassword;

    @Bean
    public RedisConnectionFactory redisConnectionFactory() {
        LettuceConnectionFactory lettuceConnectionFactory = new LettuceConnectionFactory(redisHost, redisPort);
        lettuceConnectionFactory.setPassword(redisPassword);
        return lettuceConnectionFactory;
    }

    @Bean
    public RedisTemplate<String, Object> redisTemplate(RedisConnectionFactory redisConnectionFactory) {
        RedisTemplate<String, Object> redisTemplate = new RedisTemplate<>();
        redisTemplate.setConnectionFactory(redisConnectionFactory);
        redisTemplate.setKeySerializer(new StringRedisSerializer());
        redisTemplate.setValueSerializer(new GenericJackson2JsonRedisSerializer());
        redisTemplate.setHashKeySerializer(new StringRedisSerializer());
        redisTemplate.setHashValueSerializer(new GenericJackson2JsonRedisSerializer());
        redisTemplate.afterPropertiesSet();
        return redisTemplate;
    }
}
7.4 操作Redis
7.4.1 封装操作方法
在service目录下,新增RedisService文件
package com.example.kyjjserver.service;

import org.springframework.beans.factory.annotation.Autowired;
import org.springframework.data.redis.core.RedisTemplate;
import org.springframework.stereotype.Service;

import java.util.Set;

@Service
public class RedisService {

    private final RedisTemplate<String, Object> redisTemplate;

    @Autowired
    public RedisService(RedisTemplate<String, Object> redisTemplate) {
        this.redisTemplate = redisTemplate;
    }

    public void deleteData(String key) {
        redisTemplate.delete(key);
    }

    public void deleteDataAll(String pattern) {
        Set<String> keys = redisTemplate.keys("*" + pattern + "*");
        if (keys != null) {
            redisTemplate.delete(keys);
        }
    }
}
7.4.2 调用方法,操作Redis库
1、注入
2、调用
@Component
public class DeleteRedisInfo {
    @Autowired
    private RedisService redisService;

    @Transactional
    public AAA deleteUser(xxx xxx){
        // 删除手机号
        redisService.deleteDataAll(xxx);


        return xxx;
    }
}

