背景:通过python中直接get或者urlopen打开一些有延迟加载数据的网页,会抓取不到部分信息。
1. 命令行打开chrome,并开启调试端口(前提,找到chrome安装目录,找到chrome.exe所在路径,添加到环境变量中,例如我的是C:\Program Files\Google\Chrome\Application)
chrome.exe --remote-debugging-port=9527 --user-data-dir="D:\test"
remote-debugging-port指定远程调试端口(python调用的时候要用),user-data-dir指定用户数据目录,后续浏览器窗口关闭后,再次通过相同命令打开,则之前的登录信息等内容都还在,不用重复登录。可以通过这个方式浏览一些学习知识的网站(懂的都懂),但是不在浏览器留下历史记录(其实是留下了,只不过相当于在另一个浏览器里面了,所有相关数据都在指定的那个用户数据目录了)。
2. 下载浏览器驱动
不同浏览器有不同驱动,chrome下载地址为:http://chromedriver.storage.googleapis.com/index.html,或者这个https://registry.npmmirror.com/binary.html?path=chromedriver/,查看自己浏览器版本号,下载对应版本的驱动程序。
IE浏览器
说明:该浏览器为Windows系统自带,一般无需额外下载。
浏览器下载地址:https://www.microsoft.com/zh-cn/download/internet-explorer.aspx
驱动器下载地址:http://selenium-release.storage.googleapis.com/index.html
Microsoft Edge浏览器
浏览器下载地址:https://www.microsoft.com/zh-cn/edge
驱动器下载地址:https://developer.microsoft.com/zh-cn/microsoft-edge/tools/webdriver
Chrome(google)浏览器
浏览器下载地址:https://www.google.cn/chrome
驱动器下载地址:http://chromedriver.storage.googleapis.com/index.html
Firefox(火狐)浏览器
浏览器下载地址:http://www.firefox.com.cn
驱动器下载地址:https://github.com/mozilla/geckodriver/releases
Opera浏览器
浏览器下载地址:https://www.opera.com/zh-cn
驱动器下载地址:https://github.com/operasoftware/operachromiumdriver/releases
Safari浏览器
浏览器下载地址:https://www.apple.com.cn/safari
驱动器说明:该浏览器无需下载驱动,可以直接执行代码。
3. 通过python代码打开指定网页
前提:pip install selenium
from selenium import webdriver
from selenium.webdriver.common.by import By
from selenium.webdriver.chrome.options import Options
from selenium.webdriver.chrome.service import Service
from bs4 import BeautifulSoup
options = Options()
options.add_experimental_option("debuggerAddress","127.0.0.1:9527")#用打开chrome指定的端口,此法也可打开远端的浏览器,ip地址换为远端地址即可
s = Service('C:\\Program Files\\Google\\Chrome\\Application\\chromedriver.exe') #下载的驱动可执行文件路径
browser = webdriver.Chrome(service=s, options=options)
browser.get("https://www.baidu.com/")
以上即可通过浏览器打开百度页面。
4. selenium常用操作
 #全屏:
 browser.maximize_window()
 #设置分辨率:
 browser.set_window_size(1920,1080)
 #获取cookie
 browser.get_cookies()
# 添加cookie
browser.add_cookie({'name':'test',"age":"18"})
 #刷新页面:
 browser.refresh()
# 后退:
 browser.back()
 #前进:
 browser.forward()
 # 网页标题
browser.title
# 当前网址
browser.current_url
# 浏览器名称
browser.name
# 网页源码
browser.page_source #这里的页面源码我们就可以用正则表达式、Bs4、xpath以及pyquery等工具进行解析提取想要的信息了。
#soup = BeautifulSoup(browser.page_source, 'html.parser')
#description = soup.select('meta[name="description"]')[0].attrs["content"]
#通过html id获取页面元素
element = browser.find_element(By.ID,'__NEXT_DATA__')
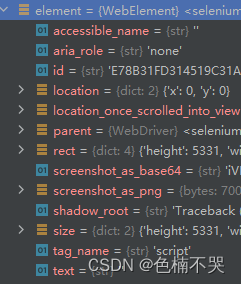
element.get_attribute('text') #get_attribute获取html节点属性的值,element其他属性见图2
#通过xpath
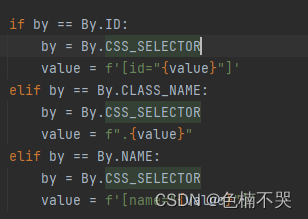
description = browser.find_element(By.XPATH, '//*[@name="description"]').get_attribute('content')#具体支持类型查看源码(图1),另有find_elements方法
#文本框输入文本
element.send_keys('2333')
#文本框清空
element.clear()
#鼠标左击
element.click()
#鼠标右击、双击、悬停
from selenium.webdriver.common.action_chains import ActionChains
ActionChains(browser).context_click(element).perform()
ActionChains(browser).double_click(element).perform()
ActionChains(browser).move_to_element(element).perform()
#键盘操作:
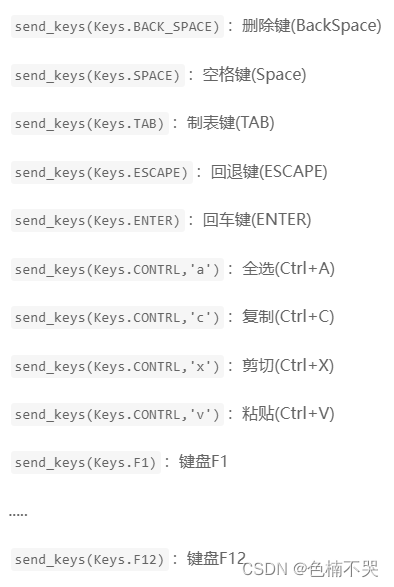
input.send_keys(Keys.ENTER) #常见操作类型见图3
#执行js
browser.execute_script('alert("2333")')
#甚至可以通过js执行fetch请求(实战中发现有些数据是通过fetch获取的,如果直接拿到fetch执行结果,会方便很多)
browser.execute_script('return fetch("http://test.com").then(function(response) {return response.json()});')
#获取请求响应内容
browser_log = browser.get_log('performance')
events = [process_browser_log_entry(entry) for entry in browser_log]
events = [event for event in events if 'Network.responseReceived' in event['method']]
for event in events:
    if "response" in event["params"] and "getImages" in event["params"]["response"]["url"]:
        #读取response
        browser.execute_cdp_cmd('Network.getResponseBody', {'requestId': events[i]["params"]["requestId"]})
        print(event["params"]["response"]["url"])
# 关闭浏览器
browser.close()
5.另外据说通过selenium扩展包:seleniumwire也能获取到浏览器请求的响应,但是我自己没成功,有兴趣的自己尝试。只有引入操作不一样,其余操作同selenium:from seleniumwire import webdriver,获取response代码(我的是空的):文章来源:https://uudwc.com/A/pJ0eL
for request in browser.requests:
    if request.response:
        print(
            request.url,
            request.response.status_code,
            request.response.headers['Content-Type']
        )
6.自行百度browsermobproxy设置代理的方式据说也可以,但是我同样没成功 图1
图1 图2
图2 图3文章来源地址https://uudwc.com/A/pJ0eL